Difference between revisions of "Smissmas 2014"
| Line 19: | Line 19: | ||
{{main|Weapons}} | {{main|Weapons}} | ||
{| class="wikitable" cellpadding=2 style="text-align:center;" | {| class="wikitable" cellpadding=2 style="text-align:center;" | ||
| − | | width="60px" style="background: #6B0000;" rowspan="2" | {{icon class|Demoman}}<br/>'''[[Demoman | + | | width="60px" style="background: #6B0000;" rowspan="2" | {{icon class|Demoman}}<br/>'''[[Demoman|<span style="color: #FFF;">Demoman</span>]]''' |
| align="center" style="background: #990000;" | {{item icon|Iron Bomber|75px}} | | align="center" style="background: #990000;" | {{item icon|Iron Bomber|75px}} | ||
| − | | style="background: #FAE5E5;" | '''[[ | + | | style="background: #FAE5E5;" | '''[[Iron Bomber]]''' |
|- | |- | ||
| align="center" style="background: #990000;" | {{item icon|Quickiebomb Launcher|75px}} | | align="center" style="background: #990000;" | {{item icon|Quickiebomb Launcher|75px}} | ||
| − | | style="background: #FAE5E5;" | '''[[ | + | | style="background: #FAE5E5;" | '''[[Quickiebomb Launcher]]''' |
|- | |- | ||
| − | | width="60px" style="background: #6B0000;" | {{icon class|Soldier}}<br/>'''[[Soldier | + | | width="60px" style="background: #6B0000;" | {{icon class|Soldier}}<br/>'''[[Soldier|<span style="color: #FFF;">Soldier</span>]]'''<br/>{{icon class|Pyro}}<br/>'''[[Pyro|<span style="color: #FFF;">Pyro</span>]]'''<br/>{{icon class|Heavy}}<br/>'''[[Heavy|<span style="color: #FFF;">Heavy</span>]]'''<br/>{{icon class|Engineer}}<br/>'''[[Engineer|<span style="color: #FFF;">Engineer</span>]]''' |
| align="center" style="background: #990000;" | {{item icon|Panic Attack|75px}} | | align="center" style="background: #990000;" | {{item icon|Panic Attack|75px}} | ||
| − | | style="background: #FAE5E5;" | '''[[ | + | | style="background: #FAE5E5;" | '''[[Panic Attack]]''' |
|- | |- | ||
|} | |} | ||
| Line 35: | Line 35: | ||
{{main|Cosmetics}} | {{main|Cosmetics}} | ||
{| class="wikitable collapsible" cellpadding="3" style="text-align:center;" | {| class="wikitable collapsible" cellpadding="3" style="text-align:center;" | ||
| − | | width="60px" style="background: #6B0000;" rowspan="4" | {{icon class|Scout}}<br/>'''[[Scout | + | | width="60px" style="background: #6B0000;" rowspan="4" | {{icon class|Scout}}<br/>'''[[Scout|<span style="color: #FFF;">Scout</span>]]''' |
| align="center" style="background: #990000;" | {{item icon|Co-Pilot|75px}} | | align="center" style="background: #990000;" | {{item icon|Co-Pilot|75px}} | ||
| − | | style="background: #FAE5E5;"| '''[[ | + | | style="background: #FAE5E5;"| '''[[Co-Pilot]]''' |
|- | |- | ||
| align="center" style="background: #990000;" | {{item icon|Courtier's Collar|75px}} | | align="center" style="background: #990000;" | {{item icon|Courtier's Collar|75px}} | ||
| − | | style="background: #FAE5E5;"| '''[[ | + | | style="background: #FAE5E5;"| '''[[Courtier's Collar]]''' |
|- | |- | ||
| align="center" style="background: #990000;" | {{item icon|Harlequin's Hooves|75px}} | | align="center" style="background: #990000;" | {{item icon|Harlequin's Hooves|75px}} | ||
| − | | style="background: #FAE5E5;"| '''[[ | + | | style="background: #FAE5E5;"| '''[[Harlequin's Hooves]]''' |
|- | |- | ||
| align="center" style="background: #990000;" | {{item icon|Mountebank's Masque|75px}} | | align="center" style="background: #990000;" | {{item icon|Mountebank's Masque|75px}} | ||
| − | | style="background: #FAE5E5;"| '''[[ | + | | style="background: #FAE5E5;"| '''[[Mountebank's Masque]]''' |
|- | |- | ||
| − | | width="60px" style="background: #6B0000;" | {{icon class|Soldier}}<br/>'''[[Soldier | + | | width="60px" style="background: #6B0000;" | {{icon class|Soldier}}<br/>'''[[Soldier|<span style="color: #FFF;">Soldier</span>]]''' |
| align="center" style="background: #990000;" | {{item icon|Skullcap|75px}} | | align="center" style="background: #990000;" | {{item icon|Skullcap|75px}} | ||
| − | | style="background: #FAE5E5;"| '''[[ | + | | style="background: #FAE5E5;"| '''[[Skullcap]]''' |
|- | |- | ||
| − | | width="60px" style="background: #6B0000;" rowspan="5" | {{icon class|Pyro}}<br/>'''[[Pyro | + | | width="60px" style="background: #6B0000;" rowspan="5" | {{icon class|Pyro}}<br/>'''[[Pyro|<span style="color: #FFF;">Pyro</span>]]''' |
| align="center" style="background: #990000;" | {{item icon|Black Knight's Bascinet|75px}} | | align="center" style="background: #990000;" | {{item icon|Black Knight's Bascinet|75px}} | ||
| − | | style="background: #FAE5E5;"| '''[[ | + | | style="background: #FAE5E5;"| '''[[Black Knight's Bascinet]]''' |
|- | |- | ||
| align="center" style="background: #990000;" | {{item icon|Charred Chainmail|75px}} | | align="center" style="background: #990000;" | {{item icon|Charred Chainmail|75px}} | ||
| − | | style="background: #FAE5E5;"| '''[[ | + | | style="background: #FAE5E5;"| '''[[Charred Chainmail]]''' |
|- | |- | ||
| align="center" style="background: #990000;" | {{item icon|Pyromancer's Hood|75px}} | | align="center" style="background: #990000;" | {{item icon|Pyromancer's Hood|75px}} | ||
| − | | style="background: #FAE5E5;"| '''[[ | + | | style="background: #FAE5E5;"| '''[[Pyromancer's Hood]]''' |
|- | |- | ||
| align="center" style="background: #990000;" | {{item icon|Pyromancer's Raiments|75px}} | | align="center" style="background: #990000;" | {{item icon|Pyromancer's Raiments|75px}} | ||
| − | | style="background: #FAE5E5;"| '''[[ | + | | style="background: #FAE5E5;"| '''[[Pyromancer's Raiments]]''' |
|- | |- | ||
| align="center" style="background: #990000;" | {{item icon|Torcher's Tabard|75px}} | | align="center" style="background: #990000;" | {{item icon|Torcher's Tabard|75px}} | ||
| − | | style="background: #FAE5E5;"| '''[[ | + | | style="background: #FAE5E5;"| '''[[Torcher's Tabard]]''' |
|- | |- | ||
| − | | width="60px" style="background: #6B0000;" rowspan="3" | {{icon class|Demoman}}<br/>'''[[Demoman | + | | width="60px" style="background: #6B0000;" rowspan="3" | {{icon class|Demoman}}<br/>'''[[Demoman|<span style="color: #FFF;">Demoman</span>]]''' |
| align="center" style="background: #990000;" | {{item icon|Scot Bonnet|75px}} | | align="center" style="background: #990000;" | {{item icon|Scot Bonnet|75px}} | ||
| − | | style="background: #FAE5E5;"| '''[[ | + | | style="background: #FAE5E5;"| '''[[Scot Bonnet]]''' |
|- | |- | ||
| align="center" style="background: #990000;" | {{item icon|Storm Stompers|75px}} | | align="center" style="background: #990000;" | {{item icon|Storm Stompers|75px}} | ||
| − | | style="background: #FAE5E5;"| '''[[ | + | | style="background: #FAE5E5;"| '''[[Storm Stompers]]''' |
|- | |- | ||
| align="center" style="background: #990000;" | {{item icon|Valhalla Helm|75px}} | | align="center" style="background: #990000;" | {{item icon|Valhalla Helm|75px}} | ||
| − | | style="background: #FAE5E5;"| '''[[ | + | | style="background: #FAE5E5;"| '''[[Valhalla Helm]]''' |
|- | |- | ||
| − | | width="60px" style="background: #6B0000;" rowspan="2" | {{icon class|Heavy}}<br/>'''[[Heavy | + | | width="60px" style="background: #6B0000;" rowspan="2" | {{icon class|Heavy}}<br/>'''[[Heavy|<span style="color: #FFF;">Heavy</span>]]''' |
| align="center" style="background: #990000;" | {{item icon|Old Man Frost|75px}} | | align="center" style="background: #990000;" | {{item icon|Old Man Frost|75px}} | ||
| − | | style="background: #FAE5E5;"| '''[[ | + | | style="background: #FAE5E5;"| '''[[Old Man Frost]]''' |
|- | |- | ||
| align="center" style="background: #990000;" | {{item icon|Siberian Facehugger|75px}} | | align="center" style="background: #990000;" | {{item icon|Siberian Facehugger|75px}} | ||
| − | | style="background: #FAE5E5;"| '''[[ | + | | style="background: #FAE5E5;"| '''[[Siberian Facehugger]]''' |
|- | |- | ||
| − | | width="60px" style="background: #6B0000;" rowspan="5" | {{icon class|Engineer}}<br/>'''[[Engineer | + | | width="60px" style="background: #6B0000;" rowspan="5" | {{icon class|Engineer}}<br/>'''[[Engineer|<span style="color: #FFF;">Engineer</span>]]''' |
| align="center" style="background: #990000;" | {{item icon|Clubsy The Seal|75px}} | | align="center" style="background: #990000;" | {{item icon|Clubsy The Seal|75px}} | ||
| − | | style="background: #FAE5E5;"| '''[[ | + | | style="background: #FAE5E5;"| '''[[Clubsy The Seal]]''' |
|- | |- | ||
| align="center" style="background: #990000;" | {{item icon|Conagher's Combover|75px}} | | align="center" style="background: #990000;" | {{item icon|Conagher's Combover|75px}} | ||
| − | | style="background: #FAE5E5;"| '''[[ | + | | style="background: #FAE5E5;"| '''[[Conagher's Combover]]''' |
|- | |- | ||
| align="center" style="background: #990000;" | {{item icon|Cop Caller|75px}} | | align="center" style="background: #990000;" | {{item icon|Cop Caller|75px}} | ||
| − | | style="background: #FAE5E5;"| '''[[ | + | | style="background: #FAE5E5;"| '''[[Cop Caller]]''' |
|- | |- | ||
| align="center" style="background: #990000;" | {{item icon|Holstered Heaters|75px}} | | align="center" style="background: #990000;" | {{item icon|Holstered Heaters|75px}} | ||
| − | | style="background: #FAE5E5;"| '''[[ | + | | style="background: #FAE5E5;"| '''[[Holstered Heaters]]''' |
|- | |- | ||
| align="center" style="background: #990000;" | {{item icon|Thermal Insulation Layer|75px}} | | align="center" style="background: #990000;" | {{item icon|Thermal Insulation Layer|75px}} | ||
| − | | style="background: #FAE5E5;"| '''[[ | + | | style="background: #FAE5E5;"| '''[[Thermal Insulation Layer]]''' |
|- | |- | ||
| − | | width="60px" style="background: #6B0000;" rowspan="2" | {{icon class|Medic}}<br/>'''[[Medic | + | | width="60px" style="background: #6B0000;" rowspan="2" | {{icon class|Medic}}<br/>'''[[Medic|<span style="color: #FFF;">Medic</span>]]''' |
| align="center" style="background: #990000;" | {{item icon|Surgeon's Shako|75px}} | | align="center" style="background: #990000;" | {{item icon|Surgeon's Shako|75px}} | ||
| − | | style="background: #FAE5E5;"| '''[[ | + | | style="background: #FAE5E5;"| '''[[Surgeon's Shako]]''' |
|- | |- | ||
| align="center" style="background: #990000;" | {{item icon|Unknown Mann|75px}} | | align="center" style="background: #990000;" | {{item icon|Unknown Mann|75px}} | ||
| − | | style="background: #FAE5E5;"| '''[[ | + | | style="background: #FAE5E5;"| '''[[Unknown Mann]]''' |
|- | |- | ||
| − | | width="60px" style="background: #6B0000;" rowspan="4" | {{icon class|Sniper}}<br/>'''[[Sniper | + | | width="60px" style="background: #6B0000;" rowspan="4" | {{icon class|Sniper}}<br/>'''[[Sniper|<span style="color: #FFF;">Sniper</span>]]''' |
| align="center" style="background: #990000;" | {{item icon|Bushman's Bristles|75px}} | | align="center" style="background: #990000;" | {{item icon|Bushman's Bristles|75px}} | ||
| − | | style="background: #FAE5E5;"| '''[[ | + | | style="background: #FAE5E5;"| '''[[Bushman's Bristles]]''' |
|- | |- | ||
| align="center" style="background: #990000;" | {{item icon|Marksman's Mohair|75px}} | | align="center" style="background: #990000;" | {{item icon|Marksman's Mohair|75px}} | ||
| − | | style="background: #FAE5E5;"| '''[[ | + | | style="background: #FAE5E5;"| '''[[Marksman's Mohair]]''' |
|- | |- | ||
| align="center" style="background: #990000;" | {{item icon|Professional's Ushanka|75px}} | | align="center" style="background: #990000;" | {{item icon|Professional's Ushanka|75px}} | ||
| − | | style="background: #FAE5E5;"| '''[[ | + | | style="background: #FAE5E5;"| '''[[Professional's Ushanka]]''' |
|- | |- | ||
| align="center" style="background: #990000;" | {{item icon|Wally Pocket|75px}} | | align="center" style="background: #990000;" | {{item icon|Wally Pocket|75px}} | ||
| − | | style="background: #FAE5E5;"| '''[[ | + | | style="background: #FAE5E5;"| '''[[Wally Pocket]]''' |
|- | |- | ||
| − | | width="60px" style="background: #6B0000;" rowspan="3" | {{icon class|Spy}}<br/>'''[[Spy | + | | width="60px" style="background: #6B0000;" rowspan="3" | {{icon class|Spy}}<br/>'''[[Spy|<span style="color: #FFF;">Spy</span>]]''' |
| align="center" style="background: #990000;" | {{item icon|Pocket Momma|75px}} | | align="center" style="background: #990000;" | {{item icon|Pocket Momma|75px}} | ||
| − | | style="background: #FAE5E5;"| '''[[ | + | | style="background: #FAE5E5;"| '''[[Pocket Momma]]''' |
|- | |- | ||
| align="center" style="background: #990000;" | {{item icon|Puffy Provocateur|75px}} | | align="center" style="background: #990000;" | {{item icon|Puffy Provocateur|75px}} | ||
| − | | style="background: #FAE5E5;"| '''[[ | + | | style="background: #FAE5E5;"| '''[[Puffy Provocateur]]''' |
|- | |- | ||
| align="center" style="background: #990000;" | {{item icon|Stealthy Scarf|75px}} | | align="center" style="background: #990000;" | {{item icon|Stealthy Scarf|75px}} | ||
| − | | style="background: #FAE5E5;"| '''[[ | + | | style="background: #FAE5E5;"| '''[[Stealthy Scarf]]''' |
|- | |- | ||
|} | |} | ||
| Line 136: | Line 136: | ||
{{main|Festive weapons}} | {{main|Festive weapons}} | ||
{| class="wikitable collapsible" cellpadding="3" style="text-align:center;" | {| class="wikitable collapsible" cellpadding="3" style="text-align:center;" | ||
| − | | width="60px" style="background: #6B0000;" | {{icon class|Scout}}<br/>'''[[Scout | + | | width="60px" style="background: #6B0000;" | {{icon class|Scout}}<br/>'''[[Scout|<span style="color: #FFF;">Scout</span>]]''' |
| align="center" style="background: #990000;" | {{item icon|Festive Bonk! Atomic Punch|75px}} | | align="center" style="background: #990000;" | {{item icon|Festive Bonk! Atomic Punch|75px}} | ||
| − | | style="background: #FAE5E5;"| '''[[ | + | | style="background: #FAE5E5;"| '''[[Festive Bonk! Atomic Punch]]''' |
|- | |- | ||
| − | | width="60px" style="background: #6B0000;" | {{icon class|Pyro}}<br/>'''[[Pyro | + | | width="60px" style="background: #6B0000;" | {{icon class|Pyro}}<br/>'''[[Pyro|<span style="color: #FFF;">Pyro</span>]]''' |
| align="center" style="background: #990000;" | {{item icon|Festive Backburner|75px}} | | align="center" style="background: #990000;" | {{item icon|Festive Backburner|75px}} | ||
| − | | style="background: #FAE5E5;"| '''[[ | + | | style="background: #FAE5E5;"| '''[[Festive Backburner]]''' |
|- | |- | ||
| − | | width="60px" style="background: #6B0000;" | {{icon class|Demoman}}<br/>'''[[Demoman | + | | width="60px" style="background: #6B0000;" | {{icon class|Demoman}}<br/>'''[[Demoman|<span style="color: #FFF;">Demoman</span>]]''' |
| align="center" style="background: #990000;" | {{item icon|Festive Chargin' Targe|75px}} | | align="center" style="background: #990000;" | {{item icon|Festive Chargin' Targe|75px}} | ||
| − | | style="background: #FAE5E5;"| '''[[ | + | | style="background: #FAE5E5;"| '''[[Festive Chargin' Targe]]''' |
|- | |- | ||
| − | | width="60px" style="background: #6B0000;" | {{icon class|Medic}}<br/>'''[[Medic | + | | width="60px" style="background: #6B0000;" | {{icon class|Medic}}<br/>'''[[Medic|<span style="color: #FFF;">Medic</span>]]''' |
| align="center" style="background: #990000;" | {{item icon|Festive Bonesaw|75px}} | | align="center" style="background: #990000;" | {{item icon|Festive Bonesaw|75px}} | ||
| − | | style="background: #FAE5E5;"| '''[[ | + | | style="background: #FAE5E5;"| '''[[Festive Bonesaw]]''' |
|- | |- | ||
| − | | width="60px" style="background: #6B0000;" | {{icon class|Sniper}}<br/>'''[[Sniper | + | | width="60px" style="background: #6B0000;" | {{icon class|Sniper}}<br/>'''[[Sniper|<span style="color: #FFF;">Sniper</span>]]''' |
| align="center" style="background: #990000;" | {{item icon|Festive SMG|75px}} | | align="center" style="background: #990000;" | {{item icon|Festive SMG|75px}} | ||
| − | | style="background: #FAE5E5;"| '''[[ | + | | style="background: #FAE5E5;"| '''[[Festive SMG]]''' |
|- | |- | ||
| − | | width="60px" style="background: #6B0000;" | {{icon class|Spy}}<br/>'''[[Spy | + | | width="60px" style="background: #6B0000;" | {{icon class|Spy}}<br/>'''[[Spy|<span style="color: #FFF;">Spy</span>]]''' |
| align="center" style="background: #990000;" | {{item icon|Festive Revolver|75px}} | | align="center" style="background: #990000;" | {{item icon|Festive Revolver|75px}} | ||
| − | | style="background: #FAE5E5;"| '''[[ | + | | style="background: #FAE5E5;"| '''[[Festive Revolver]]''' |
|- | |- | ||
| − | | width="60px" style="background: #6B0000;" | {{icon class|Soldier}}<br/>'''[[Soldier | + | | width="60px" style="background: #6B0000;" | {{icon class|Soldier}}<br/>'''[[Soldier|<span style="color: #FFF;">Soldier</span>]]'''<br/>{{icon class|Pyro}}<br/>'''[[Pyro|<span style="color: #FFF;">Pyro</span>]]'''<br/>{{icon class|Heavy}}<br/>'''[[Heavy|<span style="color: #FFF;">Heavy</span>]]'''<br/>{{icon class|Engineer}}<br/>'''[[Engineer|<span style="color: #FFF;">Engineer</span>]]''' |
| align="center" style="background: #990000;" | {{item icon|Festive Shotgun|75px}} | | align="center" style="background: #990000;" | {{item icon|Festive Shotgun|75px}} | ||
| − | | style="background: #FAE5E5;"| '''[[ | + | | style="background: #FAE5E5;"| '''[[Festive Shotgun]]''' |
|- | |- | ||
|} | |} | ||
| Line 170: | Line 170: | ||
{| class="wikitable collapsible" cellpadding="3" style="text-align:center;" | {| class="wikitable collapsible" cellpadding="3" style="text-align:center;" | ||
| align="center" style="background: #6B0000;" | {{Icon item|Naughty Winter Crate Key 2014|75px}} | | align="center" style="background: #6B0000;" | {{Icon item|Naughty Winter Crate Key 2014|75px}} | ||
| − | | align="center" style="background: #990000;" | '''[[Naughty Winter Crate Key 2014 | + | | align="center" style="background: #990000;" | '''[[Naughty Winter Crate Key 2014|<span style="color: #FFF;">Naughty Winter Crate Key 2014</span>]]''' |
| − | | style="background: #FAE5E5;"| Used to open [[ | + | | style="background: #FAE5E5;"| Used to open [[Naughty Winter Crate 2014]]. This key will not open Nice crates. After 2/16/2015 this will turn into a normal key. |
|- | |- | ||
| align="center" style="background: #6B0000;" | {{Icon item|Nice Winter Crate Key 2014|75px}} | | align="center" style="background: #6B0000;" | {{Icon item|Nice Winter Crate Key 2014|75px}} | ||
| − | | align="center" style="background: #990000;" | '''[[Nice Winter Crate Key 2014 | + | | align="center" style="background: #990000;" | '''[[Nice Winter Crate Key 2014|<span style="color: #FFF;">Nice Winter Crate Key 2014</span>]]''' |
| − | | style="background: #FAE5E5;"| Used to open [[ | + | | style="background: #FAE5E5;"| Used to open [[Nice Winter Crate 2014]]. This key will not open Naughty crates. After 2/16/2015 this will turn into a normal key. |
|- | |- | ||
|} | |} | ||
| Line 182: | Line 182: | ||
{| class="wikitable collapsible" cellpadding=2 style="text-align:center;" | {| class="wikitable collapsible" cellpadding=2 style="text-align:center;" | ||
| align="center" style="background: #990000;" | {{Icon item|Grappling Hook|75px}} | | align="center" style="background: #990000;" | {{Icon item|Grappling Hook|75px}} | ||
| − | | style="background: #FAE5E5;" | '''[[ | + | | style="background: #FAE5E5;" | '''[[Grappling Hook]]''' |
|} | |} | ||
| Line 193: | Line 193: | ||
! class="header" style="background-color: #6B0000;" |File name | ! class="header" style="background-color: #6B0000;" |File name | ||
|- | |- | ||
| − | |style="background-color: #990000;" |'''[[Foundry (Capture the Flag) | + | |style="background-color: #990000;" |'''[[Foundry (Capture the Flag)|<span style="color: #FFF;">Foundry (Capture the Flag)</span>]]''' |
| − | |style="background-color: #FAE5E5;" width="100px" | [[File:Ctf_foundry.jpg|160px|link=Foundry (Capture the Flag) | + | |style="background-color: #FAE5E5;" width="100px" | [[File:Ctf_foundry.jpg|160px|link=Foundry (Capture the Flag)]] |
| − | |style="background-color: #FAE5E5;" align="center" | '''[[ | + | |style="background-color: #FAE5E5;" align="center" | '''[[Capture the Flag]]'''<br>[[File:Intel red idle.png|50px|link=Capture the Flag]] |
| width="60px" | {{code|ctf_foundry}} | | width="60px" | {{code|ctf_foundry}} | ||
|- | |- | ||
| − | |style="background-color: #990000;" |'''[[Gorge (Capture the Flag) | + | |style="background-color: #990000;" |'''[[Gorge (Capture the Flag)|<span style="color: #FFF;">Gorge (Capture the Flag)</span>]]''' |
| − | |style="background-color: #FAE5E5;" width="100px" | [[File:Ctf gorge.jpg|160px|link=Gorge (Capture the Flag) | + | |style="background-color: #FAE5E5;" width="100px" | [[File:Ctf gorge.jpg|160px|link=Gorge (Capture the Flag)]] |
| − | |style="background-color: #FAE5E5;" align="center" | '''[[ | + | |style="background-color: #FAE5E5;" align="center" | '''[[Capture the Flag]]'''<br>[[File:Intel red idle.png|50px|link=Capture the Flag]] |
| width="60px" | {{code|ctf_gorge}} | | width="60px" | {{code|ctf_gorge}} | ||
|} | |} | ||
| Line 216: | Line 216: | ||
{{c|-|Changed:}} Grenades and stickybombs now have the same base blast radius as rockets. Changed from 159Hu to 146Hu. | {{c|-|Changed:}} Grenades and stickybombs now have the same base blast radius as rockets. Changed from 159Hu to 146Hu. | ||
|- | |- | ||
| − | ! style="background: #FAE5E5;" rowspan=2 | {{Icon item|Grenade Launcher|icon-size=75px}} <br /> [[ | + | ! style="background: #FAE5E5;" rowspan=2 | {{Icon item|Grenade Launcher|icon-size=75px}} <br /> [[Grenade Launcher]] |
|- | |- | ||
| {{c|+|Changed:}} {{botignore|Direct hit}} grenades now deal full damage to target regardless of where it struck the enemy. Previously full damage would only occur when grenades exploded closer to the target's feet. | | {{c|+|Changed:}} {{botignore|Direct hit}} grenades now deal full damage to target regardless of where it struck the enemy. Previously full damage would only occur when grenades exploded closer to the target's feet. | ||
|- | |- | ||
| − | ! style="background: #FAE5E5;" rowspan=2 | {{Icon item|Stickybomb Launcher|icon-size=75px}} <br /> [[ | + | ! style="background: #FAE5E5;" rowspan=2 | {{Icon item|Stickybomb Launcher|icon-size=75px}} <br /> [[Stickybomb Launcher]] |
|- | |- | ||
| {{c|-|Changed:}} Stickybombs that detonate in the air now have a radius ramp up, starting at 85% at base arm time (0.8s) going back to 100% over 2 seconds. Stickybombs that touch the world will have full radius.<br> | | {{c|-|Changed:}} Stickybombs that detonate in the air now have a radius ramp up, starting at 85% at base arm time (0.8s) going back to 100% over 2 seconds. Stickybombs that touch the world will have full radius.<br> | ||
| Line 226: | Line 226: | ||
{{c|+|Changed:}} Stickybombs arm particle is slightly more visible. | {{c|+|Changed:}} Stickybombs arm particle is slightly more visible. | ||
|- | |- | ||
| − | ! style="background: #FAE5E5;" rowspan=2 | {{Icon item|Loose Cannon|icon-size=75px}} <br /> [[ | + | ! style="background: #FAE5E5;" rowspan=2 | {{Icon item|Loose Cannon|icon-size=75px}} <br /> [[Loose Cannon]] |
|- | |- | ||
| {{c|+|Changed:}} Double donk explosive damage now deal full radius damage to victims. Previously double donk explosive damage was reduced by radius distance from the explosion.<br> | | {{c|+|Changed:}} Double donk explosive damage now deal full radius damage to victims. Previously double donk explosive damage was reduced by radius distance from the explosion.<br> | ||
{{c|+|Removed:}} Removed a hidden penalty where Cannonballs that touched the world would deal 50% less damage in addition to regular grenade damage reduction on world touch. | {{c|+|Removed:}} Removed a hidden penalty where Cannonballs that touched the world would deal 50% less damage in addition to regular grenade damage reduction on world touch. | ||
|- | |- | ||
| − | ! style="background: #FAE5E5;" rowspan=2 | {{Icon item|Loch-n-Load|icon-size=75px}} <br /> [[ | + | ! style="background: #FAE5E5;" rowspan=2 | {{Icon item|Loch-n-Load|icon-size=75px}} <br /> [[Loch-n-Load]] |
|- | |- | ||
| {{c|=|Changed:}} Changes to base grenade damage variance now ensure the Loch-n-Load does not exceed 124 damage on a single hit.<br> | | {{c|=|Changed:}} Changes to base grenade damage variance now ensure the Loch-n-Load does not exceed 124 damage on a single hit.<br> | ||
| Line 239: | Line 239: | ||
{{c|=|Changed:}} Loch-n-Load grenades no longer visually tumble when fired | {{c|=|Changed:}} Loch-n-Load grenades no longer visually tumble when fired | ||
|- | |- | ||
| − | ! style="background: #FAE5E5;" rowspan=2 | {{Icon item|Ali Baba's Wee Booties|icon-size=75px}} <br /> [[ | + | ! style="background: #FAE5E5;" rowspan=2 | {{Icon item|Ali Baba's Wee Booties|icon-size=75px}} <br /> [[Ali Baba's Wee Booties]] <br /> {{Icon item|Bootlegger|icon-size=75px}} <br /> [[Bootlegger]] |
|- | |- | ||
| {{c|+|Added:}} Added +25% Demoman Charge meter on charge kill. | | {{c|+|Added:}} Added +25% Demoman Charge meter on charge kill. | ||
|- | |- | ||
| − | ! style="background: #FAE5E5;" rowspan=2 | {{Icon item|Tide Turner|icon-size=75px}} <br /> [[ | + | ! style="background: #FAE5E5;" rowspan=2 | {{Icon item|Tide Turner|icon-size=75px}} <br /> [[Tide Turner]] |
|- | |- | ||
| {{c|-|Added:}} Added Penalty: Taking damage while shield charging reduces remaining charging time .<br> | | {{c|-|Added:}} Added Penalty: Taking damage while shield charging reduces remaining charging time .<br> | ||
{{c|-|Reduced:}} Kills while charging now only add 75% meter on charge kills instead of 100%. | {{c|-|Reduced:}} Kills while charging now only add 75% meter on charge kills instead of 100%. | ||
|- | |- | ||
| − | ! style="background: #FAE5E5;" rowspan=2 | {{Icon item|Scottish Resistance|icon-size=75px}} <br /> [[ | + | ! style="background: #FAE5E5;" rowspan=2 | {{Icon item|Scottish Resistance|icon-size=75px}} <br /> [[Scottish Resistance]] |
|- | |- | ||
| {{c|+|Changed:}} It is now slightly easier to do sticky jumps with the Scottish Resistance. Increased range check for stickybomb jumping to sticky damage radius of 146 from 100. | | {{c|+|Changed:}} It is now slightly easier to do sticky jumps with the Scottish Resistance. Increased range check for stickybomb jumping to sticky damage radius of 146 from 100. | ||
|- | |- | ||
| − | ! style="background: #FAE5E5;" rowspan=2 | {{Icon item|Scotsman's Skullcutter|icon-size=75px}} <br /> [[ | + | ! style="background: #FAE5E5;" rowspan=2 | {{Icon item|Scotsman's Skullcutter|icon-size=75px}} <br /> [[Scotsman's Skullcutter]] |
|- | |- | ||
| {{c|+|Changed:}} Movement speed penalty now only applies when weapon is active | | {{c|+|Changed:}} Movement speed penalty now only applies when weapon is active | ||
|- | |- | ||
| − | ! style="background: #FAE5E5;" rowspan=2 | {{Icon item|Claidheamh Mòr|icon-size=75px}} <br /> [[ | + | ! style="background: #FAE5E5;" rowspan=2 | {{Icon item|Claidheamh Mòr|icon-size=75px}} <br /> [[Claidheamh Mòr]] |
|- | |- | ||
| {{c|+|Added:}} Added +25% Demoman Charge meter on charge kill. | | {{c|+|Added:}} Added +25% Demoman Charge meter on charge kill. | ||
| Line 264: | Line 264: | ||
== Gallery == | == Gallery == | ||
<gallery> | <gallery> | ||
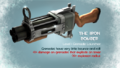
| − | File:S14 Panic Attack blog.png|The new weapon ''[[ | + | File:S14 Panic Attack blog.png|The new weapon ''[[Panic Attack]]'' in [[TF2 Official Website#Blog|TF2 Blog]]. |
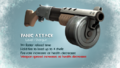
| − | File:S14 Quickiebomb Launcher blog.png|The new weapon ''[[ | + | File:S14 Quickiebomb Launcher blog.png|The new weapon ''[[Quickiebomb Launcher]]'' in TF2 Blog. |
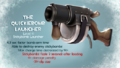
| − | File:S14 Iron Bomber blog.png|The new weapon ''[[ | + | File:S14 Iron Bomber blog.png|The new weapon ''[[Iron Bomber]]'' in TF2 Blog. |
</gallery> | </gallery> | ||
Revision as of 15:57, 20 January 2015
| “ | Smissmas is almost upon us, and everybody here on the TF2 team's been busy getting gifts ready and standing as a group under the Valve mistletoe. The smooch count's currently at zero, but we're in this for the long haul. That's right, we'll stand here all damn week if there's some make-outs in it for us. Just try and get past us, DOTA2 team. You too, CS:GO.
— TF2 Blog
|
” |

The Smissmas 2014 update was a major content update for Team Fortress 2, released on December 22, 2014 Patch. It was a sequel of past community-made updates before, by Valve's request in coincidence of the Christmas Workshop submissions.
The update added 28 new Winter-themed cosmetics and 7 new Festive weapons. The highlights of the update were a new beta game mode, Mannpower, along with two new beta maps, Foundry (Capture the Flag) and Gorge (Capture the Flag). Many already existing Demoman weapons had changes in their functions. Also added were three entirely new weapons, the Quickiebomb Launcher, the Iron Bomber, and the Panic Attack.
Contents
Additions
Weapon
Demoman |
Iron Bomber | |
| Quickiebomb Launcher | ||
Soldier Pyro Heavy Engineer |
Panic Attack |
Cosmetics
Festive weapons
Scout |
Festive Bonk! Atomic Punch | |
Pyro |
Festive Backburner | |
Demoman |
Festive Chargin' Targe | |
Medic |
Festive Bonesaw | |
Sniper |
Festive SMG | |
Spy |
Festive Revolver | |
Soldier Pyro Heavy Engineer |
Festive Shotgun |
Tools
| Naughty Winter Crate Key 2014 | Used to open Naughty Winter Crate 2014. This key will not open Nice crates. After 2/16/2015 this will turn into a normal key. | |
| Nice Winter Crate Key 2014 | Used to open Nice Winter Crate 2014. This key will not open Naughty crates. After 2/16/2015 this will turn into a normal key. |
Action items
| Grappling Hook |
Maps
| Name | Picture | Game mode | File name |
|---|---|---|---|
| Foundry (Capture the Flag) | 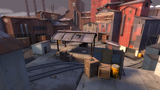
|
Capture the Flag |
ctf_foundry
|
| Gorge (Capture the Flag) | 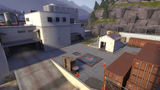
|
Capture the Flag |
ctf_gorge
|
Tweaked Weapons
| Class | Weapon | Changes |
|---|---|---|
Demoman |
All explosive primary and secondary weapons | |
| ||
Grenade Launcher | ||
Stickybomb Launcher | ||
| ||
Loose Cannon | ||
| ||
Loch-n-Load | ||
| ||
Ali Baba's Wee Booties Bootlegger | ||
Tide Turner | ||
| ||
Scottish Resistance | ||
Scotsman's Skullcutter | ||
Claidheamh Mòr | ||
Gallery
The new weapon Panic Attack in TF2 Blog.
The new weapon Quickiebomb Launcher in TF2 Blog.
The new weapon Iron Bomber in TF2 Blog.


External links
| ||||||||||||||||||||||||||||||||||||||||||||||||||||||||||||||||||||||||||||||||||||||||||||||||||