Difference between revisions of "Community Wutville strategy"
m (Some comments of this strategy page) |
m |
||
| Line 1: | Line 1: | ||
{{stub| | {{stub| | ||
| − | I've | + | I've seen some problems with this community strategy page |
* Most of the "strategies" in this page are very common/general (e.g. "You can do Sentry rocket jump to bring the Sentry to enemy lines". This is a very general strategy, and not just for Wutville. | * Most of the "strategies" in this page are very common/general (e.g. "You can do Sentry rocket jump to bring the Sentry to enemy lines". This is a very general strategy, and not just for Wutville. | ||
* These strategies doesn't use the potentials of the map (any specific part of the map, as boxes, walls, trees, etc) as a strategy (e.g. in [[Community 2Fort strategy]], the "Use the bridge awning to double jump into the enemy battlements. ..." phrase is simple, but refers that it may be useful to use some part of that map <nowiki>[the bridge]</nowiki>) or any advantages/disadvantages of using any class/weapon/movement type. | * These strategies doesn't use the potentials of the map (any specific part of the map, as boxes, walls, trees, etc) as a strategy (e.g. in [[Community 2Fort strategy]], the "Use the bridge awning to double jump into the enemy battlements. ..." phrase is simple, but refers that it may be useful to use some part of that map <nowiki>[the bridge]</nowiki>) or any advantages/disadvantages of using any class/weapon/movement type. | ||
Revision as of 20:35, 20 January 2021
| “You are so small! Is funny to me!” This article is a stub. As such, it is not complete. You can help Team Fortress Wiki by expanding it. Notes: I've seen some problems with this community strategy page
|
| Community Wutville strategy | |
|---|---|

| |
| Basic Information | |
| Developer(s): | Unknown |
| Map Photos | |
This article is about Community Wutville strategy.
Contents
General Strategy
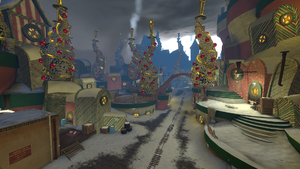
Wutville's layout is a narrow corridor with a lot of choke points, and a few tunnels which go to different places, away from the Payload track. Due to this design, Sentry Guns and Sticky Traps are all great tools for the defending team due to the narrowness of the map. Because much of the map is a long path, Sniper's long-range damage is both easily utilized and very helpful. The many tunnels allow for Spies to infiltrate the enemy team.
The final point provides high ground and plentiful health and ammo packs to the attacking team should they push up the left flank, securing this route can easily turn the tide.
Class specific strategy
 Scout
Scout
- Scout speed and double jumps can be useful for jumping over obstacles on the map.
- If you use the Atomizer you can outsmart enemies and clean the area before the load arrives so that nobody delays the load.
 Soldier
- The Soldier can make rocket jumps all over the map and arrive before everyone notices and kill them.
- You can also keep the wagon and when they attack it defend it with your rockets.
 Pyro
Pyro
- The Pyro can deflect multiple projectiles defending the charge and its pushers.
- Dragon Fury can be used to attack multiple enemies and kill them.
 Demoman
- The Demoman can defend the load with his booby traps or he can also attack by shooting with his Grenade Launcher, if you use the 2 you can defend while attacking causing the enemy team to die.
- You can use the limpet bomb to attack but it takes time to explode. The Quickiebomb Launcher shoots limpets that explode in 0.5 seconds, that will help you a lot.
- Being a demoknight is useful, you can use a Half-demoknight.
 Heavy
Heavy
- The heavy has primary weapons that do a lot of damage helping the team by killing everyone who defends the checkpoints
- You can act like a Sentry Gun by staying crouched down and shooting anything that moves
 Engineer
- The Engineer is a defensive class, you can put your Sentry Gun in strategic places but they will end up destroying it.
- You can use Frontier Justice, Gunslinger and the Wrangler to put sentrys in unsuspecting places, when you are in trouble you destroy your sentry and kill the enemy with the Frontier Justice.
- You can do Sentry rocket jump to bring the Sentry to enemy lines
 Medic
Medic
- With the Quick-Fix you can go with a Soldier or a Demoman or with any class that jumps or is fast and give it an ÜberCharge to finish off the enemy team and clean the area
- From there you can use the Crusader crossbow to heal wounded from far
 Sniper
- The map is so long that as a Sniper you can kill a TON of people from far
- Using The Huntsman you can attack / defend the charge
 Spy
Spy
- As the Spy you can go behind enemy lines and stab the distracted
- With the Dead Ringer You can simulate your death and kill the clueless team
