Difference between revisions of "Very Scary Halloween Special/zh-hant"
m (Updated to match the newest English version.) |
BrazilianNut (talk | contribs) m (→成就) |
||
| (2 intermediate revisions by the same user not shown) | |||
| Line 24: | Line 24: | ||
{{main|Weapons/zh-hant|l1=武器}} | {{main|Weapons/zh-hant|l1=武器}} | ||
{| class="wikitable collapsible" cellpadding="2" style="text-align:center;" | {| class="wikitable collapsible" cellpadding="2" style="text-align:center;" | ||
| − | + | | width="70px" style="background: #6A5587;" | '''{{class link|Scout|br=yes|color=white}}''' | |
| − | | width=" | + | | style="background: #AD9DC3;" | {{item icon|Unarmed Combat|75px}} |
| − | | | ||
| style="background: #F1ECF7;" | '''{{item link|Unarmed Combat}}''' | | style="background: #F1ECF7;" | '''{{item link|Unarmed Combat}}''' | ||
|- | |- | ||
| − | | | + | | style="background: #6A5587;" | '''{{class link|Spy|br=yes|color=white}}''' |
| − | | | + | | style="background: #AD9DC3;" | {{item icon|Wanga Prick|75px}} |
| style="background: #F1ECF7;" | '''{{item link|Wanga Prick}}''' | | style="background: #F1ECF7;" | '''{{item link|Wanga Prick}}''' | ||
| − | |||
|} | |} | ||
| Line 38: | Line 36: | ||
{{main|Halloween Costumes/zh-hant|l1=萬聖節套裝}} | {{main|Halloween Costumes/zh-hant|l1=萬聖節套裝}} | ||
{| class="wikitable collapsible" cellpadding="2" style="text-align:center;" | {| class="wikitable collapsible" cellpadding="2" style="text-align:center;" | ||
| − | | width="70px" style="background:#6A5587;" rowspan="3" | {{ | + | | width="70px" style="background:#6A5587;" rowspan="3" | '''{{class link|Scout|br=yes|color=white}}''' |
| style="background:#E8E2F0;" rowspan="3" |{{icon item|Curse-a-Nature|80px|link=The Curse-a-Nature{{if lang}}}}<br/>'''{{item link|The Curse-a-Nature}}'''<br/> | | style="background:#E8E2F0;" rowspan="3" |{{icon item|Curse-a-Nature|80px|link=The Curse-a-Nature{{if lang}}}}<br/>'''{{item link|The Curse-a-Nature}}'''<br/> | ||
| − | | | + | | style="background:#AD9DC3;" | {{icon item|Wrap Battler|75px}} |
| style="background:#F1ECF7;" | '''{{item link|Wrap Battler}}''' | | style="background:#F1ECF7;" | '''{{item link|Wrap Battler}}''' | ||
|- | |- | ||
| − | | | + | | style="background:#AD9DC3;" | {{icon item|B-ankh!|75px}} |
| style="background:#F1ECF7;" | '''{{item link|B-ankh!}}''' | | style="background:#F1ECF7;" | '''{{item link|B-ankh!}}''' | ||
|- | |- | ||
| − | | | + | | style="background:#AD9DC3;" | {{icon item|Futankhamun|75px}} |
| style="background:#F1ECF7;" | '''{{item link|Futankhamun}}''' | | style="background:#F1ECF7;" | '''{{item link|Futankhamun}}''' | ||
|- | |- | ||
| − | | | + | | style="background:#6A5587;" rowspan="3" | '''{{class link|Soldier|br=yes|color=white}}''' |
| style="background:#E8E2F0;" rowspan="3" | {{icon item|Tin Soldier|80px|link=The Tin Soldier{{if lang}}}}<br/>'''{{item link|The Tin Soldier}}'''<br/> | | style="background:#E8E2F0;" rowspan="3" | {{icon item|Tin Soldier|80px|link=The Tin Soldier{{if lang}}}}<br/>'''{{item link|The Tin Soldier}}'''<br/> | ||
| − | | | + | | style="background:#AD9DC3;" | {{icon item|Idiot Box|75px}} |
| style="background:#F1ECF7;" | '''{{item link|Idiot Box}}''' | | style="background:#F1ECF7;" | '''{{item link|Idiot Box}}''' | ||
|- | |- | ||
| − | | | + | | style="background:#AD9DC3;" | {{icon item|Steel Pipes|75px}} |
| style="background:#F1ECF7;" | '''{{item link|Steel Pipes}}''' | | style="background:#F1ECF7;" | '''{{item link|Steel Pipes}}''' | ||
|- | |- | ||
| − | | | + | | style="background:#AD9DC3;" | {{icon item|Shoestring Budget|75px}} |
| style="background:#F1ECF7;" | '''{{item link|Shoestring Budget}}''' | | style="background:#F1ECF7;" | '''{{item link|Shoestring Budget}}''' | ||
|- | |- | ||
| − | | | + | | style="background:#6A5587;" rowspan="3" | '''{{class link|Pyro|br=yes|color=white}}''' |
| style="background:#E8E2F0;" rowspan="3" | {{icon item|Infernal Imp|80px|link=The Infernal Imp{{if lang}}}}<br/>'''{{item link|The Infernal Imp}}'''<br/> | | style="background:#E8E2F0;" rowspan="3" | {{icon item|Infernal Imp|80px|link=The Infernal Imp{{if lang}}}}<br/>'''{{item link|The Infernal Imp}}'''<br/> | ||
| − | | | + | | style="background:#AD9DC3;" | {{icon item|Blazing Bull|75px}} |
| style="background:#F1ECF7;" | '''{{item link|Blazing Bull}}''' | | style="background:#F1ECF7;" | '''{{item link|Blazing Bull}}''' | ||
|- | |- | ||
| − | | | + | | style="background:#AD9DC3;" | {{icon item|Fallen Angel|75px}} |
| style="background:#F1ECF7;" | '''{{item link|Fallen Angel}}''' | | style="background:#F1ECF7;" | '''{{item link|Fallen Angel}}''' | ||
|- | |- | ||
| − | | | + | | style="background:#AD9DC3;" | {{icon item|Tail From the Crypt|75px}} |
| style="background:#F1ECF7;" | '''{{item link|Tail From the Crypt}}''' | | style="background:#F1ECF7;" | '''{{item link|Tail From the Crypt}}''' | ||
|- | |- | ||
| − | | | + | | style="background:#6A5587;" rowspan="3" | '''{{class link|Demoman|br=yes|color=white}}''' |
| style="background:#E8E2F0;" rowspan="3" | {{icon item|Highland Hound|80px|link=The Highland Hound{{if lang}}}}<br/>'''{{item link|The Highland Hound}}'''<br/> | | style="background:#E8E2F0;" rowspan="3" | {{icon item|Highland Hound|80px|link=The Highland Hound{{if lang}}}}<br/>'''{{item link|The Highland Hound}}'''<br/> | ||
| − | | | + | | style="background:#AD9DC3;" | {{icon item|Hair of the Dog|75px}} |
| style="background:#F1ECF7;" | '''{{item link|Hair of the Dog}}''' | | style="background:#F1ECF7;" | '''{{item link|Hair of the Dog}}''' | ||
|- | |- | ||
| − | | | + | | style="background:#AD9DC3;" | {{icon item|Scottish Snarl|75px}} |
| style="background:#F1ECF7;" | '''{{item link|Scottish Snarl}}''' | | style="background:#F1ECF7;" | '''{{item link|Scottish Snarl}}''' | ||
|- | |- | ||
| − | | | + | | style="background:#AD9DC3;" | {{icon item|Pickled Paws|75px}} |
| style="background:#F1ECF7;" | '''{{item link|Pickled Paws}}''' | | style="background:#F1ECF7;" | '''{{item link|Pickled Paws}}''' | ||
|- | |- | ||
| − | | | + | | style="background:#6A5587;" rowspan="3" | '''{{class link|Heavy|br=yes|color=white}}''' |
| style="background:#E8E2F0;" rowspan="3" | {{icon item|FrankenHeavy|80px|link=The FrankenHeavy{{if lang}}}}<br/>'''{{item link|The FrankenHeavy}}'''<br/> | | style="background:#E8E2F0;" rowspan="3" | {{icon item|FrankenHeavy|80px|link=The FrankenHeavy{{if lang}}}}<br/>'''{{item link|The FrankenHeavy}}'''<br/> | ||
| − | | | + | | style="background:#AD9DC3;" | {{icon item|Can Opener|75px}} |
| style="background:#F1ECF7;" | '''{{item link|Can Opener}}''' | | style="background:#F1ECF7;" | '''{{item link|Can Opener}}''' | ||
|- | |- | ||
| − | | | + | | style="background:#AD9DC3;" | {{icon item|Soviet Stitch-Up|75px}} |
| style="background:#F1ECF7;" | '''{{item link|Soviet Stitch-Up}}''' | | style="background:#F1ECF7;" | '''{{item link|Soviet Stitch-Up}}''' | ||
|- | |- | ||
| − | | | + | | style="background: #AD9DC3;" | {{icon item|Steel-Toed Stompers|75px}} |
| style="background:#F1ECF7;" | '''{{item link|Steel-Toed Stompers}}''' | | style="background:#F1ECF7;" | '''{{item link|Steel-Toed Stompers}}''' | ||
|- | |- | ||
| − | | | + | | style="background:#6A5587;" rowspan="3" | '''{{class link|Engineer|br=yes|color=white}}''' |
| style="background:#E8E2F0;" rowspan="3" | {{icon item|Brundle Bundle|80px|link=The Brundle Bundle{{if lang}}}}<br/>'''{{item link|The Brundle Bundle}}'''<br/> | | style="background:#E8E2F0;" rowspan="3" | {{icon item|Brundle Bundle|80px|link=The Brundle Bundle{{if lang}}}}<br/>'''{{item link|The Brundle Bundle}}'''<br/> | ||
| − | | | + | | style="background:#AD9DC3;" | {{icon item|Buzz Killer|75px}} |
| style="background:#F1ECF7;" | '''{{item link|Buzz Killer}}''' | | style="background:#F1ECF7;" | '''{{item link|Buzz Killer}}''' | ||
|- | |- | ||
| − | | | + | | style="background:#AD9DC3;" | {{icon item|Frontier Flyboy|75px}} |
| style="background:#F1ECF7;" | '''{{item link|Frontier Flyboy}}''' | | style="background:#F1ECF7;" | '''{{item link|Frontier Flyboy}}''' | ||
|- | |- | ||
| − | | | + | | style="background:#AD9DC3;" | {{icon item|Legend of Bugfoot|75px}} |
| style="background:#F1ECF7;" | '''{{item link|Legend of Bugfoot}}''' | | style="background:#F1ECF7;" | '''{{item link|Legend of Bugfoot}}''' | ||
|- | |- | ||
| − | | style="background:#6A5587;" rowspan="3" | {{ | + | | style="background:#6A5587;" rowspan="3" | '''{{class link|Medic|br=yes|color=white}}''' |
| style="background:#E8E2F0;" rowspan="3" | {{icon item|Mad Doktor|80px|link=The Mad Doktor{{if lang}}}}<br/>'''{{item link|The Mad Doktor}}'''<br/> | | style="background:#E8E2F0;" rowspan="3" | {{icon item|Mad Doktor|80px|link=The Mad Doktor{{if lang}}}}<br/>'''{{item link|The Mad Doktor}}'''<br/> | ||
| − | | | + | | style="background:#AD9DC3;" | {{icon item|Einstein|75px}} |
| style="background:#F1ECF7;" | '''{{item link|Einstein}}''' | | style="background:#F1ECF7;" | '''{{item link|Einstein}}''' | ||
|- | |- | ||
| − | | | + | | style="background:#AD9DC3;" | {{icon item|Dr. Gogglestache|75px}} |
| style="background:#F1ECF7;" | '''{{item link|Dr. Gogglestache}}''' | | style="background:#F1ECF7;" | '''{{item link|Dr. Gogglestache}}''' | ||
|- | |- | ||
| − | | | + | | style="background:#AD9DC3;" | {{icon item|Emerald Jarate|75px}} |
| style="background:#F1ECF7;" | '''{{item link|Emerald Jarate}}''' | | style="background:#F1ECF7;" | '''{{item link|Emerald Jarate}}''' | ||
|- | |- | ||
| − | | | + | | style="background:#6A5587;" rowspan="3" | '''{{class link|Sniper|br=yes|color=white}}''' |
| style="background:#E8E2F0;" rowspan="3" | {{icon item|Camper Van Helsing|80px|link=The Camper Van Helsing{{if lang}}}}<br/>'''{{item link|The Camper Van Helsing}}'''<br/> | | style="background:#E8E2F0;" rowspan="3" | {{icon item|Camper Van Helsing|80px|link=The Camper Van Helsing{{if lang}}}}<br/>'''{{item link|The Camper Van Helsing}}'''<br/> | ||
| − | | | + | | style="background:#AD9DC3;" | {{icon item|Holy Hunter|75px}} |
| style="background:#F1ECF7;" | '''{{item link|Holy Hunter}}''' | | style="background:#F1ECF7;" | '''{{item link|Holy Hunter}}''' | ||
|- | |- | ||
| − | | | + | | style="background:#AD9DC3;" | {{icon item|Silver Bullets|75px}} |
| style="background:#F1ECF7;" | '''{{item link|Silver Bullets}}''' | | style="background:#F1ECF7;" | '''{{item link|Silver Bullets}}''' | ||
|- | |- | ||
| − | | | + | | style="background:#AD9DC3;" | {{icon item|Garlic Flank Stake|75px}} |
| style="background:#F1ECF7;" | '''{{item link|Garlic Flank Stake}}''' | | style="background:#F1ECF7;" | '''{{item link|Garlic Flank Stake}}''' | ||
|- | |- | ||
| − | | style="background:#6A5587;" rowspan="3" | {{ | + | | style="background:#6A5587;" rowspan="3" | '''{{class link|Spy|br=yes|color=white}}''' |
| style="background:#E8E2F0;" rowspan="3" | {{icon item|Invisible Rogue|80px|link=The Invisible Rogue{{if lang}}}}<br/>'''{{item link|The Invisible Rogue}}'''<br/> | | style="background:#E8E2F0;" rowspan="3" | {{icon item|Invisible Rogue|80px|link=The Invisible Rogue{{if lang}}}}<br/>'''{{item link|The Invisible Rogue}}'''<br/> | ||
| − | | | + | | style="background:#AD9DC3;" | {{icon item|Under Cover|75px}} |
| style="background:#F1ECF7;" | '''{{item link|Under Cover}}''' | | style="background:#F1ECF7;" | '''{{item link|Under Cover}}''' | ||
|- | |- | ||
| − | | | + | | style="background:#AD9DC3;" | {{icon item|Griffin's Gog|75px}} |
| style="background:#F1ECF7;" | '''{{item link|Griffin's Gog}}''' | | style="background:#F1ECF7;" | '''{{item link|Griffin's Gog}}''' | ||
|- | |- | ||
| − | | | + | | style="background:#AD9DC3;" | {{icon item|Intangible Ascot|75px}} |
| style="background:#F1ECF7;" | '''{{item link|Intangible Ascot}}''' | | style="background:#F1ECF7;" | '''{{item link|Intangible Ascot}}''' | ||
| − | |||
|} | |} | ||
* '''備註:''' 如果這些物品是在地圖 [[Eyeaduct/zh-hant|Eyeaduct]] 冥界區的[[Haunted Halloween Gift/zh-hant|鬧鬼的萬聖節禮物]]中獲取到的話,那些物品將會有[[Haunted/zh-hant|詛咒]]屬性。 | * '''備註:''' 如果這些物品是在地圖 [[Eyeaduct/zh-hant|Eyeaduct]] 冥界區的[[Haunted Halloween Gift/zh-hant|鬧鬼的萬聖節禮物]]中獲取到的話,那些物品將會有[[Haunted/zh-hant|詛咒]]屬性。 | ||
| Line 142: | Line 139: | ||
=== 裝飾品 === | === 裝飾品 === | ||
{{main|Cosmetic items/zh-hant|l1=裝飾品}} | {{main|Cosmetic items/zh-hant|l1=裝飾品}} | ||
| − | {| class="wikitable collapsible" cellpadding="2" style="text-align: center;" | + | {| class="wikitable collapsible" cellpadding="2" style="text-align:center;" |
| − | | width=" | + | | width="70px" style="background:#6A5587;" | '''{{class link|Soldier|br=yes|color=white}}''' |
| − | | | + | | style="background:#AD9DC3;" | {{icon item|Infernal Impaler|75px}} |
| − | | style="background: #F1ECF7;" | '''{{item link|Infernal Impaler}}''' | + | | style="background:#F1ECF7;" | '''{{item link|Infernal Impaler}}''' |
|- | |- | ||
| − | | style="background: #6A5587;" rowspan="2" | {{ | + | | style="background:#6A5587;" rowspan="2" | '''{{class link|Pyro|br=yes|color=white}}''' |
| − | | | + | | style="background:#AD9DC3;" | {{item icon|Apparition's Aspect|75px}} |
| − | | style="background: #F1ECF7;" | '''{{item link|Apparition's Aspect}}''' | + | | style="background:#F1ECF7;" | '''{{item link|Apparition's Aspect}}''' |
|- | |- | ||
| − | | | + | | style="background:#AD9DC3;" | {{item icon|Last Breath|75px}} |
| − | | style="background: #F1ECF7;" | '''{{item link|Last Breath}}''' | + | | style="background:#F1ECF7;" | '''{{item link|Last Breath}}''' |
|- | |- | ||
| − | | style="background: #6A5587;" rowspan=" | + | | style="background:#6A5587;" rowspan="8" | '''{{class link|All Classes|br=yes|color=white}}''' |
| − | | | + | | style="background:#AD9DC3;" | {{icon item|Bombinomicon|75px}} |
| − | | style="background: #F1ECF7;" | '''{{item link|Bombinomicon}}''' | + | | style="background:#F1ECF7;" | '''{{item link|Bombinomicon}}''' |
|- | |- | ||
| − | | | + | | style="background:#AD9DC3;" | {{icon item|Ghastlierest Gibus|75px}} |
| − | | style="background: #F1ECF7;" | '''{{item link|Ghastlierest Gibus}}''' | + | | style="background:#F1ECF7;" | '''{{item link|Ghastlierest Gibus}}''' |
|- | |- | ||
| − | | | + | | style="background:#AD9DC3;" | {{icon item|MONOCULUS!|75px}} |
| − | | style="background: #F1ECF7;" | '''{{item link| | + | | style="background:#F1ECF7;" | '''{{item link|MONOCULUS!}}''' |
|- | |- | ||
| − | | | + | | style="background:#AD9DC3;" | {{icon item|Seal Mask|75px}} |
| − | | style="background: #F1ECF7;" | '''{{item link| | + | | style="background:#F1ECF7;" | '''{{item link|Seal Mask}}''' |
| − | |||
| − | |||
| − | |||
|- | |- | ||
| + | | style="background:#AD9DC3;" | {{icon item|Spine-Tingling Skull|80px}} | ||
| + | | style="background:#F1ECF7;" | '''{{item link|Spine-Chilling Skull 2011}}''' | ||
|} | |} | ||
| Line 175: | Line 171: | ||
{{main|List of maps/zh-hant|l1=官方地圖列表}} | {{main|List of maps/zh-hant|l1=官方地圖列表}} | ||
{| class="wikitable" cellpadding="2" style="text-align:center;" | {| class="wikitable" cellpadding="2" style="text-align:center;" | ||
| − | + | ! width="70px" style="background: #6A5587;" class="header" | <font color="white"> 名稱 | |
| − | + | ! style="background: #6A5587;" class="header" | <font color="white"> 圖片 | |
| − | ! style="background: #6A5587;" class="header" | 圖片 | + | ! style="background: #6A5587;" class="header" | <font color="white"> 遊戲模式 |
| − | ! style="background: #6A5587;" class="header" | 遊戲模式 | + | ! style="background: #6A5587;" class="header" | <font color="white"> 檔案名稱 |
| − | ! style="background: #6A5587;" class="header" | 檔案名稱 | ||
|- | |- | ||
| − | | style="background: #AD9DC3;" | '''[[Eyeaduct/zh-hant|Eyeaduct]]''' | + | | style="background:#AD9DC3;" | '''[[Eyeaduct/zh-hant|<font color="white">Eyeaduct]]''' |
| − | | style="background: #E8E2F0;" | [[File:Eyeaduct 1.png|240px|link=Eyeaduct/zh-hant]] | + | | style="background:#E8E2F0;" | [[File:Eyeaduct 1.png|240px|link=Eyeaduct/zh-hant]] |
| − | | style="background: #F1ECF7; | + | | style="background:#F1ECF7;" | '''[[King of the Hill/zh-hant|山丘之王]]'''<br />[[File:Controlpoint.png|50px|link=King of the Hill/zh-hant]] |
| − | + | | {{code|koth_viaduct_event}} | |
|} | |} | ||
| + | |||
| + | === 異常效果 === | ||
| + | {{main|Unusual effects/zh-hant|l1=異常效果}} | ||
| + | <gallery perrow="4"> | ||
| + | File:Unusual_Cauldron_Bubbles.png| {{item name|Cauldron Bubbles}} | ||
| + | File:Unusual_Cloudy_Moon.png| {{item name|Cloudy Moon}} | ||
| + | File:Unusual_Eerie_Orbiting_Fire.png| {{item name|Eerie Orbiting Fire}} | ||
| + | File:Unusual_Flaming_Lantern.png| {{item name|Flaming Lantern}} | ||
| + | </gallery> | ||
== 成就 == | == 成就 == | ||
| − | === | + | === {{Achiev type link|eye-chievements}} === |
| − | {{ | + | {{Halloween 2011 achievement list}} |
| − | |||
| − | |||
| − | }} | ||
== 更新履歷 == | == 更新履歷 == | ||
Latest revision as of 23:30, 22 July 2022

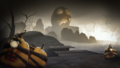
2011萬聖節更新(Third Annual Scream Fortress Very Scary Halloween Special)是一個於2011年10月27日更新釋出的重大更新。這次更新不僅包含了由地圖 Viaduct 改變而來的新地圖 Eyeaduct,也釋出了新的物品,裝備,和兩個新成就。此外,玩家只要於更新期間進入遊戲的話,還會收到一個萬聖節禮物大釜,做為這次更新免費放送的禮物。
內容
過程
在2011年10月20日更新時,主選單畫面加了一張新的萬聖節主題背景。於同次更新中,之前只有在萬聖節時才能配戴的頭飾又再度能配戴在任何角色身上。萬聖節南瓜和全職業皆適用的萬聖節嘲諷也都被加回遊戲中,當然,連馬都沒有的無頭騎士也一樣被加了回去,開始於曼恩莊園中現身。
2011年10月21日時,TF2 官方部落格上的其中一篇文章,正式宣布了第三次的萬聖節更新,將會於接下來的一星期內推出。[1]
2011年10月21日,Valve/zh-hant 的其中一名遊戲開發者 Jon Lippincott 在 HLDS mailing list 發表了一則訊息,表示新的萬聖節更新內容將會在「不久」後釋出。[2]這封訊息確認了這次將會有跟地圖曼恩莊園一樣隨機放置的萬聖節禮物的機制。Lippincott 表示,隨機放置的禮物要能出現,必須是要經過 Steam 認證的伺服器才行,任何想要騙過物品掉落系統的作弊或破壞行為,都會移除該伺服器的合格認證。
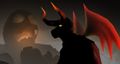
2011年10月27日時,TF2 官方部落格上的一篇新文章宣布了2011萬聖節更新的開始。文章附上了一則新的漫畫「死靈炸彈魔書」,還有一些萬聖節更新的細節,比方說「撿起禮物時能得到的超酷扮裝」。漫畫中最大的重點,是預告了畸形魔眼將會取代無頭騎士,成為 2011 年的萬聖節頭目。[3]
最後,於2011年10月27日更新更新時,所有更新內容正式加進了遊戲中。除此之外,任何在地圖 Eyeaduct 中的萬聖節禮物拿到的裝飾,將會附有「詛咒」屬性。另外,兩個萬聖節成就亦跟著每個職業皆有的套裝物品,一起加進了遊戲中。[4]
新增項目
畸形魔眼
武器
| 一臂之力 | ||
| 巫毒咒錐 |
裝飾品套裝
裝飾品
| 煉獄穿刺魔 | ||
| 亡靈之相 | ||
| 最後之息 | ||
| 死靈炸彈魔書 | ||
| 最驚悚的大禮帽 | ||
| 畸形魔眼! | ||
| 小海豹面具 | ||
| 毛骨悚然骷髏頭 2011 |
地圖
| 名稱 | 圖片 | 遊戲模式 | 檔案名稱 |
|---|---|---|---|
| Eyeaduct | 
|
山丘之王 |
koth_viaduct_event
|
異常效果

大釜綠泡

灰暗滿月

怪異鬼火

烈焰南瓜燈


成就
 2011年萬聖節成就
|
|


更新履歷
- [未記載] 新增萬聖節主題主選單背景。
- 2011年萬聖節更新活動:
- [未記載] 所有驚悚大禮帽已經升級成更加驚悚的大禮帽。
- [未記載] 現在更加驚悚的大禮帽還會升級成最驚悚的大禮帽。
- 為小錫兵套裝新增特殊的嘲諷。
- 畸形魔眼已經離開了![5]
- 結束2011萬聖節活動和特賣。
畫廊

在 2011 萬聖節出現的遊戲主選單畫面。
在 2011 萬聖節出現的遊戲主選單畫面(寬螢幕版本)。
在部落格所使用的更新推廣圖片。

火箭兵的新套裝。

工程師的新套裝。


參見
備註和參考
- ↑ "Update on the Halloween Update", TF2 Team, TF2 Official Website, October 21, 2011. Accessed October 22, 2011.
- ↑ [hlds] Halloween 2011 by Jon Lippincott, hlds@list.valvesoftware.com, October 21, 2011, 19:33:14 PDT. Accessed October 21, 2011.
- ↑ http://www.teamfortress.com/post.php?id=6633
- ↑ http://store.steampowered.com/news/6636/
- ↑ 現在畸形魔眼有了等級,每次被殺死後下次重生都會增加一個等級,同時提升發射速度和生命值。[1]
外部鏈接
- TF2 官方部落格的本次更新頁面。
| |||||||||||||||||||||||||||||||||||||

| ||||||||||||||||||||||||||||||||||||||||||||||||||||||||||||||||||||||||||||||||||||||||||||||||||