Difference between revisions of "Antiquity"
(Antiquity is a custom five point control map set in a Cambodian (modified Egypt) theme.) |
m |
||
| (15 intermediate revisions by 12 users not shown) | |||
| Line 1: | Line 1: | ||
| + | {{custom map}} | ||
{{Map infobox | {{Map infobox | ||
| − | | game-type=Control Point | + | | map-status = custom |
| − | | file-name=cp_antiquity | + | | map-workshopid = 960317656 |
| − | | map-image=Antiquity1.png | + | | map-name = Antiquity |
| − | | developer= | + | | map-game-type = Control Point |
| − | | map-environment = Cambodian (Modified Egypt), Spytech | + | | map-file-name = cp_antiquity |
| − | | map-setting = Daylight | + | | map-image = Antiquity1.png |
| − | | map-health | + | | map-developer = {{Steamid|76561198000713080}}<br />Acumen<br />{{Steamid|76561197994150794|Aeon "Void" Bollig}} |
| − | | map-health | + | | map-links = [http://forums.tf2maps.net/showthread.php?t=15191 TF2maps.net] (original RC1) |
| − | | map-ammo | + | | map-environment = Cambodian (Modified Egypt), Spytech |
| − | | map-ammo | + | | map-setting = Daylight |
| + | | map-pickups-health-small = 10 | ||
| + | | map-pickups-health-medium = 12 | ||
| + | | map-pickups-ammo-small = 4 | ||
| + | | map-pickups-ammo-medium = 16 | ||
}} | }} | ||
| − | '''Antiquity''' is a [[List of game modes#standard control point|standard Control Point]] map. | + | '''Antiquity''' is a [[List of game modes#standard control point|standard Control Point]] map. Set in Cambodian ruins similar to those of [[Wikipedia:Angkor Wat|Angkor Wat]], BLU and RED fight for control of the crumbling remains as well as the secret bases hidden within. The map consists of a base with a giant drill for each team, an open second point, and a center point inside a temple structure. |
| − | |||
| − | |||
== Locations == | == Locations == | ||
| − | + | Throughout the map, there are many high ground areas for [[Scouts]], [[Soldiers]] and [[Demomen]]. Corners, ruins and columns provide [[Spies]], [[Pyros]], [[Heavies]] and [[Engineers]] with excellent ambush locations. Each of the control points also has advantageous locations for [[Snipers]] and [[Medics]]. | |
| − | Throughout the map, there are many high ground areas for [[Scouts]], [[Soldiers]] and [[Demomen]]. | ||
=== Control Point 3 (The Temple) === | === Control Point 3 (The Temple) === | ||
| Line 28: | Line 30: | ||
</gallery> | </gallery> | ||
The central control point is partially enclosed within the ruins of an old Cambodian temple. | The central control point is partially enclosed within the ruins of an old Cambodian temple. | ||
| − | *'''Entrances:''' There are four total paths to the central control point, paired in twos. | + | *'''Entrances:''' There are four total paths to the central control point, paired in twos. Two paths come through the interior ruins via both upper and lower routes, or a large and small arch provide a more open entry to the temple area. |
| − | *'''Temple Overlook:''' A stone deck that overlooks the control point. | + | *'''Temple Overlook:''' A stone deck that overlooks the control point. Any class can jump up a series of crates on one side to access this from the garden, and leap to the stone decor to traverse mid with a height advantage. |
*'''Small Archway:''' A common location to stage attacks on mid due to cover, ammo, and health. | *'''Small Archway:''' A common location to stage attacks on mid due to cover, ammo, and health. | ||
| − | *'''Garden:''' An open intermediate area between CP2 and CP3, | + | *'''Garden:''' An open intermediate area between CP2 and CP3, separated from the middle point by a large archway. |
=== Control Points 2 & 4 (Excavation Site) === | === Control Points 2 & 4 (Excavation Site) === | ||
| Line 41: | Line 43: | ||
</gallery> | </gallery> | ||
The secondary control points are located on raised stone structures flanked by wooden platforms and broken walls. | The secondary control points are located on raised stone structures flanked by wooden platforms and broken walls. | ||
| − | *'''Stone House:''' Provides health, ammo, and a place for Engineers to set up a defensive | + | *'''Stone House:''' Provides health, ammo, and a place for Engineers to set up a defensive Sentry Gun. All classes can also use the crates and barrels to access the roof of the stone house. |
| − | *'''The Cave:''' A narrow, winding cave that leads beneath the control point structure. | + | *'''The Cave:''' A narrow, winding cave that leads beneath the control point structure. Useful for Spies, Pyros and Scouts to flank defenders from either team. |
| − | *'''Freestanding Arch:''' Placed between the interior ruins leading to the middle control point and CP2, it provides some needed cover to attackers attempting to flank | + | *'''Freestanding Arch:''' Placed between the interior ruins leading to the middle control point and CP2, it provides some needed cover to attackers attempting to flank Sentry Guns on the point itself. |
| − | *'''Broken Patio:''' A common spot for | + | *'''Broken Patio:''' A common spot for Snipers. The area below is dark and makes an interesting spot for Engineers to place a hidden teleporter. |
=== Control Points 1 & 5 (Doomsday Drill) === | === Control Points 1 & 5 (Doomsday Drill) === | ||
| Line 57: | Line 59: | ||
*'''Foyer:''' A large set of rooms from which attackers can prepare either an assault on the final point or an assault on CP2. | *'''Foyer:''' A large set of rooms from which attackers can prepare either an assault on the final point or an assault on CP2. | ||
*'''Computer Room:''' A side entrance to the final point with small ammo and health. | *'''Computer Room:''' A side entrance to the final point with small ammo and health. | ||
| − | *'''Upper Walkway:''' Overlooks the final point. | + | *'''Upper Walkway:''' Overlooks the final point. Controlling this area is of great importance for the defenders, since attackers can easily swarm the point from here. |
| − | *'''The Doomsday Drill:''' This giant structure blocks line of sight and makes rocket and sticky jumps difficult but not impossible. | + | *'''The Doomsday Drill:''' This giant structure blocks line of sight and makes rocket and sticky jumps difficult but not impossible. Sentry locations must be carefully chosen since the girders can create many blindspots. |
| − | |||
| − | |||
{{CustomMapNav}} | {{CustomMapNav}} | ||
| − | |||
Latest revision as of 01:07, 18 January 2024
 | “I built that.” This page contains information about a custom map that is not an officially released Team Fortress 2 map. All released Valve and Community-made TF2 maps can be found on the list of maps. |
| Antiquity | |
|---|---|

| |
| Basic Information | |
| Map type: | Control Point |
| File name: | cp_antiquity
|
| Developer(s): | E-Arkham Acumen Aeon "Void" Bollig |
| Link(s): | TF2maps.net (original RC1) |
| Map Info | |
| Environment: | Cambodian (Modified Egypt), Spytech |
| Setting: | Daylight |
| Map Items | |
| Map Overview | |
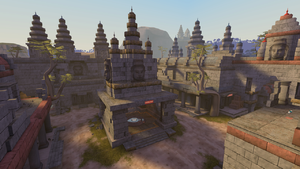
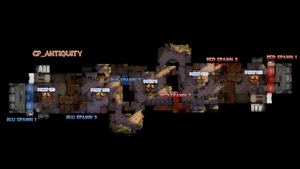
Antiquity is a standard Control Point map. Set in Cambodian ruins similar to those of Angkor Wat, BLU and RED fight for control of the crumbling remains as well as the secret bases hidden within. The map consists of a base with a giant drill for each team, an open second point, and a center point inside a temple structure.
Contents
Locations
Throughout the map, there are many high ground areas for Scouts, Soldiers and Demomen. Corners, ruins and columns provide Spies, Pyros, Heavies and Engineers with excellent ambush locations. Each of the control points also has advantageous locations for Snipers and Medics.
Control Point 3 (The Temple)
The central control point is partially enclosed within the ruins of an old Cambodian temple.
- Entrances: There are four total paths to the central control point, paired in twos. Two paths come through the interior ruins via both upper and lower routes, or a large and small arch provide a more open entry to the temple area.
- Temple Overlook: A stone deck that overlooks the control point. Any class can jump up a series of crates on one side to access this from the garden, and leap to the stone decor to traverse mid with a height advantage.
- Small Archway: A common location to stage attacks on mid due to cover, ammo, and health.
- Garden: An open intermediate area between CP2 and CP3, separated from the middle point by a large archway.
Control Points 2 & 4 (Excavation Site)
The secondary control points are located on raised stone structures flanked by wooden platforms and broken walls.
- Stone House: Provides health, ammo, and a place for Engineers to set up a defensive Sentry Gun. All classes can also use the crates and barrels to access the roof of the stone house.
- The Cave: A narrow, winding cave that leads beneath the control point structure. Useful for Spies, Pyros and Scouts to flank defenders from either team.
- Freestanding Arch: Placed between the interior ruins leading to the middle control point and CP2, it provides some needed cover to attackers attempting to flank Sentry Guns on the point itself.
- Broken Patio: A common spot for Snipers. The area below is dark and makes an interesting spot for Engineers to place a hidden teleporter.
Control Points 1 & 5 (Doomsday Drill)
The final control points are nestled beneath a giant drill which itself is supported by giant metal girders.
- Foyer: A large set of rooms from which attackers can prepare either an assault on the final point or an assault on CP2.
- Computer Room: A side entrance to the final point with small ammo and health.
- Upper Walkway: Overlooks the final point. Controlling this area is of great importance for the defenders, since attackers can easily swarm the point from here.
- The Doomsday Drill: This giant structure blocks line of sight and makes rocket and sticky jumps difficult but not impossible. Sentry locations must be carefully chosen since the girders can create many blindspots.
| ||||||||||||||||||||||||||||||||||||||||||||||||


