Difference between revisions of "Community Landfall strategy"
(→Class-specific strategy: Added Heavy tip & Fixed Medic tip grammar.) |
m (Auto: Sync Map infobox) |
||
| (4 intermediate revisions by 2 users not shown) | |||
| Line 1: | Line 1: | ||
| − | {{ | + | {{community strategy stub|Expand the "General Strategy" section to cover map locations in more detail. Potentially look at the class-specific strategies as well.}} |
{{Map infobox | {{Map infobox | ||
| − | | game-type | + | | map-strategy = yes |
| − | | file-name | + | | map-status = community |
| − | | | + | | map-name = Landfall |
| − | | | + | | map-game-type = Capture the Flag |
| − | | map-image = Ctf landfall | + | | map-file-name = ctf_landfall |
| − | + | | map-released = {{Patch name|12|17|2015}} | |
| + | | map-released-major = Tough Break Update | ||
| + | | map-image = Ctf landfall red base.png | ||
| map-environment = Alpine Forest | | map-environment = Alpine Forest | ||
| map-setting = Daylight, sunny | | map-setting = Daylight, sunny | ||
| − | | map- | + | | map-stamp-link = https://steamcommunity.com/stats/TF2/leaderboards/1098380 |
| − | | map-health | + | | map-pickups-health-small = 4 |
| − | | map-ammo | + | | map-pickups-health-medium = 4 |
| − | | map-ammo | + | | map-pickups-ammo-small = 4 |
| + | | map-pickups-ammo-medium = 4 | ||
}} | }} | ||
| + | |||
| + | This article is about '''Community Landfall strategy'''. | ||
| + | |||
| + | '''Note''': It is recommended to read the main [[Landfall]] article first to become familiar with the names of key map locations used in this article. | ||
| + | |||
| + | {{TOC limit|3}} | ||
== General strategy == | == General strategy == | ||
Latest revision as of 19:53, 20 January 2024
| “Sun Tzu's got nothing on us!” This article is a Community strategy stub. As such, it is not complete. You can help the Team Fortress Wiki Community Strategy Project by expanding it. Notes: Expand the "General Strategy" section to cover map locations in more detail. Potentially look at the class-specific strategies as well. |
| Landfall | |
|---|---|

| |
| Basic Information | |
| Map type: | Capture the Flag |
| File name: | ctf_landfall
|
| Released: | December 17, 2015 Patch (Tough Break Update) |
| Developer(s): | Andrew "Dr. Spud" Thompson Fay L. "nineaxis" Fabry Mark "Shmitz" Major |
| Map Info | |
| Environment: | Alpine Forest |
| Setting: | Daylight, sunny |
| Map Items | |
| Map Photos | |
| Map Overview | |
This article is about Community Landfall strategy.
Note: It is recommended to read the main Landfall article first to become familiar with the names of key map locations used in this article.
General strategy
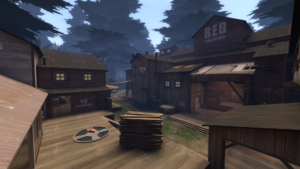
- The upper level of the map provides more flexibility, and is also advantageous in a firefight.
- The upper walkway along the side route can provide a covered path to the enemy intelligence.
Class-specific strategy
 Scout
Scout
- Even when rushing the enemy base, it's still advantageous to take the somewhat-indirect upper route, due to the Scout's maneuverability.
- Be sure to watch for Sentry Guns. There are multiple "Sentry locations" concentrated in the base, and running into one will be a very unpleasant experience.
- Though situational, try to avoid the lumber buildings' inner rooms, as they tend to limit your mobility.
- Note that as a shortcut, you can double jump from the room above the resource deck directly onto the catwalk surrounding the tree, and vice versa. This can be a good way to ambush Snipers in said room.
 Soldier
- The outdoors section of this map is excellent for rocket jumping, as you can move up and down the levels with ease. Note that the shack along the side route has a roof that is accessible with rocket jumping, so that can be a good point of harassment.
- All Sentry locations either have one safe spot or can be hit with splash damage. Be sure to use these locations to avoid damage.
 Pyro
Pyro
- The lumber building rooms are small, and thus are a good place for you to fight in.
- While outside, use the upper catwalks to ambush those below.
- If you suspect a Spy cloaked within your base, be sure to scourge all of the corners, as there are many nooks and crannies that Spies can hide in.
 Demoman
- The multiple doorways and corners inside the lumber buildings provide great locations for sticky traps. Also, an interesting sticky trap location is underneath the sign on either side of the tree. Hiding some under it can be a very unpleasant experience for those taking the catwalk into the lumber building's upper levels.
 Heavy
Heavy
- When travelling inside, be wary of Spies hiding in the corners.
- The high ground paths are much more important to you compared to other classes; stay above the enemy to avoid splash damage and be mindful of any Sniper sight lines.
 Engineer
- There are a lot of Engineer Sentry Gun spots in the base. The most notable are:
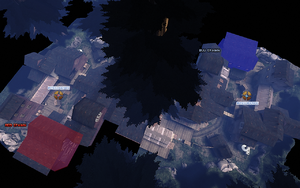
- Stump: The stump is located in the corner of the courtyard furthest from the spawn rooms. Sentry Guns located here have a clear line of fire of the entire courtyard. Note that Soldiers on the upper walkway can use splash damage to destroy Sentry Guns in this location, and that fast enemies using the side route's shed can take the intelligence with minimal damage.
- Intelligence deck: The wooden wall and the side route's shed make a corner that can house a Sentry Gun. This location covers the intelligence, but can be hit with splash damage from Soldiers on the inner deck.
- First spawn room roof: Sentry Guns wedged in the corner where the roof meets the shed above the first spawn room cover the courtyard and the intelligence, but are vulnerable to direct fire from the inner deck. Using a Wrangler can solve most of the issues.
- Second spawn room roof: To reach this location, you must take the upper walkway onto the first spawn room roof, jump onto the wood pile in the middle of the intelligence deck, then jump onto the second spawn room roof. Sentry Guns placed on here with a Wrangler can cover the courtyard, intelligence, inner deck, and side route. Note that this is a very vulnerable location as well, so use with care.
- Sentry Guns can also be placed on resource decks for area denial.
- Teleporter exits can be placed in the lumber building's forward rooms on the second floor. However, aggressive Engineers may put their Teleporters on the side route's shack (Which can be accessed via Sentry-jumping) or on the upper walkway close to the enemy base.
 Medic
Medic
- Your ÜberCharge is your team's main sentry buster. If an Engineer is turtling, build up an Über to wipe him (and any other Sentry Guns) out.
- Always be wary of enemies, especially when travelling on ground level, since you are a priority target.
 Sniper
- The walkway along the front of the lumber building provides an excellent view of the battlefield. However, watch for ambushing Scouts and Soldiers.
 Spy
Spy
- The many corners along the inside of the lumber buildings serve as good ambushing positions. However, watch for bumping enemies, as there is less space for maneuvering.
- The bases have many niches that can be used if equipping the Cloak & Dagger. If doing so, take care not to do excessive camping, as doing so is only effectively removing yourself from the battlefield.
- Using the upper walkway above the side route and a well-timed cloak can get you deep into the enemy base.

