Difference between revisions of "Panic"
NihonTiger (talk | contribs) |
NihonTiger (talk | contribs) |
||
| Line 15: | Line 15: | ||
== Goal == | == Goal == | ||
Both teams must simultaneously push their [[cart]]s through enemy territory in order to reach the capture point, while preventing the enemy team from doing the same. | Both teams must simultaneously push their [[cart]]s through enemy territory in order to reach the capture point, while preventing the enemy team from doing the same. | ||
| + | |||
| + | == Locations == | ||
| + | |||
| + | === Stage 1 === | ||
| + | Stage 1 of Panic starts with each cart falling down a ramp and rolling into its starting position before the start of the round at the front of RED or BLU's spawn. Directly after the starting point for each cart is a tight hairpin turn that crosses underneath the enemy's cart path. The cart paths then take a slight turn and head uphill to the crossover area, a small, flat and elevated arena-like area in the middle of the map. The middle of the map also features raised metal plates protecting the middle portion (to prevent [[Sentry Gun]] camping from either team's spawn to the middle point, though this set-up pre-dated the introduction of the [[Wrangler]]. It also features small alcoves/rooms where Sentry Guns can be placed. | ||
| + | |||
| + | The cart paths then hook right or left (for RED/BLU, respectively) and head back into a building. Here, they make a slow 180-degree turn back toward the enemy team's spawn and a downhill ramp. The finishing points for both carts are in front of the enemy spawn, right next to the rolldown hill for the enemy's cart. | ||
| + | |||
| + | <!-- Info to come here (and don't forget to remove the tags) | ||
| + | ===Stage 2=== | ||
| + | |||
| + | ===Stage 3=== | ||
| + | --> | ||
| + | |||
== Strategy == | == Strategy == | ||
Revision as of 17:48, 3 March 2011
| Panic | |
|---|---|

| |
| Basic Information | |
| Developer(s): | {{{map-developer}}} |
Panic is a Payload Race map created for the TF2Maps.net A/D CTF and Payload Race Contest. It was awarded second place in the competition.
Panic is set in a small industrial area, surrounded by a forest. Unlike most of the other Payload Race and Payload maps, it is possible for a player to be killed by their own cart on this map. In the first stage, the cart falls down a ramp and rolls into its starting position before the start of the round. If a player is standing in its way they will be killed by it, similarly to the trains on Well.
Stage 3 is also unique, as the entire track is a ramp with a hole at the very bottom of it, while the carts constantly roll backward when not being pushed. This forces teams to stay with their cart in order to keep it moving. Otherwise, the cart will fall off the map and cause the team to automatically lose.
Contents
Goal
Both teams must simultaneously push their carts through enemy territory in order to reach the capture point, while preventing the enemy team from doing the same.
Locations
Stage 1
Stage 1 of Panic starts with each cart falling down a ramp and rolling into its starting position before the start of the round at the front of RED or BLU's spawn. Directly after the starting point for each cart is a tight hairpin turn that crosses underneath the enemy's cart path. The cart paths then take a slight turn and head uphill to the crossover area, a small, flat and elevated arena-like area in the middle of the map. The middle of the map also features raised metal plates protecting the middle portion (to prevent Sentry Gun camping from either team's spawn to the middle point, though this set-up pre-dated the introduction of the Wrangler. It also features small alcoves/rooms where Sentry Guns can be placed.
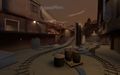
The cart paths then hook right or left (for RED/BLU, respectively) and head back into a building. Here, they make a slow 180-degree turn back toward the enemy team's spawn and a downhill ramp. The finishing points for both carts are in front of the enemy spawn, right next to the rolldown hill for the enemy's cart.
Strategy
Stage 1
- Due to the early crossover of RED's and BLU's carts, Heavies are vital for a successful push through the middle of the stage.
- Sentry Guns can be placed outside spawn to provide both cover for respawning teammates and defense against the enemy team's push.
- Spies are less effective on the first stage because of its compact design. If playing Spy on Stage 1, focus on enemy Heavies, Medics and Engineers, as they pose the greatest defensive threats.
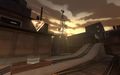
Stage 2
- The hill before each finishing point offers an optimum point for Engineers to place their Sentry Guns, as the cart will roll back down the hill if successfully defended.
- Similarly, Pyros using the Backburner can launch surprise ambushes here for the same effect.
Stage 3
- Because the cart will roll back if no enemies are pushing it, the Pyro's compression blast is incredibly useful on this map. Teamed up with a Medic, Pyros can easily push multiple enemies off the cart and onto areas below in order to force the enemy's cart to roll back.
- The covered bridge two-thirds of the way up the hill has windows above each cart path, perfect for Pyro ambushes.
- The large building in between the two cart tracks, along with the large space between each cart, make Snipers a less than ideal class for the final stage. It is suggested that players that elect to play Sniper equip Jarate for its useful Mini-Crit effect.
Screenshots
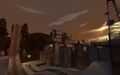
Spawn/enemy finishing point in Stage 1
Finishing point in Stage 1
Stage 2
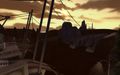
The pit which the cart can fall into in Stage 3
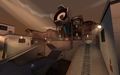
Stage 3


Changelog
b1: detailed stage 3. Finished stage 2. Initial optimization on all stages, explosion in stage 2 reduced in size to help performance. Moved some pickups around, mainly in stage 1 and 3. Closed off the middle (wooden) tunnel in stage 2. Clipped more edges, switched some clips for trigger_push to allow rocketjumping. And more that I can't remember!
a9: stage 2 detailing. custom soundscape. a8: rebuilt ALL logic in the map. Continued some detailing in stage 2. Slowed the carts in stage 3 by 20% a7: Anti-stalemate mode added. Stage 2 rough texturing. a6: stage 1 detailed, still not 100%. Fixed a rare bug with auto-rolling carts in stage 1. a5: fixed crashing. Added particles! a4: stage 2 deleted, new stage 2 added. Dynamic cart speeds in stage 3. a3: various fixes and tweaks. a2: added stage 3.
a1: release (stage 1 & 2).Additional Links
- Panic WIP Thread: http://forums.tf2maps.net/showthread.php?t=7036
| ||||||||||||||||||||||||||||||||||||||||||||||||