Difference between revisions of "Promotional images"
m (→1999 design) |
BrazilianNut (talk | contribs) m |
||
| (3 intermediate revisions by 3 users not shown) | |||
| Line 1: | Line 1: | ||
| − | [[ | + | [[File:Pres01 Team Fortress 2.jpg|370px|right|Team Fortress 2]] |
| − | |||
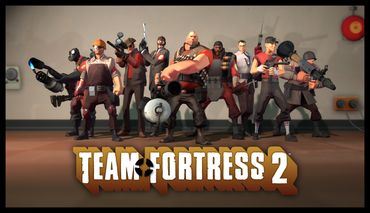
Part of the advertising for Team Fortress 2 included the use of promotional images, many of which were derived from pre-release iterations of the game, thus reflecting differences such as the roofless bridge version of [[2Fort]]. These images often reflect outdated and older designs of characters, maps, and weapons, as well as gameplay concepts. | Part of the advertising for Team Fortress 2 included the use of promotional images, many of which were derived from pre-release iterations of the game, thus reflecting differences such as the roofless bridge version of [[2Fort]]. These images often reflect outdated and older designs of characters, maps, and weapons, as well as gameplay concepts. | ||
| − | The images from the pre-release version of the current iteration of Team Fortress 2 were usually sourced from in-game screenshots or screen captures taken from [[Trailer 2]] and [[Meet the Heavy]]. Because of how prominent many of these images were, they are still used on some websites when referencing the game. For example, the [ | + | The images from the pre-release version of the current iteration of Team Fortress 2 were usually sourced from in-game screenshots or screen captures taken from [[Trailer 2]] and [[Meet the Heavy]]. Because of how prominent many of these images were, they are still used on some websites when referencing the game. For example, the [https://www.steampowered.com/status/tf2/tf2_stats.php Steam TF2 stats page] still uses the original group photo, as seen to the upper-right, to represent the game. |
== TF2 Pre-release Gallery == | == TF2 Pre-release Gallery == | ||
| Line 18: | Line 17: | ||
File:Ctf 2fort area denial.png|BLU defenders in 2Fort. | File:Ctf 2fort area denial.png|BLU defenders in 2Fort. | ||
File:Ctf 2fort0027.png|A [[Medic]] healing a Heavy in 2Fort. | File:Ctf 2fort0027.png|A [[Medic]] healing a Heavy in 2Fort. | ||
| + | File:SoldierE3.jpg|The Soldier who stays next to the Heavy and Medic in 2fort. | ||
File:Minibasesetup.png|Engineers construct a base in Well. | File:Minibasesetup.png|Engineers construct a base in Well. | ||
File:Engiel3.png|The same nest, but with a Level 3 [[Sentry Gun]]. | File:Engiel3.png|The same nest, but with a Level 3 [[Sentry Gun]]. | ||
File:Pyrovssoldier.jpg|A Pyro fighting a Soldier on a control point in [[Hydro]]. | File:Pyrovssoldier.jpg|A Pyro fighting a Soldier on a control point in [[Hydro]]. | ||
File:Nochance2.png|An [[ÜberCharge|ÜberCharged]] Pyro and Medic assault a Heavy. | File:Nochance2.png|An [[ÜberCharge|ÜberCharged]] Pyro and Medic assault a Heavy. | ||
| − | File:Scout gibs incoming.png|A [[Demoman]] about to [[gib]] a Scout in Well with [[Stickybomb]]s. Here, there are nine stickies deployed. | + | File:Scout gibs incoming.png|A [[Demoman]] about to [[Gibs|gib]] a Scout in Well with [[Stickybomb]]s. Here, there are nine stickies deployed. |
File:Spysneak2.png|A Spy decloaking behind an Engineer. | File:Spysneak2.png|A Spy decloaking behind an Engineer. | ||
File:Team-fortress-2-20070413051119142.jpg|The beta 2Fort. | File:Team-fortress-2-20070413051119142.jpg|The beta 2Fort. | ||
| + | File:2fort earlybase in.jpg|The RED basement in the beta 2Fort. | ||
File:Tf2 hydro 03.jpg|RED team in Hydro. | File:Tf2 hydro 03.jpg|RED team in Hydro. | ||
| + | File:Engilaughing.jpg|Laughing Engineer with Sentry Gun next to a point in Hydro. | ||
| + | File:Bludefending.jpg|Shooting Heavy and Scout in Hydro. | ||
File:0000002575.1920x1080.jpg|Pyro in Dustbowl. | File:0000002575.1920x1080.jpg|Pyro in Dustbowl. | ||
File:Tf2 stills01 small.jpg|A Heavy attacking the RED base in 2Fort. | File:Tf2 stills01 small.jpg|A Heavy attacking the RED base in 2Fort. | ||
| Line 34: | Line 37: | ||
== TF2 Promotional Video Gallery == | == TF2 Promotional Video Gallery == | ||
=== [[Meet the Heavy]] === | === [[Meet the Heavy]] === | ||
| − | |||
<gallery> | <gallery> | ||
File:Afd ati 04.png| "Who touched my gun?" | File:Afd ati 04.png| "Who touched my gun?" | ||
| Line 42: | Line 44: | ||
=== [[Trailer 2]] === | === [[Trailer 2]] === | ||
| − | |||
<gallery> | <gallery> | ||
| − | File:Tf2 trailer03.png | A RED [[Engineer]] killing BLU [[ | + | File:Tf2 trailer03.png| A RED [[Engineer]] killing BLU [[Soldier]]s with his Level 1 [[Sentry Gun]]. |
| − | File:Tf2 trailer06.png | A BLU [[Heavy]] firing his [[Minigun]] on [[2Fort]]. A [[Sniper]] can be seen in the background. | + | File:Tf2 trailer06.png| A BLU [[Heavy]] firing his [[Minigun]] on [[2Fort]]. A [[Sniper]] can be seen in the background. |
| − | File:Tf2 trailer07.png | Another shot of the BLU building with the | + | File:Tf2 trailer07.png| Another shot of the BLU building with the Heavy firing. |
| − | File:Tf2 trailer08.png | The BLU | + | File:Tf2 trailer08.png| The BLU Heavy killing RED Soldiers as they leave the RED base. |
| − | File:Tf2 trailer09.png | A RED | + | File:Tf2 trailer09.png| A RED Sniper taking aim. |
| − | File:Tf2 trailer10.png | The | + | File:Tf2 trailer10.png| The Sniper is about to kill the Heavy with a [[headshot]]. A BLU [[Pyro]] can be seen in the shot. |
| − | File:Tf2 trailer11.png | The BLU | + | File:Tf2 trailer11.png| The BLU Pyro looking over after the Sniper kills the Heavy. |
| − | File:Tf2 trailer12.png | A BLU [[Spy]] un-cloaking behind the | + | File:Tf2 trailer12.png| A BLU [[Spy]] un-cloaking behind the Sniper. |
| − | File:Tf2 trailer13.png | Same shot but with the | + | File:Tf2 trailer13.png| Same shot, but with the Spy completely uncloaked. |
| − | File:Tf2 trailer14.png | A headshot of the | + | File:Tf2 trailer14.png| A headshot of the Spy after [[Backstab|backstabbing]] the Sniper. |
| − | File:Tf2 trailer15.png | A BLU [[Scout]] sneaking up behind a RED | + | File:Tf2 trailer15.png| A BLU [[Scout]] sneaking up behind a RED Pyro. Note the old design for the Pyro's oxygen tank. |
| − | File:Tf2 trailer16.png | The | + | File:Tf2 trailer16.png| The Scout about to kill the Pyro with his [[Bat]]. |
| − | File:Tf2 trailer17.png | The | + | File:Tf2 trailer17.png| The Scout is about to pick up the [[Intelligence]]. |
| − | File:Tf2 trailer18.png | The [[Demoman]] firing his [[Grenade Launcher]]. A dead | + | File:Tf2 trailer18.png| The [[Demoman]] firing his [[Grenade Launcher]]. A dead Pyro can be slightly seen. |
| − | File:Tf2 trailer19.png | The | + | File:Tf2 trailer19.png| The Demoman throwing his [[Dynamite Pack]] towards an attacking RED Sentry Gun. |
| − | File:Tf2 trailer20.png | The Dynamite sticks begin to explode killing the RED | + | File:Tf2 trailer20.png| The Dynamite sticks begin to explode, killing the RED Engineer. |
| − | File:Tf2 trailer21.png | A [[Rocket Jumping]] BLU | + | File:Tf2 trailer21.png| A [[Jumping#Soldier jumps|Rocket Jumping]] BLU Soldier. |
| − | File:Tf2 trailer22.png | A row of | + | File:Tf2 trailer22.png| A row of Soldiers Rocket Jumping. |
</gallery> | </gallery> | ||
== TF2 Post-release gallery == | == TF2 Post-release gallery == | ||
<gallery> | <gallery> | ||
| − | File:Tf2groupphoto.jpg|The current TF2 group photo. | + | File:Tf2groupphoto.jpg|The current ''TF2'' group photo. |
File:Kingofthehill 2560x1024.png|Heavy and Medic in [[Viaduct]]. | File:Kingofthehill 2560x1024.png|Heavy and Medic in [[Viaduct]]. | ||
File:05_lumberyard_1.jpg|[[Lumberyard]]. | File:05_lumberyard_1.jpg|[[Lumberyard]]. | ||
| Line 73: | Line 74: | ||
File:05 ravine 2.jpg|Ravine. | File:05 ravine 2.jpg|Ravine. | ||
File:Heavyipod.jpg|The Heavy, from the [[Mac Update]]. | File:Heavyipod.jpg|The Heavy, from the [[Mac Update]]. | ||
| − | File:Imapc.jpg|Level 1 Sentry and Portal turret, from the | + | File:Imapc.jpg|Level 1 Sentry and ''Portal'' turret, from the Mac Update. |
| − | File:Max ears.jpg| A RED Heavy and Pyro wearing [[Max's Severed Head]]. | + | File:Max ears.jpg|A RED Heavy and Pyro wearing [[Max's Severed Head]]. |
| − | File:L4D2 promo.jpg| A Scout wearing the [[Ellis' Cap]] and maggots being fried by the Soldier with a [[Frying Pan]]. | + | File:L4D2 promo.jpg|A Scout wearing the [[Ellis' Cap]] and maggots being fried by the Soldier with a [[Frying Pan]]. |
| − | File:Soldier worms small.png| The Soldier wearing his [[Lumbricus Lid]] and wielding the Holy Hand Grenades. | + | File:Soldier worms small.png|The Soldier wearing his [[Lumbricus Lid]] and wielding the Holy Hand Grenades. |
| − | File:Rift.jpg| The Pyro and the Scout wielding the [[Sharpened Volcano Fragment]] and the [[Sun-On-A-Stick]]. | + | File:Rift.jpg|The Pyro and the Scout wielding the [[Sharpened Volcano Fragment]] and the [[Sun-On-A-Stick]]. |
| − | File:Soldier engy.png| The Soldier and the Engineer wearing hats from the | + | File:Soldier engy.png|The Soldier and the Engineer wearing hats from the {{Patch name|4|7|2011}}. |
| − | File:Mbsf promo.jpg| The Engineer and the Spy wearing [[Hetman's Headpiece]] and [[Janissary Ketche]]. | + | File:Mbsf promo.jpg|The Engineer and the Spy wearing [[Hetman's Headpiece]] and [[Janissary Ketche]]. |
</gallery> | </gallery> | ||
| Line 86: | Line 87: | ||
File:Tfc1.jpg|[[2Fort (Classic)|2Fort]]. | File:Tfc1.jpg|[[2Fort (Classic)|2Fort]]. | ||
</gallery> | </gallery> | ||
| + | |||
== TF2: Brotherhood of Arms Gallery == | == TF2: Brotherhood of Arms Gallery == | ||
=== 1998 design === | === 1998 design === | ||
| Line 116: | Line 118: | ||
=== 1999 design === | === 1999 design === | ||
<gallery> | <gallery> | ||
| − | File:Untitled-1.png|Brotherhood of Arms logo. | + | File:Untitled-1.png|''Brotherhood of Arms'' logo. |
File:Tf2oldstlye.jpg|Machine gun nest. | File:Tf2oldstlye.jpg|Machine gun nest. | ||
File:1029563-screenpf3.jpg|Spy. | File:1029563-screenpf3.jpg|Spy. | ||
| Line 159: | Line 161: | ||
== Notes == | == Notes == | ||
| − | [[ | + | [[File:Tf2cover2.jpg|400px|right|]] |
| − | *The Pyro does not have a hose attached to | + | * The Pyro does not have a hose attached to the [[Flame Thrower]] in any of the current iteration pre-release screenshots. |
| − | + | * The ''Brotherhood of Arms'' pictures represent several stages of design before the entire game was scrapped. | |
| − | *The Brotherhood of Arms pictures represent several stages of design before the entire game was scrapped. | + | * The promotional filename for ''Meet the Heavy'' was <code>WhoTouchedSasha.wmv</code>. |
| − | *The promotional filename for Meet the Heavy was <code>WhoTouchedSasha.wmv</code>. | ||
[[Category:Images]] | [[Category:Images]] | ||
| − | {{Media | + | {{Media Nav}} |
Latest revision as of 14:54, 12 June 2024
Part of the advertising for Team Fortress 2 included the use of promotional images, many of which were derived from pre-release iterations of the game, thus reflecting differences such as the roofless bridge version of 2Fort. These images often reflect outdated and older designs of characters, maps, and weapons, as well as gameplay concepts.
The images from the pre-release version of the current iteration of Team Fortress 2 were usually sourced from in-game screenshots or screen captures taken from Trailer 2 and Meet the Heavy. Because of how prominent many of these images were, they are still used on some websites when referencing the game. For example, the Steam TF2 stats page still uses the original group photo, as seen to the upper-right, to represent the game.
Contents
TF2 Pre-release Gallery
Heavy and Spy at RED side of 2Fort. Here, the Spy is wielding the Tranquilizer Gun.
A Heavy firing his Minigun in front of the RED base in 2Fort. Note the older muzzle flash design and the gloveless Heavy.
A Soldier rocket jumping in 2Fort with a BLU Heavy and RED Soldier fighting in the background.
A Medic healing a Heavy in 2Fort.
The same nest, but with a Level 3 Sentry Gun.
A Pyro fighting a Soldier on a control point in Hydro.
An ÜberCharged Pyro and Medic assault a Heavy.
A Demoman about to gib a Scout in Well with Stickybombs. Here, there are nine stickies deployed.
RED team in Dustbowl.
TF2 Promotional Video Gallery
Meet the Heavy
The Heavy firing his gun in Dustbowl.
Trailer 2
A RED Engineer killing BLU Soldiers with his Level 1 Sentry Gun.
A BLU Spy un-cloaking behind the Sniper.
A headshot of the Spy after backstabbing the Sniper.
A BLU Scout sneaking up behind a RED Pyro. Note the old design for the Pyro's oxygen tank.
The Scout about to kill the Pyro with his Bat.
The Scout is about to pick up the Intelligence.
The Demoman firing his Grenade Launcher. A dead Pyro can be slightly seen.
The Demoman throwing his Dynamite Pack towards an attacking RED Sentry Gun.
A Rocket Jumping BLU Soldier.
TF2 Post-release gallery
Heavy and Medic in Viaduct.
The Heavy, from the Mac Update.
A RED Heavy and Pyro wearing Max's Severed Head.
A Scout wearing the Ellis' Cap and maggots being fried by the Soldier with a Frying Pan.
The Soldier wearing his Lumbricus Lid and wielding the Holy Hand Grenades.
The Pyro and the Scout wielding the Sharpened Volcano Fragment and the Sun-On-A-Stick.
The Soldier and the Engineer wearing hats from the April 7, 2011 Patch.
The Engineer and the Spy wearing Hetman's Headpiece and Janissary Ketche.
TFC Pre-release Gallery
TF2: Brotherhood of Arms Gallery
1998 design
Button from Sierra's Valve's Team Fortress and Homeworld previews.
1999 design
Notes
- The Pyro does not have a hose attached to the Flame Thrower in any of the current iteration pre-release screenshots.
- The Brotherhood of Arms pictures represent several stages of design before the entire game was scrapped.
- The promotional filename for Meet the Heavy was
WhoTouchedSasha.wmv.
|


