Difference between revisions of "List of maps (Classic)"
m (Changed "command point" to "control point") |
(Updated to add pics and look much more like the TF2 map list) |
||
| Line 1: | Line 1: | ||
| − | + | '''Maps''' are the settings where Team Fortress Classic gameplay takes place. Team Fortress Classic has three game modes (Capture the Flag, Control Point, and Assassination/Escort). | |
| − | + | {{anchor|CTF|ctf|Ctf}} | |
| − | + | == Capture the Flag == | |
| + | <!--{{main|Capture the Flag}}--> | ||
| − | ==Capture the Flag== | + | === Standard Capture the Flag === |
| − | + | {| class="wikitable grid" | |
| − | + | ! class="header" | | |
| − | + | ! class="header" | Map | |
| − | + | ! class="header" | File Name | |
| − | + | ! class="header" | Setting(s) | |
| + | |- | ||
| + | | [[File:2fort_TFC.png|100px|link=2Fort (Classic)|2Fort]] | ||
| + | | '''[[2Fort (Classic)|2 Fortresses]]''' | ||
| + | | 2fort | ||
| + | | Industrial | ||
| + | |- | ||
| + | | [[File:Badlands_TFC.png|100px|link=Badlands (Classic)|Badlands]] | ||
| + | | '''[[Badlands (Classic)|Badlands]]''' | ||
| + | | badlands | ||
| + | | Desert Canyon | ||
| + | |- | ||
| + | | [[File:Casbah_TFC.png|100px|link=Casbah (Classic)|Casbah]] | ||
| + | | '''[[Casbah (Classic)|Casbah]]''' | ||
| + | | casbah | ||
| + | | Town | ||
| + | |- | ||
| + | | [[File:Crossover_TFC.png|100px|link=crossover 2 (Classic)|Crossover 2]] | ||
| + | | '''[[crossover 2 (Classic)|Crossover]]''' | ||
| + | | crossover2 | ||
| + | | Industrial | ||
| + | |- | ||
| + | | [[File:Well_TFC.png|100px|link=Well_(Classic)|Well]] | ||
| + | | '''[[Well_(Classic)| The Well]]''' | ||
| + | | well | ||
| + | | Industrial | ||
| + | |} | ||
| − | ===Capture the Flag Variant=== | + | === Capture the Flag Variant === |
| − | + | {| class="wikitable grid" | |
| − | + | ! class="header" | | |
| − | + | ! class="header" | Map | |
| + | ! class="header" | File Name | ||
| + | ! class="header" | Setting(s) | ||
| + | |- | ||
| + | | [[File:Flagrun_TFC.png|100px|link=flagrun (Classic)|Flagrun]] | ||
| + | | '''[[flagrun (Classic)|Flagrun]]''' | ||
| + | | flagrun | ||
| + | | Desert Town | ||
| + | |- | ||
| + | | [[File:Rock2_TFC.png|100px|link=rock 2 (Classic)|The Rock]] | ||
| + | | '''[[rock 2 (Classic)|The Rock]]''' | ||
| + | | rock2 | ||
| + | | Prison | ||
| + | |} | ||
| − | ===Reverse Capture the Flag=== | + | === Reverse Capture the Flag === |
| − | + | {| class="wikitable grid" | |
| + | ! class="header" | | ||
| + | ! class="header" | Map | ||
| + | ! class="header" | File Name | ||
| + | ! class="header" | Setting(s) | ||
| + | |- | ||
| + | | [[File:Epicenter_TFC.png|100px|link=Epicenter (Classic)|Epicenter]] | ||
| + | | '''[[Epicenter (Classic)|Epicenter]]''' | ||
| + | | epicenter | ||
| + | | Mideast Town | ||
| + | |- | ||
| + | | [[File:Ravelin_TFC.png|100px|link=ravelin (Classic)|Ravelin]] | ||
| + | | '''[[ravelin (Classic)|Ravelin]]''' | ||
| + | | ravelin | ||
| + | | Industrial | ||
| + | |} | ||
| − | ===Football=== | + | === Football === |
| − | + | {| class="wikitable grid" | |
| + | ! class="header" | | ||
| + | ! class="header" | Map | ||
| + | ! class="header" | File Name | ||
| + | ! class="header" | Setting(s) | ||
| + | |- | ||
| + | | [[File:Push_TFC.png|100px|link=Push (Classic)|Push]] | ||
| + | | '''[[Push (Classic)|Push]]''' | ||
| + | | push | ||
| + | | Industrial | ||
| + | |} | ||
| − | + | {{anchor|CP|cp|Control point}} | |
| − | |||
| − | |||
| − | == | + | == Control Point == |
| − | + | <!--{{main|Control Point}}--> | |
| − | ==Deathmatch== | + | === Standard control point === |
| − | + | {| class="wikitable grid" | |
| + | ! class="header" | | ||
| + | ! class="header" | Map | ||
| + | ! class="header" | File Name | ||
| + | ! class="header" | Setting(s) | ||
| + | |- | ||
| + | | [[File:Warpath_TFC.png|100px|link=Warpath (Classic)]] | ||
| + | | '''[[Warpath (Classic)|Warpath]]''' | ||
| + | | warpath | ||
| + | | Desert | ||
| + | |- | ||
| + | | [[File:Canalzone2_TFC.png|100px|link=cz2 (Classic)]] | ||
| + | | '''[[cz2 (Classic)|Canalzone 2]]''' | ||
| + | | cz2 | ||
| + | | Sewers | ||
| + | |} | ||
| + | |||
| + | === Attack/Defend === | ||
| + | {| class="wikitable grid" | ||
| + | ! class="header" | | ||
| + | ! class="header" | Map | ||
| + | ! class="header" | File Name | ||
| + | ! class="header" | Setting(s) | ||
| + | |- | ||
| + | | [[File:Dustbowl0003.jpg|100px|link=Dustbowl (Classic)]] | ||
| + | | '''[[Dustbowl (Classic)|Dustbowl]]''' | ||
| + | | dustbowl | ||
| + | | Desert | ||
| + | |- | ||
| + | | [[File:Avanti_tfc.jpg|100px|link=Avanti (Classic)]] | ||
| + | | '''[[Avanti (Classic)|Avanti]]''' | ||
| + | | avanti | ||
| + | | Town | ||
| + | |} | ||
| + | |||
| + | == Assassination/Escort == | ||
| + | <!--{{main|Control Point}}--> | ||
| + | |||
| + | {| class="wikitable grid" | ||
| + | ! class="header" | | ||
| + | ! class="header" | Map | ||
| + | ! class="header" | File Name | ||
| + | ! class="header" | Setting(s) | ||
| + | |- | ||
| + | | [[File:Hunted_TFC.png|100px|link=Hunted (Classic)|Hunted]] | ||
| + | | '''[[Hunted (Classic)|Hunted]]''' | ||
| + | | hunted | ||
| + | | Military | ||
| + | |} | ||
| + | |||
| + | == Deathmatch == | ||
| + | <!--{{main|Control Point}}--> | ||
| + | The following maps are Half-life maps that can be copied to Team Fortress Classic. They are not fully supported by Team Fortress Classic as they can only be played as a four team deathmatch. | ||
| + | {| class="wikitable grid" | ||
| + | ! class="header" | | ||
| + | ! class="header" | Map | ||
| + | ! class="header" | File Name | ||
| + | ! class="header" | Setting(s) | ||
| + | |- | ||
| + | | [[File:Boot_camp_TFC.jpg|100px|link=Boot_camp (Classic)]] | ||
| + | | '''[[Boot_camp (Classic)|Boot Camp]]''' | ||
| + | | boot_camp | ||
| + | | Military | ||
| + | |- | ||
| + | | [[File:Bounce_TFC.jpg|100px|link=Bounce (Classic)]] | ||
| + | | '''[[Bounce (Classic)|Bounce]]''' | ||
| + | | bounce | ||
| + | | Desert Canyon | ||
| + | |- | ||
| + | | [[File:Crossfire_TFC.jpg|100px|link=Crossfire (Classic)]] | ||
| + | | '''[[Crossfire (Classic)|Datacore]]''' | ||
| + | | crossfire | ||
| + | | Military | ||
| + | |- | ||
| + | | [[File:Datacore_TFC.jpg|100px|link=Datacore (Classic)]] | ||
| + | | '''[[Datacore (Classic)|Datacore]]''' | ||
| + | | datacore | ||
| + | | Laboratory | ||
| + | |- | ||
| + | | [[File:Frenzy_TFC.jpg|100px|link=Frenzy (Classic)]] | ||
| + | | '''[[Frenzy (Classic)|Frenzy]]''' | ||
| + | | frenzy | ||
| + | | Laboratory | ||
| + | |- | ||
| + | | [[File:Gasworks_TFC.jpg|100px|link=Gasworks (Classic)]] | ||
| + | | '''[[Gasworks (Classic)|Gasworks]]''' | ||
| + | | gasworks | ||
| + | | Laboratory | ||
| + | |- | ||
| + | | [[File:Lambda_bunker_TFC.jpg|100px|link=Lambda_bunker (Classic)]] | ||
| + | | '''[[Lambda_bunker (Classic)|Lamda Bunker]]''' | ||
| + | | lambda_bunker | ||
| + | | Laboratory | ||
| + | |- | ||
| + | | [[File:rapidcore_TFC.jpg|100px|link=Rapidcore (Classic)]] | ||
| + | | '''[[Rapidcore (Classic)|Rapidcore]]''' | ||
| + | | rapidcore | ||
| + | | Laboratory | ||
| + | |- | ||
| + | | [[File:Snark_pit_TFC.jpg|100px|link=Snark_pit (Classic)]] | ||
| + | | '''[[Snark_pit (Classic)|Snark Pit]]''' | ||
| + | | snark_pit | ||
| + | | Laboratory | ||
| + | |- | ||
| + | | [[File:Stalkyard_TFC.jpg|100px|link=Stalkyard (Classic)]] | ||
| + | | '''[[Stalkyard (Classic)|Stalkyard]]''' | ||
| + | | stalkyard | ||
| + | | Military | ||
| + | |- | ||
| + | |||
| + | | [[File:Subtransit_TFC.jpg|100px|link=Subtransit (Classic)]] | ||
| + | | '''[[Subtransit (Classic)|Subtransit]]''' | ||
| + | | subtransit | ||
| + | | Laboratory | ||
| + | |- | ||
| + | | [[File:Undertow_TFC.jpg|100px|link=Undertow (Classic)]] | ||
| + | | '''[[Undertow (Classic)|Undertow]]''' | ||
| + | | undertow | ||
| + | | Laboratory | ||
| + | |} | ||
| − | |||
| − | |||
| − | |||
| − | |||
| − | |||
| − | |||
| − | |||
| − | |||
| − | |||
| − | |||
| − | |||
| − | |||
{{TFC Nav}} | {{TFC Nav}} | ||
{{TFC maps nav}} | {{TFC maps nav}} | ||
[[Category:Lists]][[Category:Maps (Classic)]] | [[Category:Lists]][[Category:Maps (Classic)]] | ||
Revision as of 07:17, 15 December 2010
Maps are the settings where Team Fortress Classic gameplay takes place. Team Fortress Classic has three game modes (Capture the Flag, Control Point, and Assassination/Escort).
Contents
Capture the Flag
Standard Capture the Flag
| Map | File Name | Setting(s) | |
|---|---|---|---|
|
2 Fortresses | 2fort | Industrial |
|
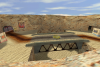
Badlands | badlands | Desert Canyon |
|
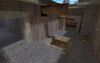
Casbah | casbah | Town |
|
Crossover | crossover2 | Industrial |
|
The Well | well | Industrial |
Capture the Flag Variant
| Map | File Name | Setting(s) | |
|---|---|---|---|
|
Flagrun | flagrun | Desert Town |

|
The Rock | rock2 | Prison |
Reverse Capture the Flag
| Map | File Name | Setting(s) | |
|---|---|---|---|
|
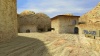
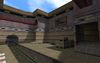
Epicenter | epicenter | Mideast Town |
|
Ravelin | ravelin | Industrial |
Football
| Map | File Name | Setting(s) | |
|---|---|---|---|

|
Push | push | Industrial |
Control Point
Standard control point
| Map | File Name | Setting(s) | |
|---|---|---|---|
|
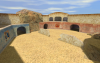
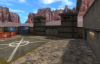
Warpath | warpath | Desert |
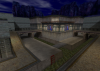
|
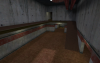
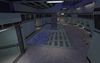
Canalzone 2 | cz2 | Sewers |
Attack/Defend
| Map | File Name | Setting(s) | |
|---|---|---|---|
|
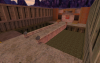
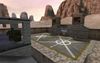
Dustbowl | dustbowl | Desert |
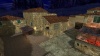
|
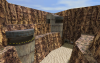
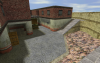
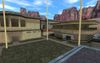
Avanti | avanti | Town |
Assassination/Escort
| Map | File Name | Setting(s) | |
|---|---|---|---|
|
Hunted | hunted | Military |
Deathmatch
The following maps are Half-life maps that can be copied to Team Fortress Classic. They are not fully supported by Team Fortress Classic as they can only be played as a four team deathmatch.
| Map | File Name | Setting(s) | |
|---|---|---|---|
|
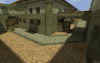
Boot Camp | boot_camp | Military |
|
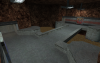
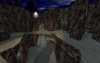
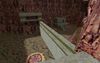
Bounce | bounce | Desert Canyon |
|
Datacore | crossfire | Military |
|
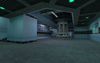
Datacore | datacore | Laboratory |
|
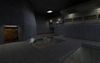
Frenzy | frenzy | Laboratory |
|
Gasworks | gasworks | Laboratory |
|
Lamda Bunker | lambda_bunker | Laboratory |
|
Rapidcore | rapidcore | Laboratory |
|
Snark Pit | snark_pit | Laboratory |
|
Stalkyard | stalkyard | Military |
|
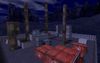
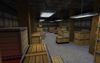
Subtransit | subtransit | Laboratory |
|
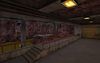
Undertow | undertow | Laboratory |
| |||||||||||
| ||||||||||||||