Difference between revisions of "Avanti (Classic)"
AquilArdens (talk | contribs) |
GrampaSwood (talk | contribs) m (Names are never explained on map pages, I don't see why it should be on here especially because the original doesn't provide a source. Moved the translation bit to trivia, as not everyone may know that.) |
||
| Line 6: | Line 6: | ||
}} | }} | ||
| − | '''Avanti''' is an [[List of maps (Classic)#Attack/Defend|Attack/Defend]] map in the ''[[Team Fortress Classic]]'' series of games. The map is set in a city | + | '''Avanti''' is an [[List of maps (Classic)#Attack/Defend|Attack/Defend]] map in the ''[[Team Fortress Classic]]'' series of games. The map is set in a city. |
== Objective == | == Objective == | ||
| Line 59: | Line 59: | ||
== Trivia == | == Trivia == | ||
[[File:Tf2 uphill.jpg|200px|right|thumb|A ''Brotherhood of Arms'' screenshot showing an area that was flipped and reused on Avanti.]] | [[File:Tf2 uphill.jpg|200px|right|thumb|A ''Brotherhood of Arms'' screenshot showing an area that was flipped and reused on Avanti.]] | ||
| + | * ''Avanti'' is Italian for "Forward". | ||
* Shooting the bell in the top of the Church tower causes the Church bells to sound. | * Shooting the bell in the top of the Church tower causes the Church bells to sound. | ||
* A few major glitches have been found with this map. One of them being that one can trap the offense team in spawn permanently for the rest of the round. | * A few major glitches have been found with this map. One of them being that one can trap the offense team in spawn permanently for the rest of the round. | ||
Revision as of 12:38, 24 September 2021
| Avanti (Classic) | |
|---|---|

| |
| Basic Information | |
| Developer(s): | Unknown |
| Map Overview | |
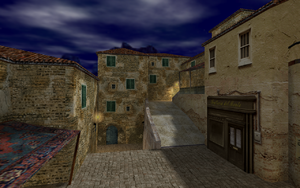
Avanti is an Attack/Defend map in the Team Fortress Classic series of games. The map is set in a city.
Contents
Objective
The attackers begin at the bottom of a hill and push uphill to seize a town through capturing command points. The defenders are given a Setup time to fortify their territory, and must hold off the attackers until time runs out. Once the attackers succeed, or time runs out, players are moved to the other team and the round restarts.
Gameplay
Command points are captured by taking the flag from the previous control point and carrying it to the next. When a command point is secured, the flag required to capture the next command point appears on top of it. For example, the flag needed to capture command point 3 will always spawn at command point 2. Dropped flags return after 15 seconds.
Scoring
- Attacking team - 10 points per command point captured.
- Defending team - Points are awarded over time for defending the Church.
Locations
Downtown
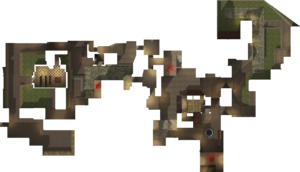
- Lowtown Spawn: The lowest section of town, the lower spawn is where the map begins. It is a large open area guarded by a hidden turret to deter enemies from entering. One team's flag spawns here and is returned here if the flag is dropped for more than 60 seconds and the team has not reached command point 1. A set of 2 gates open that allow the team to enter the Well area or to advance up a set of stairs toward the Midtown command point (2).
- The Well (command point 1): The Well is the first command point located almost immediately outside the lower team's spawn. The actual command point is located on a ledge that overlooks a well. The relatively narrow corridor up to the command point makes it a very strong choke point. There are several areas for Sentry Guns to be placed that will help to defend this command point. Be warned, some teams will put a Teleporter in the water of the Well. This tricky tactic makes it difficult to notice the Teleporter. Later on, if the defending team is patient and loses the 3rd command point, this Teleporter can be used to spawn camp the attacking team. Finally, this area has the map's only Backpack with grenades.
- The Ramp: The Ramp is part of the area that connects the Well with the sidewalk to the second command point. It is made up of two different areas. First, the more popular, and larger, direct ramp from the Well up towards the second command point. The Ramp also continues up to a dead-end platform that overlooks the Well. This area is sometimes home to a hidden Sentry Gun. The second route is a small set of stairs outside the lower spawn, this Ramp area bypasses the first command point and puts you out underneath a canopy on the sidewalks under the second command point.
Midtown
- Sidewalks: The sidewalks are a large open corridor by which a team must travel to get up to command point 2. There are several areas to defend second command point via Sentry Guns. The sidewalks have the two main entrances from the lower level (the Ramp and Stairs). There is a third entrance available by grenade/rocket jumping over a small railing next to the second command point. Since the flag must travel through this area in one form or another, it is often a highly contested area.
- Midtown (command point 2): Midtown is the area commonly referred to as command point 2. It consists of the command point itself and areas just beyond the sidewalk area. This area is accessible by the offensive team via coming up the ramp from the sidewalks or by rocket/grenade jumping above a small fence. This area is difficult to defend via a Sentry Gun being such close proximity to the command point and vulnerability to grenades. A better option is to put the Sentry Gun inside the tunnel or utilize the Demoman's Pipebomb Launcher.
- Tunnels: The Tunnels are a bottleneck immediately beyond the Midtown command point (2). There are two routes in and two routes out of the tunnels. The walkway by the command point and a platform overlooking the sidewalks both connect to a corridor. The doorway to the right and miniature Sniper deck to the left are the only exits. By this time, the attacking team has an advantage moving through this area; however, the major chokepoint is exiting the Tunnels. The use of explosives, grenades in particular, are able to aid in dispatching enemies quickly. If having trouble getting through the doorway, use both the doorway and the Sniper deck exits while throwing grenades.
- The Alley: The Alley is the most highly contested area of this map. Typically, the defending team holds on this part for the longest period of time. The alley is located between the Sniper's deck and Village command point (3). This corridor typically forces the advancing team to be in the open while carrying the flag up towards the command point. The advancing team can choose to go through the houses on the side of the Alley, but it forces the flag much further away from the point, thus increasing the likelihood of failure. The Alley is often defended by a barrage of grenades/pipebombs, rockets, and Sniper fire. Sentry Guns are typically located further back at the command point. Sometimes a defending Demoman will place a long fused Detpack below the Sniper deck in the Alley. This can sometimes catch a few unsuspecting enemies. The advancing team may use grenade/concussion grenade jumping to circumvent defenses.
Uptown
- Village (Command Point 3): The Village is command point 3, and it is frequently the most difficult point to capture. It consists of the corridor beyond the Alley, the Ramps/Ledges overlooking the 3rd command point, and command point 3 itself. It is highly contested because the offensive team does not have direct access to the control point. The command point is covered and it is difficult to rocket/grenade jump onto the control point. This makes Sentry Guns more effective at defending this point. The offensive team must attack in waves to capture the command point. Taking out defense is key. Use grenades if having trouble. The next waves must push onto the point before defenses can be set up again. Defensively, load up this area with Sentry Guns, Demomen with pipebomb traps, and other high damage defenses.
- The Yard: The Yard is the grassy area that surrounds the Church command point (4). This area is frequented by class battles, usually with only some influence of Sentry Guns closer to the main entrance of the church. The Yard has a destructible area that can be opened only by an offensive Demoman's Detpack. The breached area can only be sealed once the offensive team takes the church. Opening this area to the Church is often the best choice as it allows an alternative direct access to the final control point. The only downside to doing this is that if this technique is unsuccessful, it allows the defending team to freeze the flag by the breach, potentially wasting precious time. There are also a few Backpacks that are located in the yard for ammo and health.
- The Church (command point 4): The final point is located at the top of town. The Church is a highly contested bottleneck that is the primary focus of the map. It is a traditional church that even has pews and a bell tower. If the defensive team is pushed back to this point it is a wise idea to have a couple Sentry Guns defending the inside and outside of the Church. Due to its narrow construction, there are only a few safe places to set up Sentry Guns within the Church. If breached, be sure to defend the corridor that leads outside as it is a direct way to the point. It usually gives the offensive team enough time around the Sentry Guns to capture the command point. It also allows grenades and pipebombs to be "spammed" into this area destroying Sentry Guns and killing the defending team. Try not to allow this to happen.
- Uptown Spawn: The Uptown Spawn is a large, open, simple spawn area. It is defended by a single hidden turret located in a barrel. The defending team spawns here when they are pushed back to the 3rd and 4th command points. Otherwise, the defending team spawns in the Yard outside of the Church or the alley by command point 3. Unlike the Downtown Spawn, the Uptown area does not contain Backpacks for ammo or health.
Gallery
Trivia
- Avanti is Italian for "Forward".
- Shooting the bell in the top of the Church tower causes the Church bells to sound.
- A few major glitches have been found with this map. One of them being that one can trap the offense team in spawn permanently for the rest of the round.
- The map is partially based on the map 'Italy' from Team Fortress 2: Brotherhood of Arms and shares many textures with the cut map.
See also
| ||||||||||||||


