Difference between revisions of "Gullywash"
m (→Locations) |
|||
| Line 11: | Line 11: | ||
== Locations == | == Locations == | ||
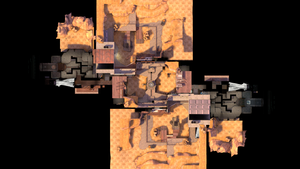
| + | [[Image:Gullywash overview.jpg|thumb|top|Overview of the map.(Large file)]] | ||
=== Control Point 3 === | === Control Point 3 === | ||
The control point consists of a balcony that is connected to a bridge, and a valley underneath. | The control point consists of a balcony that is connected to a bridge, and a valley underneath. | ||
Revision as of 11:29, 10 April 2011
| Gullywash | |
|---|---|
| 300px | |
| Basic Information | |
| Developer(s): | Unknown |
| Map Overview | |
Gullywash is a standard control point map. Set in a desert environment, the map features the BLU and RED teams fighting for control of the only source of water in the area. To win, a team must capture all five control points.
This map is commonly used for competitive 6v6 matches in ETF2L, ESEA and ozfortress competitions. Other maps include Badlands, Granary, Gravel Pit, Freight and Obscure.
Contents
Locations
Control Point 3
The control point consists of a balcony that is connected to a bridge, and a valley underneath.
- Entrances: Each team has 2 paths to the bridge. One entrance leads to the balcony on the far side of the bridge to the opposing team. Each team also has an access route to the valley to the right of the bridge.
- Ramps: There are two ramps either side of the area with lead up to the raised balconies from the valley below.
- Cover: There are boxes located on each of the balconies, to the left of the main balcony entrance. These provide cover from enemy fire.
- Capture Point: The capture point itself is raised off the ground and only accessible by Scout, Soldier and Demoman. However the capture zone extends past this raised area, so all classes can capture it. The raised point gives a good height advantage for defending.
Control Points 2 & 4
The second capture point is located in an open area, surrounded by many high vantage points. The capture zone for the point is split over two levels, with one at ground level and another at the same level as the high balconies surrounding the area.
- Entrances From Control Point 3: There are two entrances from capture point 3, the main balcony entrance leads to an open area with the capture point at the far side. The entrance from the valley exits to the right of the point (for defenders).
- Capture Point: The split level control point has a ramp on the right (for attackers) to access the higher level. The higher level also has a capture zone, so attackers can capture and have an offensive advantage over defenders on ground level.
- Balcony: Located to the left (for attackers) of the capture point there is a raised balcony, allowing defenders to cover the capture point. This balcony is accessible from the higher level of the capture point structure.
Control Points 1 & 5
The final control points are located inside the complexes at either end of the map. The layout of the final point is similar to that of Badlands.
- Entrances From Control Point 2 & 4: There are three paths to the final control point from the second or forth control point. Two entrances are on the ground level, and lead into a lobby area before the room housing the final capture point. The other route goes down the side to the final control point, acting as a flanking route.
- Lobby: The two ground level routes access a lobby area before the final room. This lobby area has 3 entrances into the final room, two raised and one at ground level. All the entrances to the final room from the lobby area are located at the far end of the room from the capture point.
- Flanking Route: The route from the raised balcony enters the final room on the right side (for defenders). The entrance itself if a ramp that leads to the ground level. This flanking route also provides access to an underground area.
- Undergound Area: Under the final room there is an underground section, it has exits on the flanking route and directly behind the final capture point.
Screenshots
- CP Gullywash 1.jpg
- CP Gullywash 3.jpg
Notes
- Gullywash is particularly similar to Badlands in both appearance and layout.
Easter Eggs
- Multiple Hats, Weapons, Ducks and a Frog can be found throughout the map.
- A Tyrant's Helm can be found on the balcony near BLU second point.
- A Pyro's Beanie can be found on top of some lockers just past RED first spawn.
- A Ye Olde Baker Boy can be found at capture point 3, very high above the BLU main entrance on top of a box.
- A Professional's Panama can be found just outside BLU first spawn, on the right ontop of a barrel.
- A bottle of Jarate can be found outside RED first spawn, outside the window on the side path to the right.
- In both RED and BLU first spawn there is a Stainless Pot in the dressing cabinet on the left.
- There are two of the second rejected Scottish Resistance sticky models in the map, which can be moved around.
Additional links
- Development thread: http://forums.tf2maps.net/showthread.php?t=6254
| ||||||||||||||||||||||||||||||||||||||||||||||||

