Difference between revisions of "Community Coal Town strategy"
m (Auto: EnforceCapitalization(Cloak) (Review RC#1136348)) |
(→{{class link|Engineer}}) |
||
| Line 76: | Line 76: | ||
=== {{class link|Engineer}} === | === {{class link|Engineer}} === | ||
| − | *There are many good places for Sentry Guns in Coal Town. The building to the right of the robots' spawn (from players' perspective) fares well in most cases. | + | *There are many good places for Sentry Guns in Coal Town. The building to the right of the robots' spawn (from players' perspective) fares well in most cases. A tried and true strategy is getting the mini-sentry upgrade, then setting yourself up in the little passage between the robot-spawn wall and the building to the left (player's perspective). Set up everything, get a pyro to come with you, and the engie gets half the kills. One problem, though, is the sentry busters. Pick up your main sentry if one is alerted, and move to the pre-suggested roof. |
*The [[Wrangler]] is exceptionally powerful in this level. Place a Sentry Gun on the building directly opposite the robot spawn, and you can deal a lot of damage from a safe distance. Few things can match the sheer power of a Wrangled Sentry at that distance. | *The [[Wrangler]] is exceptionally powerful in this level. Place a Sentry Gun on the building directly opposite the robot spawn, and you can deal a lot of damage from a safe distance. Few things can match the sheer power of a Wrangled Sentry at that distance. | ||
Revision as of 22:07, 28 August 2012
| “You are so small! Is funny to me!” This article is a stub. As such, it is not complete. You can help Team Fortress Wiki by expanding it. |
| Community Coal Town strategy | |
|---|---|

| |
| Basic Information | |
| Developer(s): | Unknown |
| Map Info | |
| Environment: | Desert |
| Map Photos | |
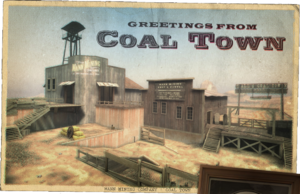
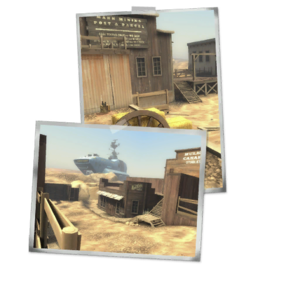
This article is about Community Coal Town strategy.
Contents
General (All Classes)
- If you can afford to, prioritize Giant robots and Tanks over smaller robots. A Sentry Gun or two will keep the latter at bay.
- The most intense combat will take place out in the open, in front of the robots' spawn area. As such, close combat classes tend to have a hard time here without strong team support. They are still important for collecting credits, though.
- There are many good places for Sentry Guns in Coal Town, so they and their Engineers must be protected. If Sentry Busters get the best of them, your team's ability to defend will quickly be cut short.
- There are two hazard areas in the map, which Pyros may find convenient to airblast enemies in to.
- The building facing the robots' entry point makes a great sniping position, especially if you invest in piercing shots. Just watch out for Spies, as you'll usually be the first target they come across.
Class-specific strategy
 Scout
Scout
- Always focus on collecting credits from destroyed robots. It will keep you healthy and you will be a great help to your team.
- The open terrain of this map generally suits a Scout, because he can make the most of his dodging ability.
- If a lot of robots are grouped together, keep your distance until their numbers wane. When it is safe enough, rush in to collect the credits.
- The Fan O'War can be very effective if you manage to mark a Giant robot for Death, since a very large amount of firepower is needed to destroy them.
- Tossing upgraded Mad Milk at tight clusters of robots will both grant the health-gaining effect for you and your allies, and slow them down as well. This makes them very easy targets.
 Soldier
- The buildings on either side of the robot spawn area are good places to get a high ground advantage.
- The Black Box is generally a very effective weapon for Mann vs Machine mode, because it can easily hit multiple robots at once and return a large amount of health in doing so.
- When spamming rockets into the horde, it's quite easy to run out of ammo at a bad moment. Stay close to ammo pickups or Dispensers.
- Always be wary for packs of Scout robots. Soldiers are especially vulnerable if they manage to close the distance, so stay near your team.
 Pyro
Pyro
- The open space can prove difficult for a Pyro unless a player buys certain upgrades. Purchasing an upgrade to gain health upon a kill will greatly improve your survivability.
- If it's too difficult to get close, use one of your Flare Guns to rack up some damage and soften up the horde. The Detonator and Scorch Shot are very effective due to their explosive flares.
- An ÜberCharge canteen works especially well on a Pyro. Although short, it allows a player to charge into a pack of robots and deal some major damage. It also draws fire away from your teammates for a short time.
- The Phlogistinator can be very powerful when used at the right moment. Mmmph can be built up extremely quickly in Mann vs Machine, allowing for repeated crit opportunities.
- You are the best line of defense against a Sentry Buster. Your airblast can prevent it from advancing while your teammates destroy it.
- The compression blast can also be used to push robots into the bottomless pit near the bomb hatch. If you kill the bomb carrier in this way, you will even force the robots to carry the bomb from the start of the level again.
 Demoman
- The Demoman's explosive weapons are a force to be reckoned with against tight groups of robots. Stickybomb carpets can wipe out an entire pack if timed properly.
- In Coal Town, your Stickybomb Launcher generally fares better than the Grenade Launcher in the wide-open spaces. The latter still proves very useful against Giant robots and Tanks, though.
- Avoid getting too close to groups of robots. You are at a disadvantage in close combat, and can be quite easily picked off if your allies are not nearby.
- Take full advantage of sources of ammo. Your weapons will chew through ammo quickly, especially in Mann vs Machine, where you will be firing almost constantly.
- The left stairwell on the starting stretch of the map makes for a perfect place to set up and maintain a Sticky Trap, running the width of the road. This is very useful for stalling the bomb as well as taking out Medics and heavily damaging giant Soldiers and Heavies.
 Heavy
Heavy
- The Heavy does well here, owing to his ability to switch targets quickly and never needing to reload. With the right upgrades, the Heavy is a strong defensive pivot.
- As powerful as the Heavy is, he is an easy target for any kind of robot with a ranged weapon. Stay close to sources of healing, such as a Medic or Dispenser.
- Your Minigun is most powerful at close range, but don't let this encourage you to get up close and personal with the robot horde. You can upgrade your weapon to make up for reduced damage at longer ranges.
- Natascha works well to slow down important targets, such as Sentry Busters and the bomb carrier.
 Engineer
- There are many good places for Sentry Guns in Coal Town. The building to the right of the robots' spawn (from players' perspective) fares well in most cases. A tried and true strategy is getting the mini-sentry upgrade, then setting yourself up in the little passage between the robot-spawn wall and the building to the left (player's perspective). Set up everything, get a pyro to come with you, and the engie gets half the kills. One problem, though, is the sentry busters. Pick up your main sentry if one is alerted, and move to the pre-suggested roof.
- The Wrangler is exceptionally powerful in this level. Place a Sentry Gun on the building directly opposite the robot spawn, and you can deal a lot of damage from a safe distance. Few things can match the sheer power of a Wrangled Sentry at that distance.
- The Frontier Justice can easily gain a full 35 revenge crits from a single Sentry in this mode. If your Sentry remains intact at the end of a wave, destroy it and build a new one to gain the crits for use. You never know when you may need to defend yourself or help pick off an important target.
- Don't hesitate to haul your building(s) away if the pressure becomes too great. Because buildings reconstruct instantly in Mann vs Machine mode, relocating is much easier than usual.
- Dispensers are very important for your teammates as well in this mode. Ammo is used up more quickly than ever here.
- Sentry Busters are as big a threat as ever, but in Coal Town you can see one coming from a distance. This should give you enough time to prepare for its almost-inevitable arrival.
- Be on the lookout for Spy robots when they appear in a wave. They are fairly easy to root out if you consciously look for them.
 Medic
Medic
 Sniper
 Spy
Spy
- The left and right forks leading from the robot spawn make good choke points if you need to sap a group of robots and backstab them all yourself because your teammates are otherwise occupied.
- Snipers will tend to spawn from the alleys to the left and right of the main robot spawn ledge; watch for them and eliminate them as quickly as possible.
- The stairs leading to the rooftops on either side of the starting robot path are excellent escape routes if you need breathing room to redisguise and your Cloak watch isn't charged. The center rooftop complex between the starting street and the bomb site is good too, but support robots will sometimes use that area so be careful.
