Difference between revisions of "Poses"
(→Marketing poses) |
|||
| Line 1: | Line 1: | ||
'''Poses''' refer to the various unique stances or gestures that the in-game [[classes]] showcase outside general gameplay but can be found within the game files, often as a basis for marketing artwork. These often consist of the numerous stances that the individual classes assume on the class-selection screen, or the various pictures of in-game models gesturing on the various update pages of the [[TF2 Official Website]]. | '''Poses''' refer to the various unique stances or gestures that the in-game [[classes]] showcase outside general gameplay but can be found within the game files, often as a basis for marketing artwork. These often consist of the numerous stances that the individual classes assume on the class-selection screen, or the various pictures of in-game models gesturing on the various update pages of the [[TF2 Official Website]]. | ||
| − | == | + | == Marketing poses == |
=== {{Class link|Scout}} === | === {{Class link|Scout}} === | ||
{{Taunt | {{Taunt | ||
| image = Scout marketing pose 1.png | | image = Scout marketing pose 1.png | ||
| − | | weapon-1 = | + | | weapon-1 = Scattergun |
| description = The Scout depicting a well-known glitch in his double jumping, which would cause his legs to flail uncontrollably (known as [[Crazy Legs]]). Seen in the blog post, [http://teamfortress.com/post.php?id=3368&p=3 Better Late Than Never]. Used by Valve as an example shot to announce they had "fixed" this long-standing glitch. However, the glitch is not actually fixed, as it still occurs (although much less frequently). | | description = The Scout depicting a well-known glitch in his double jumping, which would cause his legs to flail uncontrollably (known as [[Crazy Legs]]). Seen in the blog post, [http://teamfortress.com/post.php?id=3368&p=3 Better Late Than Never]. Used by Valve as an example shot to announce they had "fixed" this long-standing glitch. However, the glitch is not actually fixed, as it still occurs (although much less frequently). | ||
}} | }} | ||
| Line 17: | Line 17: | ||
{{Taunt | {{Taunt | ||
| image = Soldier marketing pose 2.png | | image = Soldier marketing pose 2.png | ||
| − | | weapon-1 = | + | | weapon-1 = Gunboats |
| description = The Soldier, triumphing over the Demoman to earn the Gunboats. Used in the [http://www.teamfortress.com/war/victory/ WAR! Victory page]. | | description = The Soldier, triumphing over the Demoman to earn the Gunboats. Used in the [http://www.teamfortress.com/war/victory/ WAR! Victory page]. | ||
}} | }} | ||
| Line 23: | Line 23: | ||
{{Taunt | {{Taunt | ||
| image = Soldier marketing pose 3.png | | image = Soldier marketing pose 3.png | ||
| − | | weapon-1 = | + | | weapon-1 = Direct Hit |
| description = The Soldier poses with his new weapon, the Direct Hit, which is missing from its raw model shot. Used in the [http://www.teamfortress.com/soldierupdate/index.htm#item_1 WAR! Soldier page]. | | description = The Soldier poses with his new weapon, the Direct Hit, which is missing from its raw model shot. Used in the [http://www.teamfortress.com/soldierupdate/index.htm#item_1 WAR! Soldier page]. | ||
}} | }} | ||
| Line 29: | Line 29: | ||
{{Taunt | {{Taunt | ||
| image = Soldier marketing pose 4.png | | image = Soldier marketing pose 4.png | ||
| − | | weapon-1 = | + | | weapon-1 = Buff Banner |
| description = The Soldier poses with an active [[Buff Banner]]. Used in [http://www.teamfortress.com/soldierupdate/index.htm#item_3 WAR! Soldier page]. | | description = The Soldier poses with an active [[Buff Banner]]. Used in [http://www.teamfortress.com/soldierupdate/index.htm#item_3 WAR! Soldier page]. | ||
}} | }} | ||
| Line 41: | Line 41: | ||
{{Taunt | {{Taunt | ||
| image = Demomanmarketingpose1.png | | image = Demomanmarketingpose1.png | ||
| − | | weapon-1 = | + | | weapon-1 = Eyelander |
| − | | weapon-2 = | + | | weapon-2 = Chargin' Targe |
| description = The Demoman holds his [[Eyelander]] high, and prepares to decapitate an enemy. Apart from the facial expression, this pose matches the taunt animation for the Eyelander. Used in the [http://www.teamfortress.com/demomanupdate/index.htm#item_1 WAR! Demoman page.] | | description = The Demoman holds his [[Eyelander]] high, and prepares to decapitate an enemy. Apart from the facial expression, this pose matches the taunt animation for the Eyelander. Used in the [http://www.teamfortress.com/demomanupdate/index.htm#item_1 WAR! Demoman page.] | ||
}} | }} | ||
| Line 48: | Line 48: | ||
{{Taunt | {{Taunt | ||
| image = Demomanmarketingpose2.png | | image = Demomanmarketingpose2.png | ||
| − | | weapon-1 = | + | | weapon-1 = Scottish Resistance |
| description = The Demoman relaxes, holding his [[Scottish Resistance]] loosely. Used in the [http://www.teamfortress.com/demomanupdate/index.htm#item_3 WAR! Demoman page.] | | description = The Demoman relaxes, holding his [[Scottish Resistance]] loosely. Used in the [http://www.teamfortress.com/demomanupdate/index.htm#item_3 WAR! Demoman page.] | ||
}} | }} | ||
| Line 54: | Line 54: | ||
{{Taunt | {{Taunt | ||
| image = Demomanmarketingpose3lose.png | | image = Demomanmarketingpose3lose.png | ||
| − | | weapon-1 = | + | | weapon-1 = Bottle |
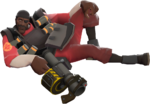
| description = The Demoman looks down, defeated. The bottle he is clutching in his right hand is missing from the raw shot. Used in the [http://www.teamfortress.com/war/victory/ WAR! Victory page.] | | description = The Demoman looks down, defeated. The bottle he is clutching in his right hand is missing from the raw shot. Used in the [http://www.teamfortress.com/war/victory/ WAR! Victory page.] | ||
}} | }} | ||
| Line 66: | Line 66: | ||
{{Taunt | {{Taunt | ||
| image = Heavy marketing pose 1.png | | image = Heavy marketing pose 1.png | ||
| − | | weapon-1 = | + | | weapon-1 = Minigun |
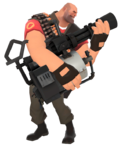
| description = The Heavy shows love to his minigun [[Sasha]]. This pose, or possibly a similar pose, was used for the VI Day image posted on the [[official blog]] with the conclusion of the WAR! Update. [http://www.teamfortress.com/images/posts/viday.jpg] | | description = The Heavy shows love to his minigun [[Sasha]]. This pose, or possibly a similar pose, was used for the VI Day image posted on the [[official blog]] with the conclusion of the WAR! Update. [http://www.teamfortress.com/images/posts/viday.jpg] | ||
}} | }} | ||
Revision as of 03:41, 8 March 2014
Poses refer to the various unique stances or gestures that the in-game classes showcase outside general gameplay but can be found within the game files, often as a basis for marketing artwork. These often consist of the numerous stances that the individual classes assume on the class-selection screen, or the various pictures of in-game models gesturing on the various update pages of the TF2 Official Website.
Marketing poses
 Scout
Scout
 |
Associated item | Description |
|---|---|---|
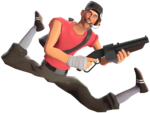
| The Scout depicting a well-known glitch in his double jumping, which would cause his legs to flail uncontrollably (known as Crazy Legs). Seen in the blog post, Better Late Than Never. Used by Valve as an example shot to announce they had "fixed" this long-standing glitch. However, the glitch is not actually fixed, as it still occurs (although much less frequently). |
 Soldier
 |
Associated item | Description |
|---|---|---|
| None | The Soldier, prepared for war. Used in the WAR! Soldier page. |
 |
Associated item | Description |
|---|---|---|
| The Soldier, triumphing over the Demoman to earn the Gunboats. Used in the WAR! Victory page. |
 |
Associated item | Description |
|---|---|---|
| The Soldier poses with his new weapon, the Direct Hit, which is missing from its raw model shot. Used in the WAR! Soldier page. |
 |
Associated item | Description |
|---|---|---|
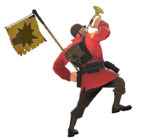
| The Soldier poses with an active Buff Banner. Used in WAR! Soldier page. |
 |
Associated item | Description |
|---|---|---|
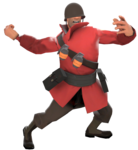
| None | Unused. Assumed to have been for the Equalizer's section on the WAR! Soldier page, or as a 'Loss' pose on the WAR! Victory page if the Soldier had lost the battle. If it's the former, then it was likely scrapped due to obvious model flaws. |
 Demoman
 |
Associated items | Description |
|---|---|---|
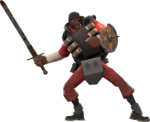
| The Demoman holds his Eyelander high, and prepares to decapitate an enemy. Apart from the facial expression, this pose matches the taunt animation for the Eyelander. Used in the WAR! Demoman page. |
 |
Associated item | Description |
|---|---|---|
| The Demoman relaxes, holding his Scottish Resistance loosely. Used in the WAR! Demoman page. |
 |
Associated item | Description |
|---|---|---|
| The Demoman looks down, defeated. The bottle he is clutching in his right hand is missing from the raw shot. Used in the WAR! Victory page. |
 |
Associated item | Description |
|---|---|---|
| None | The Demoman gestures to the sky in victory. Would have been used in the WAR! Victory page if the Demoman had won the war. |
 Heavy
Heavy
 |
Associated item | Description |
|---|---|---|
| The Heavy shows love to his minigun Sasha. This pose, or possibly a similar pose, was used for the VI Day image posted on the official blog with the conclusion of the WAR! Update. [1] |