Difference between revisions of "Classes"
(Added class icons.) |
m (Linked the new PNG role images) |
||
| Line 26: | Line 26: | ||
All nine classes are grouped into three specific combat types, offensive, defensive, and support, but all can be played outside their assigned role depending on your choice of [[Team strategy|strategy]]. | All nine classes are grouped into three specific combat types, offensive, defensive, and support, but all can be played outside their assigned role depending on your choice of [[Team strategy|strategy]]. | ||
===Offensive {{Icon class|class=scout|link=Scout}} {{Icon class|class=soldier|link=Soldier}} {{Icon class|class=pyro|link=Pyro}}=== | ===Offensive {{Icon class|class=scout|link=Scout}} {{Icon class|class=soldier|link=Soldier}} {{Icon class|class=pyro|link=Pyro}}=== | ||
| − | [[Image:Tf2_offense. | + | [[Image:Tf2_offense.png|border|150px|right]] |
Offensive classes ([[Scout]], [[Soldier]] and [[Pyro]]) are the main attack force of the team. Whether it's assaulting [[control points]] or grabbing the [[Intelligence]], these classes specialize in causing mayhem and destruction. Scouts have the ability to capture points twice as fast as any other class and can get there with their top-tier speed. Soldiers pack a punch with their devastating [[Rocket Launcher]]s. Pyros can stir up a [[fire|fiery havoc]] in enemy ranks with an ambush or [[Compression blast|extinguish]] their own burning friends. | Offensive classes ([[Scout]], [[Soldier]] and [[Pyro]]) are the main attack force of the team. Whether it's assaulting [[control points]] or grabbing the [[Intelligence]], these classes specialize in causing mayhem and destruction. Scouts have the ability to capture points twice as fast as any other class and can get there with their top-tier speed. Soldiers pack a punch with their devastating [[Rocket Launcher]]s. Pyros can stir up a [[fire|fiery havoc]] in enemy ranks with an ambush or [[Compression blast|extinguish]] their own burning friends. | ||
{{anchor|Defensive classes}} | {{anchor|Defensive classes}} | ||
===Defensive {{Icon class|class=demoman|link=Demoman}} {{Icon class|class=heavy|link=Heavy}} {{Icon class|class=engineer|link=Engineer}}=== | ===Defensive {{Icon class|class=demoman|link=Demoman}} {{Icon class|class=heavy|link=Heavy}} {{Icon class|class=engineer|link=Engineer}}=== | ||
| − | [[Image:Tf2_defense. | + | [[Image:Tf2_defense.png|border|150px|right]] |
Defensive classes ([[Demoman]], [[Heavy]] and [[Engineer]]) serve to inhibit enemy access and to hold enemies back from vital points on the map. In total, Defense has the most firepower of all the groups, and specializes in expelling all this power at one time. Demomen can safeguard areas with [[sticky bomb]]s that he can detonate when enemies come by. Heavies are great for [[Minigun|mowing down]] incoming troops and pushing back forces. Heavies can also [[Natascha|keep enemies in an area while whittling their health]] for teammates to finish off. Engineers can build [[Sentry Gun]]s with amazing power, as well as [[Teleporter]]s and [[Dispensers]] to support their team. | Defensive classes ([[Demoman]], [[Heavy]] and [[Engineer]]) serve to inhibit enemy access and to hold enemies back from vital points on the map. In total, Defense has the most firepower of all the groups, and specializes in expelling all this power at one time. Demomen can safeguard areas with [[sticky bomb]]s that he can detonate when enemies come by. Heavies are great for [[Minigun|mowing down]] incoming troops and pushing back forces. Heavies can also [[Natascha|keep enemies in an area while whittling their health]] for teammates to finish off. Engineers can build [[Sentry Gun]]s with amazing power, as well as [[Teleporter]]s and [[Dispensers]] to support their team. | ||
{{anchor|Support classes}} | {{anchor|Support classes}} | ||
===Support {{Icon class|class=medic|link=Medic}} {{Icon class|class=sniper|link=Sniper}} {{Icon class|class=spy|link=Spy}}=== | ===Support {{Icon class|class=medic|link=Medic}} {{Icon class|class=sniper|link=Sniper}} {{Icon class|class=spy|link=Spy}}=== | ||
| − | [[Image:Tf2_support. | + | [[Image:Tf2_support.png|border|150px|right]] |
Support classes ([[Medic]], [[Sniper]] and [[Spy]]) make the backbone of any team. They offer the offensive and defensive classes an extra edge in battle and can help turn the tide of the game. Whether crippling the enemy advance from behind or keeping teammates healed, the support classes are always handy to have around. Medics have the power to [[heal]] teammates and overheal them to 150% of their maximum health. Snipers can take out enemies from a distance and use [[Jarate]] to extinguish fires and increase the damage dealt by their teammates. Spies can infiltrate enemy lines undetected, [[Electro Sapper|disable buildings]] and [[Backstab|assassinate]] critical threats. | Support classes ([[Medic]], [[Sniper]] and [[Spy]]) make the backbone of any team. They offer the offensive and defensive classes an extra edge in battle and can help turn the tide of the game. Whether crippling the enemy advance from behind or keeping teammates healed, the support classes are always handy to have around. Medics have the power to [[heal]] teammates and overheal them to 150% of their maximum health. Snipers can take out enemies from a distance and use [[Jarate]] to extinguish fires and increase the damage dealt by their teammates. Spies can infiltrate enemy lines undetected, [[Electro Sapper|disable buildings]] and [[Backstab|assassinate]] critical threats. | ||
==Health points== | ==Health points== | ||
Revision as of 18:18, 17 January 2011
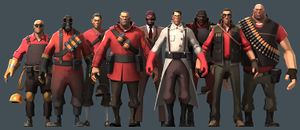
There are nine official classes that can be played in Team Fortress 2. The classes are as follows:
Unused
Note the Civilian class cannot be played in the game.
Contents
Class roles
All nine classes are grouped into three specific combat types, offensive, defensive, and support, but all can be played outside their assigned role depending on your choice of strategy.
Offensive 


Offensive classes (Scout, Soldier and Pyro) are the main attack force of the team. Whether it's assaulting control points or grabbing the Intelligence, these classes specialize in causing mayhem and destruction. Scouts have the ability to capture points twice as fast as any other class and can get there with their top-tier speed. Soldiers pack a punch with their devastating Rocket Launchers. Pyros can stir up a fiery havoc in enemy ranks with an ambush or extinguish their own burning friends.
Defensive 


Defensive classes (Demoman, Heavy and Engineer) serve to inhibit enemy access and to hold enemies back from vital points on the map. In total, Defense has the most firepower of all the groups, and specializes in expelling all this power at one time. Demomen can safeguard areas with sticky bombs that he can detonate when enemies come by. Heavies are great for mowing down incoming troops and pushing back forces. Heavies can also keep enemies in an area while whittling their health for teammates to finish off. Engineers can build Sentry Guns with amazing power, as well as Teleporters and Dispensers to support their team.
Support 


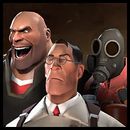
Support classes (Medic, Sniper and Spy) make the backbone of any team. They offer the offensive and defensive classes an extra edge in battle and can help turn the tide of the game. Whether crippling the enemy advance from behind or keeping teammates healed, the support classes are always handy to have around. Medics have the power to heal teammates and overheal them to 150% of their maximum health. Snipers can take out enemies from a distance and use Jarate to extinguish fires and increase the damage dealt by their teammates. Spies can infiltrate enemy lines undetected, disable buildings and assassinate critical threats.
Health points
A Medic may overheal someone to 150% of their normal health maximum. Classes can refill their health through a number of ways.
Class health points comparison table
| Class | Normal Max | Over-healed Max |
|---|---|---|
(with the Sandman equipped) (with the Special Delivery pack equipped) |
125 110 150 |
185 165 225 |
| 200 | 300 | |
| 175 | 260 | |
| 20px Demoman (with the Eyelander or HHHH equipped, 0 heads) (with the Eyelander or HHHH equipped, 1 head) (with the Eyelander or HHHH equipped, 2 heads) (with the Eyelander or HHHH equipped, 3 heads) (with the Eyelander or HHHH equipped, 4+ heads) (with the Claidheamh Mòr equipped) |
175 150 165 180 195 210 160 |
260 225 245 270 290 315 240 |
(within 30 seconds after consuming Dalokohs Bar) (with the Warrior's Spirit equipped) |
300 350 280 |
450 450 420 |
(with the Gunslinger equipped) |
125 150 |
185 225 |
(with the Vita-Saw equipped) |
150 140 |
225 210 |
(with the Darwin's Danger Shield equipped) |
125 150 |
185 225 |
| 125 | 185 | |
| Civilian | 50 | 75 |
Speed
Speed is measured in-game using the command cl_showpos set to 1, measuring in velocity units (v). The standard movement speed is 100% (that of Spy, Sniper, Pyro, and Engineer). Note forward speed is obtained by pressing the forward, left or right keys, backward speed obtained by pressing the backward key, while crouching speed is found by pressing the crouch button. Backward speed is generally calculated by 90% of the class's forward speed, while crouching is at 33%. Forward and backward speeds are, however, the same when crouching or charging/zooming as a Sniper. During humiliation all classes on the winning team will move 10% faster and all on the losing team will move 10% slower.
For Spies, disguising as a slower class (Soldier, Demoman & Heavy) will accurately reduce the Spy's speed to the appropriate speed of the class he is disguised as (e.g. Spy disguised as Heavy will move to the speed of Heavy) and remain at that speed unless he undisguises or Cloaks. Disguising as a faster class (Scout, Medic, etc.) however will not make the Spy move faster and will continue to move at 100% speed.
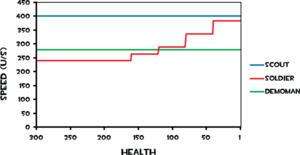
A Demoman wielding the Eyelander will gain approximately 8% on his speed with every killing blow or "head". With a Chargin' Targe he charges at 250% of the standard movement speed. Soldier's speed while wielding the Equalizer increases by 10% with every loss of 40 health below 200.
The Horseless Headless Horsemann is not a class, but is shown here for comparison.
Class speed comparison table
| Class | Forward | (abs) | Backward | (abs) | Crouched | (abs) |
|---|---|---|---|---|---|---|
| 133% | 400v | 120% | 360v | 44.4% | 133.33v | |
(while using the Equalizer with 121-160 hp) |
80%
88%
|
240v
264v
|
72%
79%
|
216v
238v
|
26.6%
29.3%
|
80v
88v
|
(with the Gas Jockey's Gear pack equipped) |
100%
110% |
300v
330v |
90%
99% |
270v
297v |
33.3%
36.7% |
100v
110v |
| 20px Demoman (while charging with the Chargin' Targe) |
93%
250% |
280v
750v |
84%
N/A |
252v
N/A |
31.1%
N/A |
93.33v
N/A |
(with Minigun revved) |
77% 37% |
230v 110v |
69% 33% |
207v 99v |
25.5% 0% |
76.67v 0v |
(while hauling any building at any level, Combat Mini-Sentry Guns included) |
100%
75% |
300v
225v |
90%
67.5% |
270v
202.5v |
33.3%
25% |
100v
75v |
| 107% | 320v | 96% | 288v | 35.5% | 106.67v | |
(with Sniper Rifle or Sydney Sleeper zoomed) |
100% 27%
|
300v 80v
|
90% 27%
|
270v 80v
|
33.3% 1.33%
|
100v 4v
|
| 100% | 300v | 90% | 270v | 33.3% | 100v | |
| Civilian | 100% | 300v | 90% | 270v | N/A | N/A |
| Horseless Headless Horsemann | 133% | 400v | N/A | N/A | N/A | N/A |
abs - absolute figures in velocity units (v)
Size
All classes have varying height, with the Engineer being the shortest and the Heavy being the tallest class. Classes also have various builds and general body sizes; each class has their own individual set of shaped hitboxes used for bullet-based attacks.
However, for the purposes of collisions with objects, players, melee attacks, and projectiles, all classes are considered to be the same width and height. This means the Huntsman will act as a headshot independently of a class' actual head height. This also means that no class has an advantage or disadvantage when it comes to navigating corners or tight spaces.
| |||||


