Difference between revisions of "Glacier"
NihonTiger (talk | contribs) (→Screenshots: Added new screenshots) |
(Flavor, CE) |
||
| Line 7: | Line 7: | ||
[http://forums.tf2maps.net/showthread.php?t=6684 TF2Maps.net]}} | [http://forums.tf2maps.net/showthread.php?t=6684 TF2Maps.net]}} | ||
| − | '''Glacier''' is an Attack/Defend [[Control Point]] map where [[RED]] | + | '''Glacier''' is an Attack/Defend [[Control Point]] map where [[RED]] plays defense and [[BLU]] plays offense. Once the BLU team has captured a point, it is locked and can not be retaken by RED. There are three control points: A, B, and C. A and B are directly accessible from the BLU base, C can only be reached through A or B. Likewise, RED's base sits adjacent to point C. |
| − | Glacier is set in an Arctic environment. Elements like the large, cracked chunks of ice forming steps at Control Point B and the ice cave in which Control Point C | + | Glacier is set in an Arctic environment. Elements like the large, cracked chunks of ice forming steps at Control Point B and the ice cave in which Control Point C is situated give Glacier a slightly different look than most other Arctic maps. |
| − | BLU must capture all three points. Control points A and B must be captured before C can be. RED must defend the points. RED wins if any of the points | + | BLU must capture all three points. Control points A and B must be captured before C can be. RED must defend the points. RED wins if any of the points remain uncaptured when time runs out. Time is added to the countdown if BLU captures any of the points. |
Glacier was mentioned during [http://www.teamfortress.com/classless/day02.php Day 2] of the [[August 13, 2009 Patch | Classless Update]], where it was acknowledged for its snowfall theme in an edit to the Day 2 page. The page's original text had noted that [[Viaduct]] was the first-ever Team Fortress 2 map to take place during a snowfall. A [http://www.teamfortress.com/post.php?id=2732 Team Fortress 2 blog post] later referenced the text change, which acknowledged Glacier and other snowfall-themed maps. | Glacier was mentioned during [http://www.teamfortress.com/classless/day02.php Day 2] of the [[August 13, 2009 Patch | Classless Update]], where it was acknowledged for its snowfall theme in an edit to the Day 2 page. The page's original text had noted that [[Viaduct]] was the first-ever Team Fortress 2 map to take place during a snowfall. A [http://www.teamfortress.com/post.php?id=2732 Team Fortress 2 blog post] later referenced the text change, which acknowledged Glacier and other snowfall-themed maps. | ||
| Line 27: | Line 27: | ||
=== Control Point A === | === Control Point A === | ||
| − | Control Point A | + | Control Point A occupies what appears to be a loading dock, surrounded on two sides by buildings, one side by a reinforced rock wall and on the fourth side by shallow water. The point itself is under an overhang. The buildings flanking A are multiple stories tall, with the accessible second floors featuring openings that look down upon Control Point A. |
=== Control Point B === | === Control Point B === | ||
| − | Control Point B is located in a lowered area on what appears to be a fragmenting glacier or ice pack | + | Control Point B is located in a lowered area on what appears to be a fragmenting glacier or ice pack atop frigid water. A large tower constructed from ice and wooden planks sits in the middle of the map, though its top is inaccessible. The broken ice chunks are bordered on three sides by rocky cliffs, with broken pieces of ice forming a set of stairs up to RED's main entrances to B. The fourth side possesses a stone bridge extending from the entrance nearest BLU's spawn. At the end of the bridge, a small red wooden building offers some shelter. A small, hollowed-out ice cave sits in the middle of the map near the control point. |
=== Control Point C === | === Control Point C === | ||
| − | Control Point C is located on an elevated ice "platform" | + | Control Point C is located on an elevated ice "platform" within a large ice cave. There are two entrances to this point each from Control Points A and B (i.e. four total), while RED's spawn is located opposite the entrances from Control Point A. |
== Strategy == | == Strategy == | ||
| Line 41: | Line 41: | ||
=== Control Point A === | === Control Point A === | ||
*The overhanging roof at Control Point A provides some protection for RED Engineers. Use it to your advantage and build [[Sentry Gun]]s in the rooms to either side of the point. | *The overhanging roof at Control Point A provides some protection for RED Engineers. Use it to your advantage and build [[Sentry Gun]]s in the rooms to either side of the point. | ||
| − | *The two upper rooms near the point offer BLU | + | *The two upper rooms near the point offer BLU cover and vantage points overlooking the point. Just beware of enemies attacking from behind, namely [[Spy|Spies]]. |
=== Control Point B === | === Control Point B === | ||
| − | *Though the cliff above the control point offers a good spot for building [[Sentry Gun]]s, the prime placement is in the small ice cave on the ground level next to the capture point | + | *Though the cliff above the control point offers a good spot for building [[Sentry Gun]]s, the prime placement is in the small ice cave on the ground level next to the capture point, which offers considerably more cover from enemy fire. |
**However, the cliff above the control point offers sightlines directly into BLU's main entrances to B, making it an excellent perch for [[Sniper]]s and Engineers using the [[Wrangler]]. | **However, the cliff above the control point offers sightlines directly into BLU's main entrances to B, making it an excellent perch for [[Sniper]]s and Engineers using the [[Wrangler]]. | ||
| − | **BLU can employ similar strategy from their entrance tunnels, but their Sentry Guns will be more vulnerable, as [[Demoman|Demomen]] and [[Soldier]]s can attack them from below. | + | **BLU can employ similar a strategy from their entrance tunnels, but their Sentry Guns will be more vulnerable, as [[Demoman|Demomen]] and [[Soldier]]s can attack them from below. |
| − | * | + | *[[Pyro]]s can make use of their [[compression blast]] ability to push enemies off into the waters around Control Point B, which will instantly kill anyone who touches them. |
| − | *Watch out for | + | *Watch out for [[Stickybomb]]s around the BLU door leading to Control Point B. They can be hidden behind the concrete frame of the door easily. |
| − | *If they've captured Control Point A, BLU can | + | *If they've captured Control Point A, BLU can flank RED by sending Spies and Pyros around to B through Control Point C. Even if they don't reach B, they can distract RED long enough to allow others to capture. |
=== Control Point C === | === Control Point C === | ||
| − | *The ceiling here allows for some rocket and sticky jumping, but in general, it is not advised | + | *The ceiling here allows for some rocket and sticky jumping, but in general, it is not advised. Instead, focus firepower on the point itself. |
*BLU Engineers can build Teleporters, Dispensers and Sentry Guns for staging inside the tunnels between the two previous points and Control Point C. | *BLU Engineers can build Teleporters, Dispensers and Sentry Guns for staging inside the tunnels between the two previous points and Control Point C. | ||
*Snipers with the Sniper Rifle equipped are generally less effective on the final point due to its design than those equipped with the Huntsman. | *Snipers with the Sniper Rifle equipped are generally less effective on the final point due to its design than those equipped with the Huntsman. | ||
Revision as of 23:18, 1 March 2011
| Glacier | |
|---|---|

| |
| Basic Information | |
| Developer(s): | {{{map-developer}}} |
Glacier is an Attack/Defend Control Point map where RED plays defense and BLU plays offense. Once the BLU team has captured a point, it is locked and can not be retaken by RED. There are three control points: A, B, and C. A and B are directly accessible from the BLU base, C can only be reached through A or B. Likewise, RED's base sits adjacent to point C.
Glacier is set in an Arctic environment. Elements like the large, cracked chunks of ice forming steps at Control Point B and the ice cave in which Control Point C is situated give Glacier a slightly different look than most other Arctic maps.
BLU must capture all three points. Control points A and B must be captured before C can be. RED must defend the points. RED wins if any of the points remain uncaptured when time runs out. Time is added to the countdown if BLU captures any of the points.
Glacier was mentioned during Day 2 of the Classless Update, where it was acknowledged for its snowfall theme in an edit to the Day 2 page. The page's original text had noted that Viaduct was the first-ever Team Fortress 2 map to take place during a snowfall. A Team Fortress 2 blog post later referenced the text change, which acknowledged Glacier and other snowfall-themed maps.
Contents
Locations
Control Point A
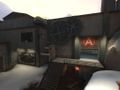
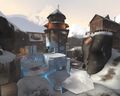
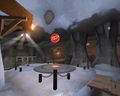
Control Point A occupies what appears to be a loading dock, surrounded on two sides by buildings, one side by a reinforced rock wall and on the fourth side by shallow water. The point itself is under an overhang. The buildings flanking A are multiple stories tall, with the accessible second floors featuring openings that look down upon Control Point A.
Control Point B
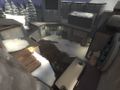
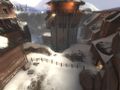
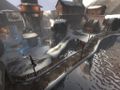
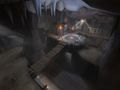
Control Point B is located in a lowered area on what appears to be a fragmenting glacier or ice pack atop frigid water. A large tower constructed from ice and wooden planks sits in the middle of the map, though its top is inaccessible. The broken ice chunks are bordered on three sides by rocky cliffs, with broken pieces of ice forming a set of stairs up to RED's main entrances to B. The fourth side possesses a stone bridge extending from the entrance nearest BLU's spawn. At the end of the bridge, a small red wooden building offers some shelter. A small, hollowed-out ice cave sits in the middle of the map near the control point.
Control Point C
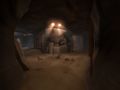
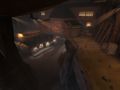
Control Point C is located on an elevated ice "platform" within a large ice cave. There are two entrances to this point each from Control Points A and B (i.e. four total), while RED's spawn is located opposite the entrances from Control Point A.
Strategy
Control Point A
- The overhanging roof at Control Point A provides some protection for RED Engineers. Use it to your advantage and build Sentry Guns in the rooms to either side of the point.
- The two upper rooms near the point offer BLU cover and vantage points overlooking the point. Just beware of enemies attacking from behind, namely Spies.
Control Point B
- Though the cliff above the control point offers a good spot for building Sentry Guns, the prime placement is in the small ice cave on the ground level next to the capture point, which offers considerably more cover from enemy fire.
- However, the cliff above the control point offers sightlines directly into BLU's main entrances to B, making it an excellent perch for Snipers and Engineers using the Wrangler.
- BLU can employ similar a strategy from their entrance tunnels, but their Sentry Guns will be more vulnerable, as Demomen and Soldiers can attack them from below.
- Pyros can make use of their compression blast ability to push enemies off into the waters around Control Point B, which will instantly kill anyone who touches them.
- Watch out for Stickybombs around the BLU door leading to Control Point B. They can be hidden behind the concrete frame of the door easily.
- If they've captured Control Point A, BLU can flank RED by sending Spies and Pyros around to B through Control Point C. Even if they don't reach B, they can distract RED long enough to allow others to capture.
Control Point C
- The ceiling here allows for some rocket and sticky jumping, but in general, it is not advised. Instead, focus firepower on the point itself.
- BLU Engineers can build Teleporters, Dispensers and Sentry Guns for staging inside the tunnels between the two previous points and Control Point C.
- Snipers with the Sniper Rifle equipped are generally less effective on the final point due to its design than those equipped with the Huntsman.
Screenshots
BLU spawn
BLU spawn
Control Point A
Control Point A
Control Point B
Control Point B (with ice cave shown)
Bridge at Control Point B
Path from Control Point A to Control Point C
Control Point C
Control Point C
RED spawn at Control Point C
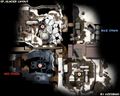
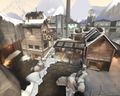
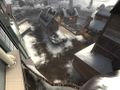
Overhead view of cp_glacier


Changelog
- Compiled with more accurate lighting and model lightmaps
- Added cables to the lights at C
- Fixed an exploit which allowed any class to get onto the bridge at B simply by jumping
- Added more detail to the rock walls at C and B
- Added some misc detailing to B
- Added collision to the lightposts at the B bridge
- Optimised a little more all over
- Fixed two light bleeds
cp_glacier release candidate 6 (8 December 2009):
- Detailed some more in various places
- Added a new room at B in the building
Additional Links
| ||||||||||||||||||||||||||||||||||||||||||||||||