Difference between revisions of "Snakewater (competitive)/ru"
(→Контрольная Точка 1/5) |
(→Контрольная Точка 1/5) |
||
| Line 16: | Line 16: | ||
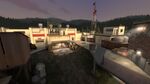
[[Image:Snakewater last 2.jpg|thumb| Final Point.]] | [[Image:Snakewater last 2.jpg|thumb| Final Point.]] | ||
* '''Левый проход''': Один из основых путей,который объединит атаку других игроков справа.Также,там есть поднятая доска для прикрытия от снайперов и пулемётчиков также,как и забор расположенный дальше. | * '''Левый проход''': Один из основых путей,который объединит атаку других игроков справа.Также,там есть поднятая доска для прикрытия от снайперов и пулемётчиков также,как и забор расположенный дальше. | ||
| − | * ''' | + | * '''Нижняя зона/Основная зона''':Это место,где разведчики и,возможно,подрывники будут удерживать позиции,в то время как игроки справа и слева объединятся.Это место находиться внизу и имеет большой проход непосредственно к точке.Также,невозможно занять эту позицию,если на точке стоит пулемётчик.Ещё,там есть лестница,которая ведёт к Правому проходу для быстрого бегства. |
* '''Правый проход''':Это ещё один путь который объеденяет игроков.Там есть огромная скала и высоко расположенный дом,который очень полезен для обороняющиеся команды,чтобы просматривать зоны,которые атакующие команды могут попробывать занять. | * '''Правый проход''':Это ещё один путь который объеденяет игроков.Там есть огромная скала и высоко расположенный дом,который очень полезен для обороняющиеся команды,чтобы просматривать зоны,которые атакующие команды могут попробывать занять. | ||
* '''Drop Down''':Эта область находится у левого края,и имеет крошечную дверь,с лестницей сделанной из коробок.Это место полезно только для обороняющиеся команды чтобы защищать выход,или для шпионов. | * '''Drop Down''':Эта область находится у левого края,и имеет крошечную дверь,с лестницей сделанной из коробок.Это место полезно только для обороняющиеся команды чтобы защищать выход,или для шпионов. | ||
Revision as of 20:04, 27 July 2011
Статьи о режиме соревнования ещё находятся в разработке. Вносите предложения на страницу обсуждения.
 | В данный момент статья переводится с английского языка на русский. Если для перевода необходима помощь, напишите об этом на странице обсуждения или обратитесь к участникам, правившим эту статью (просмотрев её историю). |

Карта Snakewater содержит базы для каждой команды, открытую вторую точку для командного захвата и центральную точку.
The objective of Snakewater is to control all five capture points. Each team starts with their second and final control points locked, leaving only the middle point available.
Snakewater is not an official map released in the game, and as such is mostly only seen in competitive play.
Содержание
Place names
All place names are given from the perspective of defense as their primary name (in terms of left and right), except obviously for the middle control point.
Контрольная Точка 1/5

- Левый проход: Один из основых путей,который объединит атаку других игроков справа.Также,там есть поднятая доска для прикрытия от снайперов и пулемётчиков также,как и забор расположенный дальше.
- Нижняя зона/Основная зона:Это место,где разведчики и,возможно,подрывники будут удерживать позиции,в то время как игроки справа и слева объединятся.Это место находиться внизу и имеет большой проход непосредственно к точке.Также,невозможно занять эту позицию,если на точке стоит пулемётчик.Ещё,там есть лестница,которая ведёт к Правому проходу для быстрого бегства.
- Правый проход:Это ещё один путь который объеденяет игроков.Там есть огромная скала и высоко расположенный дом,который очень полезен для обороняющиеся команды,чтобы просматривать зоны,которые атакующие команды могут попробывать занять.
- Drop Down:Эта область находится у левого края,и имеет крошечную дверь,с лестницей сделанной из коробок.Это место полезно только для обороняющиеся команды чтобы защищать выход,или для шпионов.
- Лобби:Это самая главная зона для атакующей команды,где она занимает позиции и имеет входы для всех стратегически важных точек для атаки.
Main/Lower
Лобби


Control Points 2/4

Some people refer to this control point as «Yard» because of it's open area.
- Ramp: One main area that allows access into the lobby, it's located in the middle area of the yard.
- Cliff/Drop Down: This area is covered behind a fence, as well as having access to the lobby. This area is called drop down because a player can go through lobby and go through the pit at the top, getting easy access to being behind the team. The Medic will typically stand in this area with his pocket.
- Control Point: The control point itself is located more to the left of the whole area. The cliff is located above it, so the combo can drop down to defend it. A train cart is located to the right of the point. A fence and a house protect the team from direct spam, however they can both be jumped over.
- Flank: The flank is located to the far right. This area is not so much of a flank, as it does not take the offenders directly behind the defenders, however this spot is hard to guard directly, but is less open.
- Main: This is the main area where most combos will push into the point. It is located right in front of the team and acts as a push area.
- House: This area is mostly used as a sniping area for attacking Snipers. It is located above the main area. Players can drop down from it, but it is difficult to get back up.
Control Point 3
Because of the symmetrical style of Snakewater (and almost all 5 Point Control Point maps), each team share a similar landmark/location on their respective sides of the middle point. A popular method to counteract this is to add the prefix «our» or «their», e.g. «their Choke». Some players may also refer the middle point as «Mid».
- Control Point: The middle point is comprised of two sheds with outstretched planks, containing a log that connects the two. This log hangs directly over the middle point.
- Sheds: The sheds are located to the left and right of the point. Inside both of the sheds are areas that lead to either team's respective right area.
- Choke: This is the area where the combo typically emerges from. It is straight behind the little house vertical to the point.
- Right: The area that is directly to the right of the choke. Players can go through the sheds to get to this area for each respective team. Teams will typically push through right instead of through choke because of it's tactical advantages.
- Houses: These areas are located somewhat behind the planks on top of the shed and are often used to spam down on the point and sheds.
The roll-out
- Demoman
- The usual route for the Demoman will see him Sticky jump out of spawn, and going into lobby. After reaching lobby, he can jump from the Ramp into the house. This can be a tricky maneuverer to perform, so an alternate route would be to go into the main area below house instead. You'll lose your height advantage, however you might be really weak if you go through house.
- Soldier
- The snakewater rollout is comparably easier than Badlands rollouts. The Soldier should jump out of spawn and go right into lobby. Once reaching lobby, he should continue to go right and drop down into the flank area. After that, continue right and the point is right there.