Stoneyridge
| Stoneyridge | |
|---|---|

| |
| Basic Information | |
| Developer(s): | Unknown |
Stoneyridge is a Team Fortress 2 custom map created by members of the Penny Arcade forum community. This two point, attack/defend map (similar to cp_gorge,) is a snowy, night-time map which includes hints of the construction pack.
The main objective is for Blu to capture the control points while Red defends.
Contents
Locations
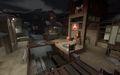
Control Point A
Control Point A is located above a low lying rail-road track that has been piled up with snow. It is backed with a large stack of barrel pallets and is open on the other 3 sides. A building leading to B is located behind it.
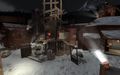
Control Point B
Control Point B is perched inside of a massive tower stretching towards the sky with a ominously large bomb dangling above it. There is a staircase leading up on the right side of it from the front, and two from both directions on the back. Red team's spawn room
Strategy
Control Point A
- You have greater penetration as an attacker if you take the lower route below A, but you are more vulnerable to attackers if they notice you. There is a full health pack waiting down here as well.
- Going to A while attacking, the right side path has great cover and penetration, but opens you up to being pushed off the ridge to your death. There is a medium health pack here.
- Defenders should hold the concrete building in front of A as long as possible, as this is the most direct route to the control point
Control Point B
- As an attacker, taking the upper path through the wooden building will push you far into enemy territory, but you are very vulnerable when you get there. Once you drop down, you only have a small health pack in the spytech room, before you get to the tower.
- Taking the right path behind control point A is the most direct route to the tower, but you are very exposed with limited options, but this route should not be underestimated in the heat of battle.
- A well placed sentry in the building directly behind the tower, looking towards the point, and a sentry on the ledge overlooking the spy tech room is a great way to lock down the tower for defense. However, you will want to keep an eye on any longer ranged attacks that may come.
- The tower provides an excellent height advantage for defenders, but be wary of getting pushed off into the pit below.
Gallery
Control Point A
Control Point B
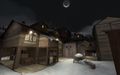
Blu Team's Starting Spawn
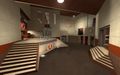
Spy tech Room near Control Point B


Changelog
(Released 7/8/12)
- Redesigned previous blue barn in front of blue begining spawn
- Further optimized map, especially around A
- Added two seconds to Red respawn time
- Added new blue forward spawn entrance
- Now takes two seconds longer (for a scout) to cap A
- Redesigned covered area looking over B - now larger, better for sentry spots
- Added railing for area going up to the back end of B
- Updated construction area behind A
- Raised back wall in Rocket Room (by B) to allow for better teleporter placement for Red
- Changed small health to medium in Blue upper staging area going to B
- Added medium ammo and small health to new sentry area facing B
- Lowered ammo from full to medium next to area coming out of the front of Red spawn
- Cleaned up ridge
- Blue now spawn slightly farther away from B in blue forward spawn
- Updated lighting all over map
- Deleted any unneccary props
- Updated prop fade distance for many props
- Fixed random displacement problems
- Altered various props and overlays
- Cleaned up brush work and detailing around map
- Made slight changes to skybox
- Changed load screen image
Additional Links
| ||||||||||||||||||||||||||||||||||||||||||||||||