Process (competitive)
This article is for competitive play, based on the standard community competitive format. For the generic article on this topic, see: Process.
The community competitive scene changes frequently. Some or all info may be outdated.
The community competitive scene changes frequently. Some or all info may be outdated.
Process is a popular Control Point map. It is usually played in 6s. The goal of the map is to capture all 5 of the control points.
Contents
Locations
Control Point 3
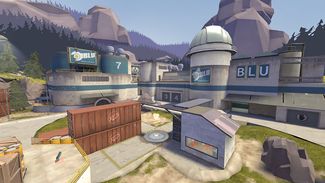
The Control Point is set in a large depression, surrounded by rocks and shipping containers
- Entrances: Each team has 3 entrances to the point. One behind the crates, one that leads to a platform near the crates, and a choke that leads out onto the rocks
- Platform: The platform exit directly looks over the point, and provides a nice height advantage to the player.
- Behind: The exit behind the crates is perpendicular to the platform, and adjacent to the rocks. It provides direct access to both team's platforms
- Choke: The choke is located in the corners of the mid. The sight line is blocked by a large rock.
- Control Point: The point is in the center of the area, flanked by two shipping containers. There's a small bridge connecting both crates directly above the point, that gives an aggressive player control of the point
Control Points 2 & 4
This control point has 3 connectors from mid. It is made up of a spire overlooking a valley, with a balcony on the opposite side.
- Entrances: There are multiple entrances to the point. There are two, above and below each other, from the platform exit on mid. There are two more from the back side entrance to mid, and a final entrance through the choke.
- Spire: The spire hold the control point. It is connected to the balcony by a bridge, and to the valley by a set of stairs.
- Valley: The valley is overshadowed by the spire. It separates the spire from the choke and backside entrance to mid.
- Balcony: The balcony is behind the spire, and leads to the last point. It is a very defensible position, only being shorter than the spire itself.
Control Points 1 & 5
The last control point is made up of a platform with the control point on it, overlooked by a balcony. It is connected to the second by hallways and a lobby.
- Lobby: The lobby is connected directly to the balcony of second, and spills onto the platform on last. It contains a medium health and ammo pack
- Platform: The platform sits directly in the middle of the room. It is overlooked by the balcony.
- Balcony: The balcony sits on the back of the room, above everything else. It provides a defensible position for the team
- Hallways: On one side of the last, there is a set of hallways leading to the second point. They are a prime defensive position being difficult to push into.
Tactics
Control Point 3
Mid Fight
- Most teams hold on their side of the crates
- The Roamer Should bomb the enemy combo as they come out of choke, or hold on top of the crates and spam
- The Pocket should hold on top of the crates and spam, but be ready to fall back to defend the medic. Alternatively, the pocket can play more defensively and hold with the medic
- The Demoman should hold on the platform, and spam across the point
- The scouts should rush the other team and attempt to kill the combo
Attacking
- Depending on the Ubercharge, teams will usually hold by the choke closer to the other team's second
- The combo should uber through the choke and engage the other combo and do damage
- The roamer should bomb through the sewer or the computer room, and try to cut off a retreating combo or demo
- The demo should follow the combo through the choke and spam on the combo
- Scouts should follow through sewer or computer room, and attempt to kill the other team's scouts and trap the combo
Defending
- If the other team has more players, or an Uber advantage, it is advised to hold far back, by your choke. If you have the Ubers are equal, you should hold by their choke
- The combo should hold on the health platform
- The demo should stay near big rock, and keep spamming through choke so that the other team doesn't walk in
- The roamer and scouts should be in Computer Room and Sewer. Most prefer to have the Roamer in sewer
Control Points 2 & 4
Attacking
- Most teams hold close on the choke, but some prefer to move over to Computer room in preparation for the push
- The combo should uber through their preferred entrance. The pocket should jump the spire and try to force off the other team's players
- The demo should follow the combo in. When the Pocket jumps, he should get the remaining uber, and attempt to spam out the other players as they hold, or cut them off as they retreat
- The roamer and scouts should jump in and fight the other team. As the combo pushes the other team out, they are supposed to cap.
