 | 這頁目前正處於被翻譯至繁體中文的狀態。
如果你會說繁體中文,請在討論頁中留下你的大名,或透過查看歷史紀錄跟有編輯這頁的用戶聯繫。
|
狙擊手能夠利用一發完全充能的 爆頭殺死任何職業的能力,讓他成為在遠距離時極具威脅性的職業。一般而言,由於缺乏具足夠威脅性的近戰武器,因此與狙擊手接戰時的距離是越近越好。
然而,當你處在遠距離時,你應該藉由不規則移動、混合交替使用蹲下與跳躍來躲避狙擊手的攻擊;但這方法在對抗老練的狙擊手時卻不見得這麼有效。
除了逃跑或是利用較不具威脅性的武器(像是衝鋒槍 或是近戰武器)與你交戰之外,一名被拉近距離的狙擊手並沒有其他有效的對策可以對抗敵人。但是根據裝備的不同,一名狙擊手可以對敵人造成流血或是小爆擊的效果。另外,一名裝備獵人長弓的狙擊手雖然失去了原本擅於長距離的優勢,但卻可以快速地發射箭矢並加強了狙擊手在中至近距離的交戰能力。
General
 Role Role
|
- Make use of any available cover; if you must expose yourself, keep moving or else you will be an easy target.
- A Sniper is most effective when he fights from a distance, so close the gap between you and him to increase your chances of survival.
|
 Health Health
|
- The Sniper has a rather low amount of health; he is quite vulnerable at close range and will generally lose a fight against sturdier classes.
|
 Speed Speed
|
- The Sniper walks and runs at an average pace, but he lags behind his team's main force for protection. In addition, he moves very slowly while scoped in. This makes the Sniper's ability to flee from fights rather poor.
|
 Power Power
|
- The Sniper's primary weapons are unaffected by damage ramp-up and fall-off, making the Sniper very dangerous even at long ranges. They also have the ability to kill players instantly, so try to not get hit by them at all.
|
Weapon Specific
A list of useful tidbits about the Sniper's tools, and how to counter them.
Primary Weapons
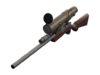
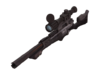
狙擊槍
|
- A Sniper has a very limited field of vision while he scopes in with his Sniper Rifle; ambush him from the side or the back. A Sniper's aim will be disrupted if he takes damage while scoped, so try to hurt him if you cannot escape his sight.
- Firing projectiles (such as rockets) may intimidate a Sniper into dodging them, denying him the time to take a clean shot. Keep moving from cover to cover, and limit your time out in the open.
- If you believe Snipers are watching the upcoming path, find an alternate one to bypass or attack them, if possible.
|
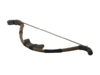
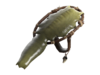
獵人長弓
|
- While Huntsman arrows are nowhere as fast as bullets, they are just as dangerous, even moreso the closer the Sniper is to his target. Keep moving to deny him an accurate shot.
- If you can, make him airborne, as this will prevent him from firing an arrow until he lands. Note that arrows can be lit, and can be reflected (though this takes considerable skill, so a Pyro should just conserve its ammo). Also be wary of rushing blindly into corridors, as a Sniper may ambush you with the Huntsman's taunt-kill.
|
雪梨沉睡者
|
- Don't underestimate the Sydney Sleeper due to its inability to perform headshots; it can reach full charge faster than the standard Sniper Rifle (a fully charged bodyshot can kill classes that have 150 HP or less), and will coat you in Jarate when charged over 50%. The Jarate effect proves to be very hazardous if you have just run into enemy forces, since they will likely target you now.
|
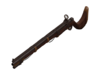
巴剎長槍
|
- Snipers spawning with the Bazaar Bargain are at a disadvantage, requiring a longer time to charge high-damage shots. However, any headshot will hasten the Bazaar Bargain's charge rate; make sure to take constant cover.
- Scoped bodyshots and misses reduce the bonus - if you can't make a Sniper miss, at least force him to strike your body instead of your head.
|
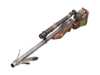
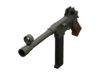
神授貫殺獵槍
|
- The tracer rounds this weapon fires makes locating a Sniper much easier; however, fully utilize cover as you approach him, for a fully charged shot will cause massive damage.
- Be wary of lining up with another teammate out in the open; a Sniper may succeed in shooting (and killing) you both.
- The Machina can only fire while scoped, so attack the Sniper up close; close enough so that the Sniper cannot get an accurate shot, yet just outside his melee range.
|
Secondary Weapons
衝鋒槍
|
- The Submachine Gun is surprisingly accurate, yet ineffective at longer ranges. If a Sniper attempts to attack you with it, try to move away from him while attacking with a more powerful weapon.
- The SMG only contains three clips of ammo, so it may not take long before the Sniper must resort to another weapon.
|
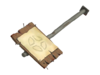
劍脊野豬盾
|
- The Razorback deprives a Sniper of his Secondary weapon, so attack him just outside his melee range.
- This item may discourage Spies from backstabbing him, but it shouldn't deter you from attacking him from outside his view anyway.
|
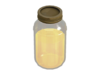
瓶手道
|
- It is often best to retreat for cover if covered in Jarate, as you will most likely be pursued by the Sniper's teammates, who can now inflict Mini-Crits on you. Jarate can be removed by extended Healing, entering water, or touching a Supply Cabinet.
|
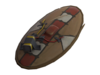
達爾文鱷魚盾
|
- Do not underestimate the health of a Sniper using the Shield; take advantage of his lack of a secondary weapon and kill him outside of his melee range.
- As a Spy, do not be intimidated by the presence of the Darwin's Danger Shield on a potential victim; the item does not prevent backstabs like the Razorback does.
|
Melee Weapons
Kukri / Saxxy / Conscientious Objector
|
- A Sniper will generally only use this weapon as a last resort. Simply back up and finish the Sniper off.
|
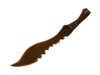
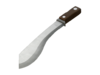
部落戰刀
|
- The Tribalman's Shiv does less damage upfront, meaning you will probably kill the Sniper in melee combat. However, the bleeding causes it to do more damage over time, so have an idea of where health kits and Medics are before facing a Sniper wielding one.
- Do not let the Sniper get close to you if you have been doused in Jarate, as bleeding is affected by Mini-Crits.
|
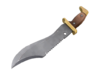
布伊刀
|
- A Sniper will typically pull out this weapon after dousing you in Jarate. Wait for the effect to fade away before confronting him, or keep your distance as you attack, preferably with ranged weapons.
- Beware facing a Sniper with the Bushwacka out while under the effects of Crit-a-Cola, the Buffalo Steak Sandvich, or if he is buffed by the Buff Banner; he will deal critical hits instead of Mini-Crits.
- Because of his increased fire vulnerability, use fire to dispatch the Sniper more quickly.
|
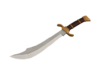
王中之王
|
- Be careful in engaging in prolonged melee combat with a Sniper wielding the Shahanshah. At over 50% health, the weapon will do 25% less damage than normal; once a Sniper's health is under 50%, the weapon will do 25% more damage than normal.
- A Sniper wielding this weapon may purposely run into harm's way in order to deal serious damage to you once he gets within melee range; kill him before he gets the chance.
|
Class Set
See also

