Community Viaduct strategy
| “Sun Tzu's got nothing on us!” This article is a Community strategy stub. As such, it is not complete. You can help the Team Fortress Wiki Community Strategy Project by expanding it. Notes: Expand the "General strategy" section to cover map locations in more detail. Potentially look at the class-specific strategies as well. |
| Viaduct | |
|---|---|

| |
| Basic Information | |
| Map type: | King of the Hill |
| File name: | koth_viaduct
|
| Released: | August 13, 2009 Patch (Classless Update) |
| Variants: | Eyeaduct |
| Developer(s): | Valve |
| Map Info | |
| Environment: | Alpine |
| Setting: | Daylight, snowy |
| Pyrovision Support: | Yes |
| Bot support: | Yes |
| Map Items | |
| Map Photos | |
| Map Overview | |
For strategy specific to the Halloween variant of Viaduct, see Community Eyeaduct strategy.
This article is about Community Viaduct strategy.
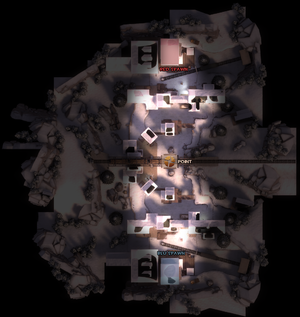
Note: It is recommended to read the main Viaduct article first to become familiar with the names of key map locations used in this article.
General strategy
- While playing on this map, it is a good idea to always keep in mind the size of this map.
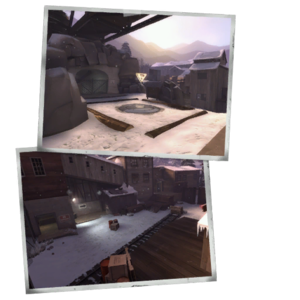
- Snipers can and will be a huge nuisance on this map – the sheltered catwalks, the area underneath and the ledges on either side all have great sight lines and are difficult to hit from the point itself. This is compounded by the fact there are no side routes, which makes ambushing and spying difficult.
Class-specific strategy
 Scout
Scout
- As the map is small, dodging is nearly impossible because of the constant cross fire, using the Force-A-Nature or Scattergun can be very useful here in dishing out large amounts of damage. Using Bonk! Atomic Punch can get you in advantageous positions for flanking by simply running through the cross fire with its invulnerability effect.
- Likewise, the small areas cramping enemies together can show just how effective Mad Milk really can be. Throw the jar at chokepoints to mark often numerous people.
 Soldier
- The Soldier can rocket jump to great heights to gain a wide view of the battlefield and rain down rockets on the other team concentrated near the point. Using blast damage to deal massive damage to the other team is very useful, and sometimes one critical rocket can take out multiple enemies. A good place to do this on this map is behind the sign that borders the control point because your opponents don't expect you to fly out from behind a sign and that you are immediately above the control point.
- Due to the concentration of the enemies, use of the Black Box can significantly increase your average lifespan on this map, but keep in mind the downsides of having one less rocket.
- The Hill is a good route for approaching the point when your team does not hold it. The Ledge commands the point, you can get long-range direct or splash angles on enemy Sentry Guns across the map, you are less likely to be rushed by the enemy, enemy Spies have to take a long route that is easily Spy checked, and you can quickly jump down to help your team's capture.
- The Pain Train can speed your team's capture of the point, reducing the time you have to stay in such an exposed position. Once the point is captured, move off to better positions to fight off enemy counterattacks.
- Once your team has captured the point and you have a Heavy on the point, the Heavy can easily run short on Ammo. Use your Rocket blasts to flip Ammo drops closer to or into the Heavy.
 Pyro
Pyro
- At the start of a round, stay with your team before going on the offense, as there are no flank routes to avoid detection across the middle area.
- The Pyro has an advantage due to the small size of the map.
- Using the compression blast to reflect enemy projectiles, and in turn dealing mini-crits, is an advantageous strategy due to the small control point area.
- Your team's side of the point draws flanking Scouts and Spies. Patrol that area until your team has pushed past the point.
- The enemy will be tightly packed together at the control point. Simply popping out from behind the rocks on your side and frying the entire area can be devastating, since you will already be in extremely close range. Be wary, however, of enemies such as Demomen who stay further away from the point. Also, a single Heavy will destroy you at such close range, so let your teammates take care of them before you attack.
 Demoman
- Demomen are an excellent choice on this map – they can clear the point both defensively and offensively, shell the ledges and act as an anti-Sniper and Engineer class. While in the pathway connecting the control point to the Valley, using the pipe bomb and air spamming is valid strategy that will distract and erode the enemy team's health.
- Stickybombs can also be hidden on the back of the rock (relative to your opponents) bordering the control point or just placed on the control point for a distraction. If your team has successfully pushed the enemy team back into their Valley, sticky trapping the pathways and spamming pipes down the slope that lead to the control point is also a good strategy to keep the enemies in the Valley.
- You can use the low ground such as in the Valley to shoot sticky bombs while being in cover. Since Viaduct is a King of the Hill map, crowd control is a very useful tactic to employ.
 Heavy
Heavy
- In this map, the battle is always upon you. Keeping your Minigun spun up is necessary yet dangerous at the same time due to the Snipers. Due of this you must keep moving and spin up in midair to prevent yourself from being killed. Using the side covers is also valid, but be careful as the enemy Snipers are likely to be waiting for you.
- The Hill is a good route for approaching the point when your team does not hold it. The Ledge commands the point, you are less likely to be rushed by the enemy, enemy Spies have to take a long route that is easily Spy checked, and you can quickly jump down to back up your team's push past the point.
- Once your team has captured the point, the contest to hold/retake the point generally revolves around the four routes between the Valley and the point.
- Let your teammates take the fight forward; you stay spun up on the point where you can cover the enemy approaches of the Hill, Stairs, and Catwalk.
- Ammo management is essential on the point since you really don't want to leave the point to rearm. Walk over Ammo drops from the enemy. Your teammates should leave Ammo to you.
- Health management is also essential on the point since there are no Health Pickups nearby. The Sandvich is a very useful weapon also to keep handy when you are defending the point and there are no medics, or if your Medic is low on health. Dropping the Sandvich is usually the best idea when out of cover, but if you choose to eat it, duck around the boulder on your team's side, otherwise you will be sitting duck to the enemy, especially Snipers.
- If your team has the enemy pushed back far enough, reload from their Ammo Pickup by their Shack and cover the stairs.
- If you have the enemy backed into their Spawn yard, move between them and the Health and Ammo Pickups next to the fence, that way you can fall back and use the pickups when they try to push out.
 Engineer
- The ledges are an excellent place for a Sentry Gun. If the point has been taken by the enemy, consider setting up in the lower area with the health pack/ammo crate to the left of the Scullery, and teleporting your teammates in.
- The small lower areas looking onto the capture point are good Sentry Gun locations. A good setup there can hold of the enemies from the point and allow your team to control the mid. Just watch out for enemy Snipers if you decide to set up here.
- Use of the Gunslinger here will require strategic positioning due to the small map size because the mini sentry can easily be overwhelmed and destroyed. Likewise goes for the normal Sentry Gun. Strategic placement is very important in this map.
- On this map more often than not keeping up a Dispenser is a difference of winning and losing and there are very good locations to place a Dispenser down to assist your team with ammunition and health. Examples are behind rock near the control point and cliffs close to chokepoint.
 Medic
Medic
- As a Medic, healing your teammates is a given. However, be careful of Snipers as the control point itself is very exposed; so taking any shelter is useful. The wall right behind the point and the other team's cover is a good spot to take shelter. Also taunting with the Amputator behind shelter is a valid strategy, as the map is narrow, the healing effect can cover a good handful of your teammates. Use of cover is vital in such a small map.
- Also due to the small map size, there is a constant battle for the control point. Being an efficient Medic here is vital so being able to double ÜberCharge can come in very handy.
 Sniper
- One of the most formidable classes on this map is the Sniper, with an easy lookout over the entire battle, the Sniper can hide himself in the Valley, Scullery exterior or the ledges of the map and be able to pick off enemies. Take advantage of this as it can help your teammates a good deal if you are are able to pick off an incoming Heavy before he can even spin his Minigun.
- Jarate is also useful here, as the enemies are bunched up due to the narrowness of the map. Throwing a jar of Jarate into the midst of a battle can turn the tides for your allies.
- Using the Huntsman and firing arrows into the group of enemies is also a valid strategy here because of the size of the map and how the enemies have to squeeze through narrow areas to gain access to the control point.
 Spy
Spy
- As a Spy, take advantage of the Scullery for transportation to flank the enemies. However, be careful as you and your enemies have to squeeze through the narrow pathways to get to the control point, getting behind them would have to require you to be in very close terms with your enemies and bumping into them would mean the end.
- The Dead Ringer can prove to be very useful in this map as the enemies have no time to think about whether they really killed you, and if they do, they are doomed to be finished off by friendly Snipers. However, be careful as the loud de-cloaking sound may alert the entire enemy team to your presence due to the small map size.
- Use the enclosed houses and catwalks to sneak up on enemy Snipers.
- The many routes into the house and dual slopes on each side provide escape routes should you need them.
- Use the height of the map to your advantage: Spies do well on maps that have walkways, catwalks, and paths above the main path- enemies often don't look up so you can stab them effectively.

