Difference between revisions of "Australian Christmas"
(Dear Saxton! this took forever! I changed it to reduce the length of the page along with matching the mannco update style. Ugh.) |
|||
| Line 25: | Line 25: | ||
{{main|Weapons|Hats|Item sets}} | {{main|Weapons|Hats|Item sets}} | ||
| − | === | + | ===Items=== |
{| class="wikitable grid" style="text-align: center;" | {| class="wikitable grid" style="text-align: center;" | ||
! class="header"| [[Class]] | ! class="header"| [[Class]] | ||
! class="header"| [[Item Sets]] | ! class="header"| [[Item Sets]] | ||
! class="header"| Item | ! class="header"| Item | ||
| + | ! class="header"| Killicon | ||
! class="header"| Details | ! class="header"| Details | ||
| − | |||
|- | |- | ||
| − | | rowspan= | + | | rowspan=3|{{Icon class|class=scout|link=Scout}}<br>'''[[Scout]]''' |
| − | | rowspan= | + | | rowspan=3|No item set |
| {{Backpack icon|weapon=Boston Basher|icon-size=100x100px}}<br>'''[[Boston Basher]]''' | | {{Backpack icon|weapon=Boston Basher|icon-size=100x100px}}<br>'''[[Boston Basher]]''' | ||
| + | | align="center" | {{Icon killicon|weapon=boston basher}} | ||
| {{Pro}}On Hit: Bleed for 5 seconds. <br>{{Con}} On Miss: Hit yourself. Idiot. | | {{Pro}}On Hit: Bleed for 5 seconds. <br>{{Con}} On Miss: Hit yourself. Idiot. | ||
| − | |||
|- | |- | ||
| {{Backpack icon|weapon=Candy Cane|icon-size=100x100px}}<br>'''[[Candy Cane]]''' | | {{Backpack icon|weapon=Candy Cane|icon-size=100x100px}}<br>'''[[Candy Cane]]''' | ||
| + | | align="center" | {{Icon killicon|weapon=candy cane}} | ||
| {{Pro}}On kill: A small health pack is dropped.<br>{{Con}}25% explosive damage vulnerability on wearer. | | {{Pro}}On kill: A small health pack is dropped.<br>{{Con}}25% explosive damage vulnerability on wearer. | ||
| − | |||
|- | |- | ||
| − | | rowspan= | + | | {{icon item|item=Flipped Trilby|icon-size=100px}}<br>'''[[Flipped Trilby]]''' |
| − | | rowspan= | + | | |
| + | | | ||
| + | |- | ||
| + | | rowspan=2|{{Icon class|class=Soldier|link=Soldier}}<br>'''[[Soldier]]''' | ||
| + | | rowspan=2|No item set | ||
| + | |{{icon item|item=Exquisite Rack|icon-size=100px}}<br>'''[[Exquisite Rack]]''' | ||
| + | | | ||
| + | | | ||
| + | |- | ||
| + | |{{icon item|item=Defiant Spartan|icon-size=100px}}<br>'''[[Defiant Spartan]]''' | ||
| + | | | ||
| + | | | ||
| + | |- | ||
| + | | rowspan=4|{{Icon class|class=Pyro|link=Pyro}}<br>'''[[Pyro]]''' | ||
| + | | rowspan=4|No item set | ||
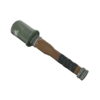
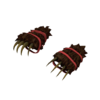
| {{Backpack icon|weapon=Back Scratcher|icon-size=100x100px}}<br>'''[[Back Scratcher]]''' | | {{Backpack icon|weapon=Back Scratcher|icon-size=100x100px}}<br>'''[[Back Scratcher]]''' | ||
| + | | align="center" | {{Icon killicon|weapon=back scratcher}} | ||
| {{Pro}}+25% damage done<br>{{Con}}-75% health from healers on wearer<br>{{Pro}}+50% health from packs on wearer. | | {{Pro}}+25% damage done<br>{{Con}}-75% health from healers on wearer<br>{{Pro}}+50% health from packs on wearer. | ||
| − | |||
|- | |- | ||
| − | | rowspan= | + | |{{icon item|item=Madame Dixie|icon-size=100px}}<br>'''[[Madame Dixie]]''' |
| + | | | ||
| + | | | ||
| + | |- | ||
| + | |{{icon item|item=Pryomancer's Mask|icon-size=100px}}<br>'''[[Pryomancer's Mask]]''' | ||
| + | | | ||
| + | | | ||
| + | |- | ||
| + | |{{icon item|item=Prancer's Pride|icon-size=100px}}<br>'''[[Prancer's Pride]]''' | ||
| + | | | ||
| + | | | ||
| + | |- | ||
| + | | rowspan=5|{{Icon class|class=Demoman|link=Demoman}}<br>'''[[Demoman]]''' | ||
| rowspan=2|'''[[Item sets#Demoman|The Expert's Ordnance]]'''<br>{{Pro}}+10% fire damage resistance on wearer | | rowspan=2|'''[[Item sets#Demoman|The Expert's Ordnance]]'''<br>{{Pro}}+10% fire damage resistance on wearer | ||
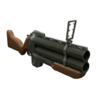
| {{Backpack icon|weapon=Loch-n-Load|icon-size=100x100px}}<br>'''[[Loch-n-Load]]''' | | {{Backpack icon|weapon=Loch-n-Load|icon-size=100x100px}}<br>'''[[Loch-n-Load]]''' | ||
| + | | align="center" | {{Icon killicon|weapon=loch-n-load}} | ||
| {{Con}}-60% clip size<br>{{Pro}}+10% damage done<br>{{Pro}}+25% projectile speed<br>{{Con}}+25% damage to self<br>{{Con}}Launched bombs shatter on surfaces | | {{Con}}-60% clip size<br>{{Pro}}+10% damage done<br>{{Pro}}+25% projectile speed<br>{{Con}}+25% damage to self<br>{{Con}}Launched bombs shatter on surfaces | ||
| − | |||
|- | |- | ||
| {{Backpack icon|weapon=Ullapool Caber|icon-size=100x100px}}<br>'''[[Ullapool Caber]]''' | | {{Backpack icon|weapon=Ullapool Caber|icon-size=100x100px}}<br>'''[[Ullapool Caber]]''' | ||
| + | | align="center" | {{Icon killicon|weapon=ullapool caber}} | ||
| {{Con}}No random critical hits<br>{{Info}}High-yield Scottish face removal.<br>{{Info}}A sober person would throw it... | | {{Con}}No random critical hits<br>{{Info}}High-yield Scottish face removal.<br>{{Info}}A sober person would throw it... | ||
| − | |||
|- | |- | ||
| − | | rowspan= | + | | rowspan=3|No item set |
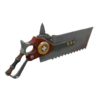
| {{Backpack icon|weapon=Claidheamohmor|icon-size=100x100px}}<br>'''[[Claidheamohmor]]''' | | {{Backpack icon|weapon=Claidheamohmor|icon-size=100x100px}}<br>'''[[Claidheamohmor]]''' | ||
| + | | align="center" | {{Icon killicon|weapon=claidheamohmor}} | ||
| {{Pro}}0.5 sec increase in charge duration <br>{{Con}}No random critical hits<br>{{Con}}-15 max health on wearer | | {{Pro}}0.5 sec increase in charge duration <br>{{Con}}No random critical hits<br>{{Con}}-15 max health on wearer | ||
| − | |||
|- | |- | ||
| − | | rowspan= | + | |{{icon item|item=Prince Tavish's Crown|icon-size=100px}}<br>'''[[Prince Tavish's Crown]]''' |
| + | | | ||
| + | | | ||
| + | |- | ||
| + | |{{icon item|item=Scotch Bonnet|icon-size=100px}}<br>'''[[Scotch Bonnet]]''' | ||
| + | | | ||
| + | | | ||
| + | |- | ||
| + | | rowspan=7|{{Icon class|class=Heavy|link=Heavy}}<br>'''[[Heavy]]''' | ||
| rowspan=3|'''[[Item sets#Heavy|The Hibernating Bear]]'''<br>{{Pro}}+5% Critical hit damage resistance on wearer | | rowspan=3|'''[[Item sets#Heavy|The Hibernating Bear]]'''<br>{{Pro}}+5% Critical hit damage resistance on wearer | ||
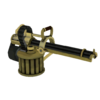
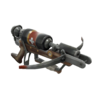
| {{Backpack icon|weapon=Brass Beast|icon-size=100px}}<br>'''[[Brass Beast]]''' | | {{Backpack icon|weapon=Brass Beast|icon-size=100px}}<br>'''[[Brass Beast]]''' | ||
| + | | align="center" | {{Icon killicon|weapon=brass beast}} | ||
| {{Pro}}+20% damage done<br>{{Con}}50% slower spin up time<br>{{Con}}60% slower move speed while deployed | | {{Pro}}+20% damage done<br>{{Con}}50% slower spin up time<br>{{Con}}60% slower move speed while deployed | ||
| − | |||
|- | |- | ||
| {{Backpack icon|weapon=Buffalo Steak Sandvich|icon-size=100px}}<br>'''[[Buffalo Steak Sandvich]]''' | | {{Backpack icon|weapon=Buffalo Steak Sandvich|icon-size=100px}}<br>'''[[Buffalo Steak Sandvich]]''' | ||
| + | | | ||
| {{Pro}}Move speed is temporarily increased by roughly 35%<br>{{Con}}Player may only use melee weapons<br>{{Info}}Damage done and taken will be Mini-Crits<br>{{Info}}Who needs bread? | | {{Pro}}Move speed is temporarily increased by roughly 35%<br>{{Con}}Player may only use melee weapons<br>{{Info}}Damage done and taken will be Mini-Crits<br>{{Info}}Who needs bread? | ||
| − | |||
|- | |- | ||
| {{Backpack icon|weapon=Warrior's Spirit|icon-size=100px}}<br>'''[[Warrior's Spirit]]''' | | {{Backpack icon|weapon=Warrior's Spirit|icon-size=100px}}<br>'''[[Warrior's Spirit]]''' | ||
| + | | align="center" | {{Icon killicon|weapon=warrior's spirit}} | ||
| {{Pro}}+30% damage done<br>{{Con}}-20 Max Health | | {{Pro}}+30% damage done<br>{{Con}}-20 Max Health | ||
| − | |||
|- | |- | ||
| − | | rowspan= | + | | rowspan=4|No item set |
| {{Backpack icon|weapon=Fists of Steel|icon-size=100x100px}}<br>'''[[Fists of Steel]]''' | | {{Backpack icon|weapon=Fists of Steel|icon-size=100x100px}}<br>'''[[Fists of Steel]]''' | ||
| + | | align="center" | {{Icon killicon|weapon=fists of steel}} | ||
| {{Pro}}-60% damage from ranged sources while active<br>{{Con}}+100% damage from melee sources while active | | {{Pro}}-60% damage from ranged sources while active<br>{{Con}}+100% damage from melee sources while active | ||
| − | |||
|- | |- | ||
| − | | rowspan= | + | |{{icon item|item=Coupe D'isaster|icon-size=100px}}<br>'''[[Coupe D'isaster]]''' |
| − | | rowspan= | + | | |
| + | | | ||
| + | |- | ||
| + | |{{icon item|item=Magnificent Mongolian|icon-size=100px}}<br>'''[[Magnificent Mongolian]]''' | ||
| + | | | ||
| + | | | ||
| + | |- | ||
| + | |{{icon item|item=Big Chief|icon-size=100px}}<br>'''[[Big Chief]]''' | ||
| + | | | ||
| + | | | ||
| + | |- | ||
| + | | rowspan=3|{{Icon class|class=Engineer|link=Engineer}}<br>'''[[Engineer]]''' | ||
| + | | rowspan=3|No item set | ||
| {{Backpack icon|weapon=Jag|icon-size=100x100px}}<br>'''[[Jag]]''' | | {{Backpack icon|weapon=Jag|icon-size=100x100px}}<br>'''[[Jag]]''' | ||
| + | | align="center" | {{Icon killicon|weapon=jag}} | ||
| {{Pro}}30% faster construction rate<br>{{Con}}-25% damage done | | {{Pro}}30% faster construction rate<br>{{Con}}-25% damage done | ||
| − | |||
|- | |- | ||
| − | | rowspan= | + | |{{icon item|item=Industrial Festivizer|icon-size=100px}}<br>'''[[Industrial Festivizer]]''' |
| + | | | ||
| + | | | ||
| + | |- | ||
| + | |{{icon item|item=Buckaroos Hat|icon-size=100px}}<br>'''[[Buckaroos Hat]]''' | ||
| + | | | ||
| + | | | ||
| + | |- | ||
| + | | rowspan=5|{{Icon class|class=Medic|link=Medic}}<br>'''[[Medic]]''' | ||
| rowspan=2|'''[[Item sets#Medic|The Medieval Medic]]'''<br>{{Pro}}+1 health regenerated per second on wearer | | rowspan=2|'''[[Item sets#Medic|The Medieval Medic]]'''<br>{{Pro}}+1 health regenerated per second on wearer | ||
| {{Backpack icon|weapon=Crusader's Crossbow|icon-size=100x100px}}<br>'''[[Crusader's Crossbow]]''' | | {{Backpack icon|weapon=Crusader's Crossbow|icon-size=100x100px}}<br>'''[[Crusader's Crossbow]]''' | ||
| + | | align="center" | {{Icon killicon|weapon=crusader's crossbow}} | ||
| {{Pro}}Fires special bolts that heal teammates and deal damage based on distance traveled.<br>{{Con}}No headshots<br>{{Con}}-75% max primary ammo on wearer | | {{Pro}}Fires special bolts that heal teammates and deal damage based on distance traveled.<br>{{Con}}No headshots<br>{{Con}}-75% max primary ammo on wearer | ||
| − | |||
|- | |- | ||
| {{Backpack icon|weapon=Amputator|icon-size=100x100px}}<br>'''[[Amputator]]''' | | {{Backpack icon|weapon=Amputator|icon-size=100x100px}}<br>'''[[Amputator]]''' | ||
| + | | align="center" | {{Icon killicon|weapon=amputator}} | ||
| {{Pro}}On Taunt: Applies a healing effect to all nearby teammates | | {{Pro}}On Taunt: Applies a healing effect to all nearby teammates | ||
| − | |||
| − | |||
| − | |||
| − | |||
| − | |||
| − | |||
| − | |||
| − | |||
| − | |||
| − | |||
| − | |||
| − | |||
| − | |||
| − | |||
| − | |||
| − | |||
| − | |||
| − | |||
| − | |||
| − | |||
| − | |||
| − | |||
| − | |||
| − | |||
| − | |||
|- | |- | ||
| − | + | | rowspan=3|No item set | |
| − | |||
| − | | rowspan=3| | ||
| − | |||
| − | |||
| − | |||
| − | |||
| − | |||
| − | |||
| − | |||
| − | |||
| − | |||
| − | |||
| − | |||
| − | |||
|{{icon item|item=Blighted Beak|icon-size=100px}}<br>'''[[Blighted Beak]]''' | |{{icon item|item=Blighted Beak|icon-size=100px}}<br>'''[[Blighted Beak]]''' | ||
| + | | | ||
| + | | | ||
|- | |- | ||
|{{icon item|item=German Gonzila|icon-size=100px}}<br>'''[[German Gonzila]]''' | |{{icon item|item=German Gonzila|icon-size=100px}}<br>'''[[German Gonzila]]''' | ||
| + | | | ||
| + | | | ||
|- | |- | ||
| − | |{{icon item|item=Berliner's Bucket Helm|icon-size=100px}}<br>'''[[Berliner's Bucket Helm]]''' | + | ||{{icon item|item=Berliner's Bucket Helm|icon-size=100px}}<br>'''[[Berliner's Bucket Helm]]''' |
| + | | | ||
| + | | | ||
|- | |- | ||
| rowspan=1|{{Icon class|class=Sniper|link=Sniper}}<br>'''[[Sniper]]''' | | rowspan=1|{{Icon class|class=Sniper|link=Sniper}}<br>'''[[Sniper]]''' | ||
| + | | rowspan=1|No item set | ||
|{{icon item|item=Larrikin Robin|icon-size=100px}}<br>'''[[Larrikin Robin]]''' | |{{icon item|item=Larrikin Robin|icon-size=100px}}<br>'''[[Larrikin Robin]]''' | ||
| + | | | ||
| + | | | ||
|- | |- | ||
| rowspan=2|{{Icon class|class=Spy|link=Spy}}<br>'''[[Spy]]''' | | rowspan=2|{{Icon class|class=Spy|link=Spy}}<br>'''[[Spy]]''' | ||
| + | | rowspan=2|No item set | ||
|{{icon item|item=Detective Noir|icon-size=100px}}<br>'''[[Detective Noir]]''' | |{{icon item|item=Detective Noir|icon-size=100px}}<br>'''[[Detective Noir]]''' | ||
| + | | | ||
| + | | | ||
|- | |- | ||
|{{icon item|item=Le Party Phantom|icon-size=100px}}<br>'''[[Le Party Phantom]]''' | |{{icon item|item=Le Party Phantom|icon-size=100px}}<br>'''[[Le Party Phantom]]''' | ||
| + | | | ||
| + | | | ||
|- | |- | ||
| rowspan=2|'''All Classes''' | | rowspan=2|'''All Classes''' | ||
| + | | rowspan=2|No item set | ||
|{{icon item|item=A Rather Festive Tree|icon-size=100px}}<br>'''[[A Rather Festive Tree]]''' | |{{icon item|item=A Rather Festive Tree|icon-size=100px}}<br>'''[[A Rather Festive Tree]]''' | ||
| + | | | ||
| + | | | ||
|- | |- | ||
|{{icon item|item=World Traveler's Hat|icon-size=100px}}<br>'''[[World Traveler's Hat]]''' | |{{icon item|item=World Traveler's Hat|icon-size=100px}}<br>'''[[World Traveler's Hat]]''' | ||
| + | | | ||
| + | |Given to generous souls who have donated to community map makers. The effect will only be visible while on a map that has been donated towards! | ||
| + | |- | ||
|} | |} | ||
Revision as of 22:13, 20 December 2010
| “Let's go, let's go, let's go!” This article documents a recent addition. It may contain speculation, broken links or errors. You can help improve it by editing this page to include new information. |
The Australian Christmas was a major content update for Team Fortress 2, released on December 17, 2010.
A new game mode, Medieval Mode, was introduced, featuring the new map Degroot Keep.
The update increased backpack slots from 200 to 300, with the possibility of buying additional slots, 100 at a time, with the Backpack Expander. The maximum backpack size became 1000 slots.
During the event, the Festive Winter Crate became unlockable with a Festive Winter Crate Key that is only available as a purchase from the Mann Co. Store for US $2.49, UK £1.99, EURO €2.49.
The official Valve page for the event may be viewed here.
Origin story
On December 18th, 1788, less than a year after the first settlers colonized Australia, an old cutthroat named Nicolas Crowder arrived on a boat with some other new settlers, took one look at the heat and privations, said "screw this," commandeered the boat, and set course on a one-man voyage to conquer the South Pole. Legend tells that he lives there still.
Every December 18th, "Old Nick" returns down under to find out if Australia's children have been naughty or nice. The nice children are given the greatest gift of all -- they are not abducted along with the naughty ones and carted off to the South Pole.
For the next twelve months, the naughty children make toys to Old Nick's exacting specifications. Then, on December 17th, the presents are gift-wrapped, placed in a sleigh, and driven to Old Nick's mansion, where he opens them. Naturally, given the sheer number of hats and weapons Old Nick receives, there are bound to be duplicates -- and every December 18th, he posts them online, selling them at prices so low that he's practically giving them away.
New additions
Items
| Class | Item Sets | Item | Killicon | Details |
|---|---|---|---|---|
Scout |
No item set | 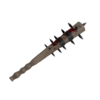 Boston Basher |
||
 Candy Cane |
||||
Flipped Trilby |
||||
Soldier |
No item set | Exquisite Rack |
||
Defiant Spartan |
||||
Pyro |
No item set |  Back Scratcher |
||
Madame Dixie |
||||
Pryomancer's Mask |
||||
Prancer's Pride |
||||
Demoman |
The Expert's Ordnance |
 Loch-n-Load |
||
 Ullapool Caber |
||||
| No item set | File:Backpack Claidheamohmor.png Claidheamohmor |
|||
Prince Tavish's Crown |
||||
Scotch Bonnet |
||||
Heavy |
The Hibernating Bear |
 Brass Beast |
||
 Buffalo Steak Sandvich |
||||
 Warrior's Spirit |
||||
| No item set |  Fists of Steel |
|||
Coupe D'isaster |
||||
Magnificent Mongolian |
||||
Big Chief |
||||
Engineer |
No item set | 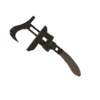 Jag |
||
Industrial Festivizer |
||||
Buckaroos Hat |
||||
Medic |
The Medieval Medic |
 Crusader's Crossbow |
||
 Amputator |
||||
| No item set | Blighted Beak |
|||
German Gonzila |
||||
Berliner's Bucket Helm |
||||
Sniper |
No item set | Larrikin Robin |
||
Spy |
No item set | Detective Noir |
||
Le Party Phantom |
||||
| All Classes | No item set | A Rather Festive Tree |
||
World Traveler's Hat |
Given to generous souls who have donated to community map makers. The effect will only be visible while on a map that has been donated towards! |
Tools
- Backpack Expander - Expand backpack by 100 spaces (max of 1000 space)
- Map Stamps - Buy a map stamp to get a hat, and whenever you play the map that you purchased the stamp on, you will have a particle effect attached to you.
Trivia
- It is actually summer, not winter, during the Christmas season in Australia because of the tilt of the Earth's axis during that time of the year.