Difference between revisions of "Npire"
ShadowMan44 (talk | contribs) m |
BrazilianNut (talk | contribs) m (Moved "Trivia" to before "Gallery" (usual placement); other, minor changes.) |
||
| (13 intermediate revisions by 3 users not shown) | |||
| Line 1: | Line 1: | ||
| − | {{ | + | {{custom map}} |
{{Map infobox | {{Map infobox | ||
| − | | game-type | + | | map-status = custom |
| − | | file-name | + | | map-name = Npire |
| − | + | | map-game-type = Capture the Flag | |
| + | | map-file-name = ctf_npire_v3 | ||
| map-image = Npirethumbnail.png | | map-image = Npirethumbnail.png | ||
| − | | | + | | map-version = Version 3 (Final) |
| − | | | + | | map-released = {{patch name|08|8|2008|date-only=yes}} |
| + | | map-links = [https://web.archive.org/web/20160313232016/http://www.mrmof.com/?page_id=9#ctf_npire mrmof's blog (archived)] | ||
| + | | map-developer = {{Steamid|76561197993480237|mrmof}} | ||
| map-environment = Industrial | | map-environment = Industrial | ||
| map-setting = Daytime | | map-setting = Daytime | ||
| − | | map- | + | | map-has-deep-water = no |
| − | | map-ammo | + | | map-pickups-health-medium = 5 |
| − | | map-ammo | + | | map-pickups-ammo-medium = 5 |
| − | + | | map-pickups-ammo-large = 2 | |
| − | + | }} | |
| + | '''Npire''' is a vertically-reflected symmetrical community-made [[Capture the Flag]] map with a unique take on the game mode. Instead of teams infiltrating each other's bases to steal their [[Intelligence|intelligence]], there is one briefcase tucked at the opposite side of the map that players must race to and capture at their own base. Both spawn rooms contain Teleporters that warp players to the opposite side of the map, where they can find their capture points. The entire map has paths for RED and BLU completely parallel to each other. | ||
| − | + | [[File:Npire_Map_Overview.png|thumb|top|Overview of Npire.]] | |
== Locations == | == Locations == | ||
| − | * '''The Bridge''': Outside of the capture point area features a bridge that players can make a quick surprise attack from. From there it connects to the upper path into the midpoint. Both sides across the bridge have Sniper sightlines that lead directly to the capture points, allowing for easy kills on enemies exiting the resupply room. | + | * '''The Bridge''': Outside of the capture point area features a bridge that players can make a quick surprise attack from. From there it connects to the upper path into the midpoint. Both sides across the bridge have [[Sniper]] sightlines that lead directly to the capture points, allowing for easy kills on enemies exiting the resupply room. |
* '''The Pipe Room''': The midpoint of the map features an indoor area with piping. The lower part has an ankle-length pool of water, which can be a useful spot for [[Engineer]] Teleporters. The upper entryway has a path that a [[Scout]] or rocket-jumping [[Soldier]] can get across for easier infiltration. | * '''The Pipe Room''': The midpoint of the map features an indoor area with piping. The lower part has an ankle-length pool of water, which can be a useful spot for [[Engineer]] Teleporters. The upper entryway has a path that a [[Scout]] or rocket-jumping [[Soldier]] can get across for easier infiltration. | ||
| Line 25: | Line 29: | ||
* '''The Archway''': Right before the Intelligence area is a walkway featuring two archways parallel to each other. | * '''The Archway''': Right before the Intelligence area is a walkway featuring two archways parallel to each other. | ||
| − | * '''The Intelligence Area''': The | + | * '''The Intelligence Area''': The Intelligence is in between 2 hexagon shaped corners which both house 2 large ammo packs. There are 2 medium health packs hidden in the water right behind the wall. Players can view the spawn rooms of each team through the windows. |
<gallery widths=140px heights=80px> | <gallery widths=140px heights=80px> | ||
| − | + | File:Npire_Bridge.png|Bridge. | |
| − | + | File:Npire_Pipe_Room.png|Pipe room. | |
| − | + | File:Npire_Archway.png|Archway. | |
| − | + | File:Npire_Intel_Room.png|Intel area. | |
</gallery> | </gallery> | ||
| + | |||
| + | == Strategy == | ||
| + | * Since this map's symmetry is parallel, there are chances that the route you're going in is going to be copied by the enemy team. | ||
| + | * It might be a good idea to use a relay method of bringing the intelligence to your capture point. | ||
| + | * The upper route to the intelligence most likely will go unnoticed to most players, so using Scout or Soldier to jump across the disconnected platform might get you there faster. | ||
| + | |||
| + | == Trivia == | ||
| + | *The map features custom logos for both RED and BLU teams. | ||
| + | *The download page mentions a bug that breaks the arrow that is supposed to point where the Intelligence is. Since then, the bug has likely been fixed. | ||
| + | *This map is one of the earliest made custom maps in TF2's lifespan. | ||
== Gallery == | == Gallery == | ||
<gallery> | <gallery> | ||
| − | Npire_Red_Spawn_Teleporters.png|RED's spawn teleporters. | + | File:Npire_Red_Spawn_Teleporters.png|RED's spawn teleporters. |
| − | Npire_Blu_Spawn_Teleporters.png|BLU's spawn teleporters. | + | File:Npire_Blu_Spawn_Teleporters.png|BLU's spawn teleporters. |
| − | Npire_Red_Cap.png|RED Base capture point. | + | File:Npire_Red_Cap.png|RED Base capture point. |
| − | Npire_Blu_Cap.png|BLU Base capture point. | + | File:Npire_Blu_Cap.png|BLU Base capture point. |
| − | Npire_Red_Sniper_Sightline.png|RED Base | + | File:Npire_Red_Sniper_Sightline.png|RED Base Sniper sightline. |
| − | Npire_Blu_Sniper_Sightline.png|BLU Base | + | File:Npire_Blu_Sniper_Sightline.png|BLU Base Sniper sightline. |
| − | Npire_Sewer.png|The sewer below the pipe room. | + | File:Npire_Sewer.png|The sewer below the pipe room. |
| − | + | File:Npire_sketch.jpg|Sketches of the map. | |
</gallery> | </gallery> | ||
| − | + | == Additional screenshots == | |
| − | |||
| − | == Additional | ||
<gallery> | <gallery> | ||
| − | Npire_misc_1.png|Graffiti art of a duck near the pipe room. | + | File:Npire_misc_1.png|Graffiti art of a duck near the pipe room. |
| − | Npire_misc_2.png|"That's right, I'm god" graffiti'd in the sewer of the pipe room. | + | File:Npire_misc_2.png|"That's right, I'm god" graffiti'd in the sewer of the pipe room. |
| − | Npire_misc_3.png|RED's custom logo. | + | File:Npire_misc_3.png|RED's custom logo. |
| − | Npire_misc_4.png|BLU's custom logo. | + | File:Npire_misc_4.png|BLU's custom logo. |
| − | Npire_misc_5.png|RED's propaganda graffiti. | + | File:Npire_misc_5.png|RED's propaganda graffiti. |
| − | Npire_misc_6.png|BLU's propaganda graffiti. | + | File:Npire_misc_6.png|BLU's propaganda graffiti. |
| − | Npire_misc_7.png|The health packs hidden in the intel room. | + | File:Npire_misc_7.png|The health packs hidden in the intel room. |
| − | Npire_Minimap.png|The minimap displayed in spawn rooms. | + | File:Npire_Minimap.png|The minimap displayed in spawn rooms. |
| − | Npire_skybox.png|The skybox. | + | File:Npire_skybox.png|The skybox. |
</gallery> | </gallery> | ||
| − | + | {{Custom Map Nav}} | |
| − | |||
| − | |||
| − | |||
| − | |||
[[Category:Custom maps]] | [[Category:Custom maps]] | ||
Latest revision as of 04:33, 11 April 2024
 | “I built that.” This page contains information about a custom map that is not an officially released Team Fortress 2 map. All released Valve and Community-made TF2 maps can be found on the list of maps. |
| Npire | |
|---|---|

| |
| Basic Information | |
| Map type: | Capture the Flag |
| File name: | ctf_npire_v3
|
| Version: | Version 3 (Final) |
| Released: | August 8, 2008 |
| Developer(s): | mrmof |
| Link(s): | mrmof's blog (archived) |
| Map Info | |
| Environment: | Industrial |
| Setting: | Daytime |
| Deep Water: | No |
| Map Items | |
Npire is a vertically-reflected symmetrical community-made Capture the Flag map with a unique take on the game mode. Instead of teams infiltrating each other's bases to steal their intelligence, there is one briefcase tucked at the opposite side of the map that players must race to and capture at their own base. Both spawn rooms contain Teleporters that warp players to the opposite side of the map, where they can find their capture points. The entire map has paths for RED and BLU completely parallel to each other.
Locations
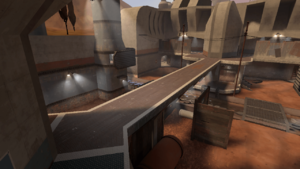
- The Bridge: Outside of the capture point area features a bridge that players can make a quick surprise attack from. From there it connects to the upper path into the midpoint. Both sides across the bridge have Sniper sightlines that lead directly to the capture points, allowing for easy kills on enemies exiting the resupply room.
- The Pipe Room: The midpoint of the map features an indoor area with piping. The lower part has an ankle-length pool of water, which can be a useful spot for Engineer Teleporters. The upper entryway has a path that a Scout or rocket-jumping Soldier can get across for easier infiltration.
- The Archway: Right before the Intelligence area is a walkway featuring two archways parallel to each other.
- The Intelligence Area: The Intelligence is in between 2 hexagon shaped corners which both house 2 large ammo packs. There are 2 medium health packs hidden in the water right behind the wall. Players can view the spawn rooms of each team through the windows.
Strategy
- Since this map's symmetry is parallel, there are chances that the route you're going in is going to be copied by the enemy team.
- It might be a good idea to use a relay method of bringing the intelligence to your capture point.
- The upper route to the intelligence most likely will go unnoticed to most players, so using Scout or Soldier to jump across the disconnected platform might get you there faster.
Trivia
- The map features custom logos for both RED and BLU teams.
- The download page mentions a bug that breaks the arrow that is supposed to point where the Intelligence is. Since then, the bug has likely been fixed.
- This map is one of the earliest made custom maps in TF2's lifespan.
Gallery
Additional screenshots
| ||||||||||||||||||||||||||||||||||||||||||||||||


