Difference between revisions of "Metalworks (competitive)"
m |
|||
| (3 intermediate revisions by one other user not shown) | |||
| Line 1: | Line 1: | ||
{{competitive|generic=Metalworks}} | {{competitive|generic=Metalworks}} | ||
{{Map infobox | {{Map infobox | ||
| − | | game-type | + | | map-status = community |
| − | | file-name | + | | map-name = Metalworks |
| − | | map-image = Cp_metalworks_b22_5.jpg | + | | map-game-type = Control Point |
| − | + | | map-file-name = cp_metalworks_rc5 | |
| − | | map-environment = Industrial | + | | map-image = Cp_metalworks_b22_5.jpg |
| − | | map-setting = Night, cloudy | + | | map-environment = Industrial |
| − | | map-health | + | | map-setting = Night, cloudy |
| − | | map-health | + | | map-pickups-health-small = 4 |
| − | | map-ammo | + | | map-pickups-health-medium = 8 |
| − | | map-ammo | + | | map-pickups-ammo-small = 4 |
| − | + | | map-pickups-ammo-medium = 12 | |
}} | }} | ||
| + | |||
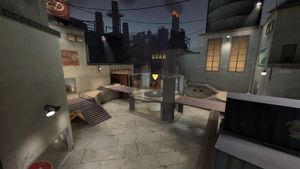
'''Metalworks''' is a 5CP map designed around a metal processing facility. It takes place at night in an industrial setting. | '''Metalworks''' is a 5CP map designed around a metal processing facility. It takes place at night in an industrial setting. | ||
| Line 21: | Line 22: | ||
===Point 1/5=== | ===Point 1/5=== | ||
<gallery widths=150px heights=90px> | <gallery widths=150px heights=90px> | ||
| − | File:Cp_metalworks_rc5_1. | + | File:Cp_metalworks_rc5_1.png |
| − | File:Cp_metalworks_rc5_6. | + | File:Cp_metalworks_rc5_6.png |
</gallery> | </gallery> | ||
Metalworks last is made up of a bridge and several exits leading in to a building | Metalworks last is made up of a bridge and several exits leading in to a building | ||
| Line 32: | Line 33: | ||
<gallery widths=150px heights=90px> | <gallery widths=150px heights=90px> | ||
File:Cp_metalworks_rc5_2.png|Second Point | File:Cp_metalworks_rc5_2.png|Second Point | ||
| − | File:Cp metalworks rc5 4. | + | File:Cp metalworks rc5 4.png|Flank |
</gallery> | </gallery> | ||
The second of metal works is quite large, and encompasses a flank, building, and point | The second of metal works is quite large, and encompasses a flank, building, and point | ||
Latest revision as of 01:28, 18 January 2024
The community competitive scene changes frequently. Some or all info may be outdated.
| Metalworks | |
|---|---|

| |
| Basic Information | |
| Map type: | Control Point |
| File name: | cp_metalworks_rc5
|
| Developer(s): | Valve |
| Map Info | |
| Environment: | Industrial |
| Setting: | Night, cloudy |
| Map Items | |
| Map Overview | |
Metalworks is a 5CP map designed around a metal processing facility. It takes place at night in an industrial setting.
It is currently played in ESEA and has gained a following in the competitive community
Contents
Locations
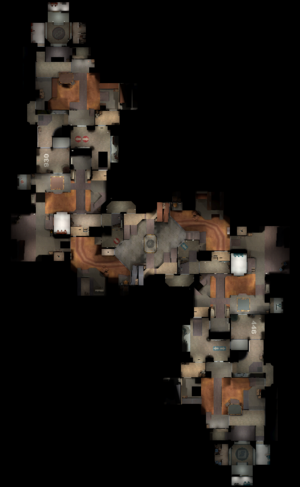
Metalworks is symmetrical so both teams have identical fighting areas
Point 1/5
Metalworks last is made up of a bridge and several exits leading in to a building
- Bridge: The bridge runs next to the point, and connects the shutter with the spawn
- Spawn: The spawn opens up on to a large are behind the point, with a small ammo pack
- Shutter: The shutter separates last from the building
- Flanks: Both flanks lead into the building
Points 2/4
The second of metal works is quite large, and encompasses a flank, building, and point
- Flank: The Flank connects the yard with the point, and contains a medium Health and Ammo pack and a very narrow chokepoint
- Bridge: The bridge runs along the point, and sits on top of a medium health and ammo pack, with a shutter and stair case leading to the building
- Point: The point leads into a room containing a small health and ammo pack, that is connected to the shutter room and one of the flank entrances to last
- Shutter Room: The shutter room contains a mid health pack, shutter door, and a flank entrance to last
- Drop Down: Connecting pipe room, yard, and second, drop down contains a small health and ammo kit
Point 3
The Middle point is also very large and contains a lot of resources
- Point: The point is in the middle of the mid, raised up on a spire and surrounded by bridges and on top of two ammo packs
- Choke: The choke connects pipe room and mid, with a stair case and bridge leading to the point
- Pipe Room: The pipe room contains a medium health and ammo pack and connects second and mid
- Yard: Yard separates mid and flank and has a medium health and ammo pack
Tactics
Last
- Defending
The defending team in general should play passively while waiting for picks. The general course of action should be to kill the enemies as quickly as possible, and try to recapture second.
- Avoid retreating, even to dodge damage. If you fall behind your fence, the enemy can lock you there and capture the point with impunity.
- The combo should hold on the bridge near the spawn, while the flank should cover the flanks and have one of them covering the point with the combo
- Snipers and Heavies are very effective on this last, and can make up for an Uber Disadvantage
- Engineer is very powerful on this last. Building a sentry under the bridge can make the enemy team waste their uber
- Attacking
When attacking Metalworks last, the best plan of action isn't necessarily to kill all the enemies. Because of the structure of the last, simply pushing the enemy behind the point can net you a win because they'll be unable to fight back. If you're taking the uber, play to gain ground, not frag. If the enemy is running an Engi or heavy, be sure to comm it and make your team focus them.
- There is no best entrance to push through, all 4 of the entrances to last can be used to uber in successfully
- If you're having trouble getting a pick or advantage, the right flank has a strong sight-line for snipers
- Classes other than Sniper or Spy are not very effective off classes on this map due to the open nature and ease of denying the bridge
Second
- Defending
Defending your second on metal works is paramount, as the nature of the map makes pushing out of last very difficult. The combo should hold on the bridge near the point and spam into the pipe room, while the flank should hold on the flank, and peak into yard if possible. Beyond that, it's a fairly standard hold, which is usually contested via an uber push
- Attacking
When attacking second, the combo should hold in pipe room, with the flank in yard. Barring a large advantage, most pushes should come with an uber. Your flank can play through yard and drop down, and play for picks. A good roamer can pick the med by jumping through drop down or flank
Mid
- Combo: At mid, the combo has two options. They can either exit through choke or lower. Taking choke keeps you out of the fight longer, but lower can be dangerous since you lose any height advantage. The demo should focus on putting damage on the point and floor, keeping players off his side of the map. The pocket can either jump or protect his combo if he wishes. Once at mid, the med should tank heals primarily on the scouts and demoman
- Flank: The flank should focus on getting to mid and gaining ground. A good bomb as the combo comes out of choke can stop the mid at the beginning. Scout should try to pick anything damaged, and assist the demo and medic if they become injured.
Rollout
Demoman
Demoman Rollout:
Soldier
The soldier rollout involves jumping from spawn to bridge, then over the bridge to shutter. From there you should stay near your medic until you come out to mid.
| |||||||||||||||||||||||||||||||


