Difference between revisions of "User:Fresh/Sandbox/ro"
m (→Main Base Locations: to png) |
|||
| (3 intermediate revisions by 2 users not shown) | |||
| Line 81: | Line 81: | ||
*'''Basement:''' The space downstairs between the spiral ramp and the L-shaft is the "Basement". It leads to the Intelligence room. There is a resupply point at the end nearest to the L-shaft. There is a Health pack and an Ammo box in the middle of the basement - added in [[April 29, 2008 Patch]]. The addition of these pickups has made camping the Intelligence harder, and attacking the Intelligence slightly easier. | *'''Basement:''' The space downstairs between the spiral ramp and the L-shaft is the "Basement". It leads to the Intelligence room. There is a resupply point at the end nearest to the L-shaft. There is a Health pack and an Ammo box in the middle of the basement - added in [[April 29, 2008 Patch]]. The addition of these pickups has made camping the Intelligence harder, and attacking the Intelligence slightly easier. | ||
| − | [[Image:TF2 2fort intel. | + | [[Image:TF2 2fort intel.png|164px|right|thumb|BLU intel room]] |
*'''Intelligence room:''' This is the room that has the Intelligence. It has two entrances from the basement. This is the primary defensive point of 2Fort, and as such it is frequently camped by [[Engineer]]s, [[Demoman|Demomen]], and other classes. To successfully capture your opposition's Intelligence, you must return it to the Intelligence room in your own base. The Intelligence is on top of a desk in the opposite corner to both entrances. The way the room is laid out makes it very simple for campers to entrench themselves, and successfully removing them can be almost impossible without an [[ÜberCharge]]. | *'''Intelligence room:''' This is the room that has the Intelligence. It has two entrances from the basement. This is the primary defensive point of 2Fort, and as such it is frequently camped by [[Engineer]]s, [[Demoman|Demomen]], and other classes. To successfully capture your opposition's Intelligence, you must return it to the Intelligence room in your own base. The Intelligence is on top of a desk in the opposite corner to both entrances. The way the room is laid out makes it very simple for campers to entrench themselves, and successfully removing them can be almost impossible without an [[ÜberCharge]]. | ||
| Line 138: | Line 138: | ||
{{Maps nav}} | {{Maps nav}} | ||
| + | |||
| + | {{DISPLAYTITLE:Junction}} | ||
| + | {{Map infobox | ||
| + | | game-type=Control Point | ||
| + | | file-name=cp_junction_final | ||
| + | | map-image=Junct 01.jpg | ||
| + | | developer=[http://steamcommunity.com/id/sean_c Sean "Heyo" Cutino] | ||
| + | | map-stamp-link=http://steamcommunity.com/stats/TF2/leaderboards/30384 | ||
| + | | map-environment = Spytech | ||
| + | | map-setting = Indoor | ||
| + | | map-health-pickups-small = 8 | ||
| + | | map-health-pickups-medium = 1 | ||
| + | | map-health-pickups-large = | ||
| + | | map-ammo-pickups-small = | ||
| + | | map-ammo-pickups-medium = 7 | ||
| + | | map-ammo-pickups-large = | ||
| + | }} | ||
| + | |||
| + | {{Quotation|[http://www.teamfortress.com/scoutupdate/watchtower_and_junction.htm Scout Update page for Junction]| A Gravel Pit style map. Junction is a sharp contrast to [[Watchtower]]. It’s full of tight spaces and short sight lines, which create combat opportunities dominated by ambushes and explosive weaponry.}} | ||
| + | |||
| + | '''Junction''' este o hartă în stil Atac/Defensivă cu [[Control Point/ro|Puncte de Control]]. A fost inclusă împreună cu [[The Scout Update/ro|Actualizarea Scout]] ca o hartă oficială dezvoltată de comunitate mulțumită calității acesteia. Design-ul este similar cu cel de pe [[Gravel Pit/ro|Gravel Pit]]. | ||
| + | |||
| + | Scopul echipei BLU este de a ataca și trebuie să captureze toate cele trei puncte de control pentru a câștiga jocul. A și B trebuie capturate înainte ca C să se poată captura. Pentru ca echipa RED să câștige, ei trebuie să prevină echipa BLU să captureze ultimul punct de control C. Dacă echipa BLU captureaza ori punctul A ori B se adaugă timp pentru a câștiga mai mult timp în capturarea ultimului punct. | ||
| + | |||
| + | ==Locații== | ||
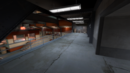
| + | [[Image:Junction overview.jpg|thumb|top|Privire în ansamblu a hărți.(fișier mare)]] | ||
| + | Junction este o hartă strâmtă, cu multe holuri și pasaje care duc către cele trei puncte de control. Folosirea claselor Demoman și Soldier duce la rezultate optime atât în defensivă cât și în ofensivă. | ||
| + | |||
| + | ===Punctul de Control A=== | ||
| + | |||
| + | Punctul A se află într-o cameră mică pe o platformă ridicată cu două seturi de scări care duc sus. Scările sunt sub punct, unul în față, alăturată de camera de spawn a echipei BLU și una pe lateral. | ||
| + | |||
| + | *'''A Lobby:''' A Lobby este o zonă mică imediat după ieșirea din camera de spawn a echipei BLU, sub punct. Aceasta face conexiunea cu holurile A/B, scări și holurile A/C. | ||
| + | *'''Stairs:''' Dedesubtul punctului se află un set mic de scări care duc direct în spatele punctului. | ||
| + | *'''Platform:''' Platforma e zona ridicată de la capătul scărilor, cea pe care se află punctul de control. | ||
| + | *'''A/B Flank:''' Flancul A/B este conectat către Lobby. Acesta este un hol care duce direct către punctul de control B. De asemenea conectează flancul A/C. | ||
| + | |||
| + | <gallery widths=130px heights=90px> | ||
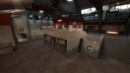
| + | Image:junction_cp_01.png|Cap Point A | ||
| + | Image:junction_cp_04.png|Cap Point A | ||
| + | File:junctionA01.png| Stairwell | ||
| + | File:junctionA02.png| A/C & A/B Flank | ||
| + | </gallery> | ||
| + | |||
| + | ===Control Point B=== | ||
| + | |||
| + | Punctul B se află într-o cameră mai mare cu un balcon care acoperă doi pereți între el. B este in colțul unde cele două balcoane se întâlnesc, și e accesibil doar prin cele două holuri de pe lateral. Punctul în sine este acoperit de o fereastră indestructibilă, prevenind focul inamic să lovească direct punctul. Două scări înconjoară și duc către punct. | ||
| + | |||
| + | *'''B Lobby:''' B Lobby este un alt hol aflat la ieșirea din locul de spawn al echipei BLU. Este mai mare decât lobby-ul A, și are cutii împrăștiate în jur. Se conectează cu flancul A/B și duce către balcoane. | ||
| + | *'''Balconies:''' Balcoanele se află la scările din lobby și merg de-a lungul pereților. Amândouă duc către camera cu punctul de control. Balconul mai îndepărtat duce către flancul B/C. | ||
| + | *'''Point Room:''' Camera punctului este locată la sfârșitul balcoanelor și adăpostește punctul de control. Este sigilată de niște ferestre cu vedere la balcoane. | ||
| + | |||
| + | <gallery widths=130px heights=90px> | ||
| + | Image:junction_cp_02.png|Cap Point B | ||
| + | Image:junction_cp_05.png|Cap Point B | ||
| + | File:junctionB01.png| A/B Flank | ||
| + | File:junctionB02.png| Balcony | ||
| + | </gallery> | ||
| + | |||
| + | ===Control Point C=== | ||
| + | |||
| + | P is located on a platform that rests on an elevated area that is, again, only accessible by stairs. The point itself has a small balcony surrounding it's front side and two side doors. Stairs lead from the point down to the elevated area. The elevated area also has stairs leading down to ground level. There are three entrances to C, two from A and one from B. The entrance from B is at the bottom of a flight of stairs, and the two from A are small doorways. | ||
| + | |||
| + | *'''A/C Flank:''' From Point A is a hallway which forks into two entrances to C. Both of these are located near each other at the bottom of the stairwell. | ||
| + | *'''B/C Flank:''' From Point B is another hallway which leads to an entrance at the other end of the stairwell. Next to the hallway is a room with two open windows viewing the area around the point. | ||
| + | *'''Balcony:''' Surrounding the point room, at the top of the stairs is a balcony from which the entire stairwell area can be seen. This area gives height advantage against any attackers. | ||
| + | *'''Battlements:''' Next to the point near the A/C flank is a small hallway and set of stairs. At the end of them is a tight area with a window all along the wall facing the point. This spot overlooks most of the area and is very useful as a [[Sentry Gun]] placement spot. | ||
| + | *'''Point Room:''' The point room is located in the center of the area, right outside the spawn, and on top of the stairs. It is shaped like a box with two entrances on each side of the balcony. Each side also has large windows along the walls. | ||
| + | |||
| + | <gallery widths=130px heights=90px> | ||
| + | Image:junction_cp_06.png|Cap Point C | ||
| + | Image:junction_cp_03.png|Cap Point C | ||
| + | File:junctionC01.png| A/C Flank | ||
| + | File:junctionC02.png| Battlements | ||
| + | </gallery> | ||
| + | |||
| + | ==Strategie== | ||
| + | {{hatnote|Vezi [[Community Junction strategy/ro]]}} | ||
| + | |||
| + | == Timp Punct Control == | ||
| + | {{Control Point Timing/Official Map}} | ||
| + | |||
| + | == Istorie actualizări == | ||
| + | '''[[March 5, 2009 Patch]]''' | ||
| + | * Fixed an exploit where Engineers could build a teleporter exit in an invalid area. | ||
| + | * Fixed a few bad overlay assignments and other minor issues. | ||
| + | '''[[April 20, 2009 Patch]]''' | ||
| + | * Updated Junction to score per-capture instead of per-round. This fixes the map not working correctly with Tournament mode and the stopwatch. | ||
| + | |||
| + | == Trivia == | ||
| + | *Junction's control points have the same name as the control points from Gravel Pit (i.e. Point C is still called "The Laser Gun") | ||
| + | |||
| + | == External links == | ||
| + | *[http://www.teamfortress.com/scoutupdate/watchtower_and_junction.htm ''The Scout Update'': Maps - Watchtower + Junction] | ||
| + | |||
| + | {{ScoutUpdateNav}} | ||
| + | <br /> | ||
| + | {{Maps nav}} | ||
| + | |||
|} | |} | ||
Latest revision as of 22:43, 28 December 2023
| 2fort | ||||||||||||||||||||||||||||||||||||||||||||||||||||||||||||||||||||||||||||||||||||||||||||||||||||||||||||||||||||||||||||||||||||||
|---|---|---|---|---|---|---|---|---|---|---|---|---|---|---|---|---|---|---|---|---|---|---|---|---|---|---|---|---|---|---|---|---|---|---|---|---|---|---|---|---|---|---|---|---|---|---|---|---|---|---|---|---|---|---|---|---|---|---|---|---|---|---|---|---|---|---|---|---|---|---|---|---|---|---|---|---|---|---|---|---|---|---|---|---|---|---|---|---|---|---|---|---|---|---|---|---|---|---|---|---|---|---|---|---|---|---|---|---|---|---|---|---|---|---|---|---|---|---|---|---|---|---|---|---|---|---|---|---|---|---|---|---|---|---|
2Fort este o hartă de tip Capturează Steagul și este o refacere a hărții cu același nume din Team Fortress Classic, aceste hărți sunt ambele bazate pe harta Team Fortress "2fort5." 2Fort a fost prima hartă CTF oficială pentru Team Fortress 2. A fost lansată ca una din cele șase hărți inițiale incluse la lansarea jocului. Această hartă constă în două forturi similare opuse unul de altul, care sunt separate de un bazin umplut cu apă. Un pod acoperit trece peste bazin și locurile de bătălie de pe fiecare fort conțin poziții excelente pentru a ataca jucătorii care vin din sens opus, particular pentru Sniper. Sunt câte trei intrări în fiecare fort, oricum nu toate sunt accesibile de fiecare clasă. Intrările primare se află la nivelul solui. Sunt rămpi scurte care duc către fiecare intrare, și intrările se strâng sub o poartă deschisă. Aceste rămpi le dau voie apărătorilor să atace intrușii de sus. A doua intrare este prin canalizările de sub bază. Intrările dintre canal și bază au niște scări și o baltă mare de apă; această zonă este un punct bun pentru atac. A treia intrare sunt zonele de bătălii de la fiecare bază, care pot fi accesate doar folosind tehnici speciale de sărire precum cele pentru Scout, Soldier, Demoman, sau Engineer. Bazele 2fort sunt celem ia ușor de apărat din toate hărțil oficiale CTF mulțumită pasagelor lungi și ușor de blocat către camera steagului echipei. Fiecare captură necesită coordonare în echipă substanțială, mai ales când sunt mulți jucători. Pentru a câștiga, echipa ta trebuie să captureze Inteligența echipei inamice continuu până la limita jocului de capturări (3 în mod normal), în timp ce preveniți echipa opusă în realizarea aceleiași misiuni. CuprinsFilm introducătorLocațiiOutside Locations
Fort Locations
Main Base Locations
StrategySee 2Fort (strategy)
Related Achievements
| ||||||||||||||||||||||||||||||||||||||||||||||||||||||||||||||||||||||||||||||||||||||||||||||||||||||||||||||||||||||||||||||||||||||


|
|


Update history
- Added medium ammo and health to basement hallways.
- Added small ammo and health to top of spiral.
- Fixed a clip brush exploit outside blue Sniper deck.
- Fixed number "2" overlay on front of red base not being assigned to the brush face.
- Fixed BLU players being able to block the BLU spawn room doors to lock in teammates.
- Moved the BLU team Sniper wall down to match the RED team Sniper wall.
Bugs
- Currently, a Dispenser placed in the doorway to the Spiral Ramp will only completely block enemy players and the owning Engineer on the BLU side of the map. A Dispenser placed in a similar position on the RED side of the map can always be bypassed by crouch-jumping over it.
- Due to the ankle-depth water in the sewers, players using them can be heard walking from almost anywhere inside the base, even the Battlements.
- Players can jump in and out of the Sniper battlement window frames when playing 2Fort on the Xbox 360 and PlayStation 3 version; however, in the PC version of 2Fort this is not possible.
- On the corner of the top of the building near spawn near the BLU battlements there is an invisible clipping that allows Soldiers and Demomen to jump up to and see through the map.
Trivia
- In GameInformer's March 2010 issue, 2Fort was named #6 in their list of Top 10 FPS Multiplayer Maps, with Dust from Counter-Strike taking #1 (Issue 203, page 31)
- "The Teufort Times" is the title of the newspaper seen in Crafting, Saxton Hale part of the WAR! Update. "Teufort" is obviously a play on words with 2Fort.
- Teufort is, however, shown to be the real locational name of the map, as suggested by the Mann's land map, and can be seen near the bottom of the Engineer Update.
- According to the map of Mann's Land, 2Fort (again called Teufort) is north of Dustbowl and eastward from Badwater Basin.
- A Beta version of 2Fort can be seen in the second Team Fortress 2 trailer.
References
See also
Warning: Display title "Junction" overrides earlier display title "2Fort".
| Fresh/Sandbox | |
|---|---|

| |
| Informaţii de bază | |
| Autor(i): | Necunoscut |
| Informaţii despre hartă | |
| Mediu: | Spytech |
| Scenariu: | Indoor |
| Poze cu harta | |
 | |
| “ | A Gravel Pit style map. Junction is a sharp contrast to Watchtower. It’s full of tight spaces and short sight lines, which create combat opportunities dominated by ambushes and explosive weaponry.
|
” |
Junction este o hartă în stil Atac/Defensivă cu Puncte de Control. A fost inclusă împreună cu Actualizarea Scout ca o hartă oficială dezvoltată de comunitate mulțumită calității acesteia. Design-ul este similar cu cel de pe Gravel Pit.
Scopul echipei BLU este de a ataca și trebuie să captureze toate cele trei puncte de control pentru a câștiga jocul. A și B trebuie capturate înainte ca C să se poată captura. Pentru ca echipa RED să câștige, ei trebuie să prevină echipa BLU să captureze ultimul punct de control C. Dacă echipa BLU captureaza ori punctul A ori B se adaugă timp pentru a câștiga mai mult timp în capturarea ultimului punct.
Locații
Junction este o hartă strâmtă, cu multe holuri și pasaje care duc către cele trei puncte de control. Folosirea claselor Demoman și Soldier duce la rezultate optime atât în defensivă cât și în ofensivă.
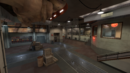
Punctul de Control A
Punctul A se află într-o cameră mică pe o platformă ridicată cu două seturi de scări care duc sus. Scările sunt sub punct, unul în față, alăturată de camera de spawn a echipei BLU și una pe lateral.
- A Lobby: A Lobby este o zonă mică imediat după ieșirea din camera de spawn a echipei BLU, sub punct. Aceasta face conexiunea cu holurile A/B, scări și holurile A/C.
- Stairs: Dedesubtul punctului se află un set mic de scări care duc direct în spatele punctului.
- Platform: Platforma e zona ridicată de la capătul scărilor, cea pe care se află punctul de control.
- A/B Flank: Flancul A/B este conectat către Lobby. Acesta este un hol care duce direct către punctul de control B. De asemenea conectează flancul A/C.
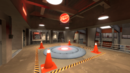
Cap Point A
Cap Point A

Stairwell
A/C & A/B Flank


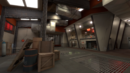
Control Point B
Punctul B se află într-o cameră mai mare cu un balcon care acoperă doi pereți între el. B este in colțul unde cele două balcoane se întâlnesc, și e accesibil doar prin cele două holuri de pe lateral. Punctul în sine este acoperit de o fereastră indestructibilă, prevenind focul inamic să lovească direct punctul. Două scări înconjoară și duc către punct.
- B Lobby: B Lobby este un alt hol aflat la ieșirea din locul de spawn al echipei BLU. Este mai mare decât lobby-ul A, și are cutii împrăștiate în jur. Se conectează cu flancul A/B și duce către balcoane.
- Balconies: Balcoanele se află la scările din lobby și merg de-a lungul pereților. Amândouă duc către camera cu punctul de control. Balconul mai îndepărtat duce către flancul B/C.
- Point Room: Camera punctului este locată la sfârșitul balcoanelor și adăpostește punctul de control. Este sigilată de niște ferestre cu vedere la balcoane.
Cap Point B
Cap Point B
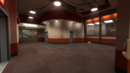
A/B Flank
Balcony


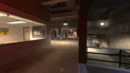
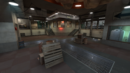
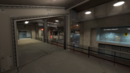
Control Point C
P is located on a platform that rests on an elevated area that is, again, only accessible by stairs. The point itself has a small balcony surrounding it's front side and two side doors. Stairs lead from the point down to the elevated area. The elevated area also has stairs leading down to ground level. There are three entrances to C, two from A and one from B. The entrance from B is at the bottom of a flight of stairs, and the two from A are small doorways.
- A/C Flank: From Point A is a hallway which forks into two entrances to C. Both of these are located near each other at the bottom of the stairwell.
- B/C Flank: From Point B is another hallway which leads to an entrance at the other end of the stairwell. Next to the hallway is a room with two open windows viewing the area around the point.
- Balcony: Surrounding the point room, at the top of the stairs is a balcony from which the entire stairwell area can be seen. This area gives height advantage against any attackers.
- Battlements: Next to the point near the A/C flank is a small hallway and set of stairs. At the end of them is a tight area with a window all along the wall facing the point. This spot overlooks most of the area and is very useful as a Sentry Gun placement spot.
- Point Room: The point room is located in the center of the area, right outside the spawn, and on top of the stairs. It is shaped like a box with two entrances on each side of the balcony. Each side also has large windows along the walls.
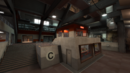
Cap Point C
Cap Point C

A/C Flank
Battlements


Strategie
Timp Punct Control
Istorie actualizări
- Fixed an exploit where Engineers could build a teleporter exit in an invalid area.
- Fixed a few bad overlay assignments and other minor issues.
- Updated Junction to score per-capture instead of per-round. This fixes the map not working correctly with Tournament mode and the stopwatch.
Trivia
- Junction's control points have the same name as the control points from Gravel Pit (i.e. Point C is still called "The Laser Gun")
External links
| |||||||||||||||||
| |||||||||||||||||||||||||||||||||||||||||||||||||||||||||||||||||||