Difference between revisions of "Classes"
(→Update history: Added 4 more patches) |
(→Class speed comparison) |
||
| Line 576: | Line 576: | ||
|} | |} | ||
<br clear="all" /> | <br clear="all" /> | ||
| − | ''* Note'': '''abs''' = absolute figures in velocity units (v), or [[Hammer unit]]s per second. | + | ''* Note'': '''abs''' = absolute figures in velocity units (v), or [[Hammer unit]]s per second.<br> |
''* Note'': Direction of movement does not affect speed under water. | ''* Note'': Direction of movement does not affect speed under water. | ||
Revision as of 01:47, 25 June 2012
| “ | Are you dangerous like Heavy, or coward like Scout?
Click to listen
— The Heavy
|
” |
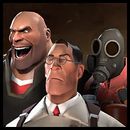
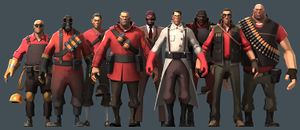
There are nine official classes that can be played in Team Fortress 2; they are as follows:
Official classes
Contents
Class roles
All nine classes are grouped into three specific combat types, offensive, defensive, and support, but all can be played outside their assigned role depending on the player's choice of strategy.
Offensive 


Offensive classes (Scout, Soldier, and Pyro) are the main attack force of the team. Whether it's assaulting Control Points or grabbing the Intelligence, these classes focus on mobility. Scouts have the ability to capture points twice as fast as any other class and can get there with their top-tier speed and double jumps. Soldiers pack a punch with their devastating Rocket Launchers, and can attack from unexpected directions by rocket jumping. Pyros can wreck fiery havoc in enemy ranks with a well timed ambush or extinguish their own burning friends, and offer the highest speed/health ratio of all classes (barring buffs or nonstandard equipment).
Defensive 


Defensive classes (Demoman, Heavy, and Engineer) serve to inhibit enemy access and to hold enemies back from vital points on the map. Overall, the defensive group has the most firepower of all the groups. Demomen can safeguard areas with stickybombs that they can detonate when enemies come by. Heavies are great for mowing down incoming troops and pushing back forces. Heavies can also keep enemies in an area while whittling their health for teammates to finish off. Engineers can build Sentry Guns for effective area defense, as well as build Teleporters and Dispensers for logistical support of the team.
Support 


Support classes (Medic, Sniper, and Spy) cannot hold the fight on their own, but their specialized abilities can tip the balance in their team's favor. They offer the offensive and defensive classes an extra edge in battle and can help turn the tide of the game. Whether crippling the enemy advance from behind or keeping teammates healed, the support classes are always handy to have around. Medics offer a mobile means of healing for teammates, capable of overhealing them to 150% of their maximum health, and can provide a range of buffs such as invincibility, 100% critical hit rate, or 300% healing rate as well as immunity to movement impairing effects. Snipers can eliminate key targets from a distance and use Jarate to extinguish teammates on fire and increase the damage dealt to the enemy. Spies can infiltrate enemy lines undetected, disable buildings, and assassinate critical threats.
Health points
Class health points comparison
| Class | Base HP | Overhealed |
|---|---|---|
(Sandman equipped) (Special Delivery pack equipped) |
125 110 125 |
185 165 185 |
| 200 | 300 | |
| 175 | 260 | |
(Eyelander, HHHH or Nessie's Nine Iron equipped, 0 heads) (Eyelander, HHHH or Nessie's Nine Iron equipped, 1 head) (Eyelander, HHHH or Nessie's Nine Iron equipped, 2 heads) (Eyelander, HHHH or Nessie's Nine Iron equipped, 3 heads) (Eyelander, HHHH or Nessie's Nine Iron equipped, 4+ heads) (Claidheamh Mòr equipped) (Ali Baba's Wee Booties or Bootlegger equipped) (Ali Baba's Wee Booties or Bootlegger and the Eyelander, HHHH or Nessie's Nine Iron equipped, 0 heads) (Ali Baba's Wee Booties or Bootlegger and the Eyelander, HHHH or Nessie's Nine Iron equipped, 1 head) (Ali Baba's Wee Booties or Bootlegger and the Eyelander, HHHH or Nessie's Nine Iron equipped, 2 heads) (Ali Baba's Wee Booties or Bootlegger and the Eyelander, HHHH or Nessie's Nine Iron equipped, 3 heads) (Ali Baba's Wee Booties or Bootlegger and the Eyelander, HHHH or Nessie's Nine Iron equipped, 4+ heads) (Ali Baba's Wee Booties or Bootlegger and the Claidheamh Mòr equipped) |
175 150 165 180 195 210 175 200 175 190 205 220 235 200 |
260 225 245 270 290 315 260 300 260 285 305 330 350 300 |
(Dalokohs Bar or Fishcake for 30 seconds) (Warrior's Spirit equipped) (Dalokohs Bar or Fishcake eaten and Warrior's Spirit equipped) |
300 350 300 350 |
450 450 450 450 |
(Gunslinger equipped) |
125 150 |
185 225 |
(Vita-Saw equipped) |
150 140 |
225 210 |
(Darwin's Danger Shield equipped) |
125 125 |
185 185 |
(Conniver's Kunai equipped) (Maximum buff from Conniver's Kunai) (Big Earner equipped) |
125 70 N/A 100 |
185 105 210 185 |
A Medic with the Medi Gun or Kritzkrieg may overheal a teammate to 150% of their normal health maximum. The Quick-Fix cannot overheal but may maintain overhealed health created by the Medi Gun or Kritzkrieg. If hurt, a player can refill their health through a number of ways.
Speed
Speed is measured in-game using the command cl_showpos 1, measuring in velocity units (v.) The standard movement speed is 100% (that of the Spy, Sniper, Pyro, and Engineer.) Note forward speed is obtained by pressing the forward, left, or right keys, backward speed obtained by pressing the backward key, while crouching speed is found by pressing the crouch button. Backward speed is generally calculated by 90% of the class's forward speed, while crouching is at 33%. Forward and backward speeds are, however, the same when crouching or charging/zooming as a Sniper. During humiliation all classes on the winning team will move 10% faster and all on the losing team will move 10% slower. All normal walking speeds are capped at 450v, or 150%.
For Spies, disguising as a slower class (Soldier, Demoman, or Heavy) will accurately reduce the Spy's speed to the appropriate speed of the class he is disguised as, e.g. the Spy disguised as the Heavy will move to the speed of Heavy, and remain at that speed unless he undisguises or cloaks. Disguising as a faster class (Scout and Medic), however, will not make the Spy move faster and he will continue to move at 100% speed.
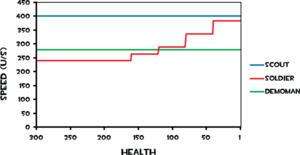
A Demoman wielding the Eyelander, Nessie's Nine Iron or the Horseless Headless Horsemann's Headtaker will gain approximately 8% on his speed with every kill or "head" taken with it. While charging with the Chargin' Targe or Splendid Screen equipped, he moves at 250% of the standard movement speed. The Soldier's speed while wielding the Equalizer increases by 10% with every loss of 40 health below 200.
A Soldier who has hit a teammate within the last 4 seconds with the Disciplinary Action will allow the teammate and the Soldier himself to move at 140% of the speed they normally would, capped at 450v.
A Medic who has the Quick-Fix equipped will be able to match the speed of any faster heal target while they are connected by the healing beam.
The Horseless Headless Horsemann is not a class, but is shown here for comparison.
Class speed comparison
| Class | Forward | (abs) | (real world) | Backward | (abs) | Crouched | (abs) | Underwater | (abs) |
|---|---|---|---|---|---|---|---|---|---|
| 133% | 400v | 17.0 mph | 120% | 360v | 44.4% | 133.33v | 106.4% | 320v | |
(Equalizer with 121-160 HP) |
80%
88%
|
240v
264v
|
10.2 mph
11.3 mph
|
72%
79%
|
216v
238v
|
26.7%
29.3%
|
80v
88v
|
64%
70.4%
|
192v
211.2v
|
(Gas Jockey's Gear set equipped) |
100%
110% |
300v
330v |
12.8 mph
14.1 mph |
90%
99% |
270v
297v |
33.3%
36.7% |
100v
110v |
80%
88% |
240
264 |
(charging with Chargin' Targe or Splendid Screen) |
93% 250% |
280v 750v |
11.9 mph
32.0 mph |
84%
N/A |
252v
N/A |
31.1%
N/A |
93.33v
N/A |
74.4%
200%
|
224v
600v
|
(Minigun, Natascha, or Tomislav spinning) |
77% 37% |
230v 110v |
9.8 mph 4.7 mph |
69% 33% |
207v 99v |
25.5% 0% |
76.67v 0v |
61.6%
29.6%
|
184v
88v
|
(hauling any building) |
100%
75% |
300v
225v |
12.8 mph
9.6 mph |
90%
67.5% |
270v
202.5v |
33.3%
25% |
100v
75v |
80%
60% |
240v
225v |
(Overdose drawn with 100% ÜberCharge) |
107%
117.33% |
320v
352v |
13.6 mph
15.0 mph |
96%
105.6% |
288v
316.8 |
35.5%
39.11% |
106.67v
117.34v |
85.6%
93.86%
|
256v
273.6v
|
(Sniper Rifle, Sydney Sleeper, Bazaar Bargain, or Machina zoomed) |
100% 27%
|
300v 80v
|
12.8 mph 3.4 mph
|
90% 27%
|
270v 80v
|
33.3% 1.33%
|
100v 4v
|
80%
21.6%
|
240v
64v
|
| 100% | 300v | 12.8 mph | 90% | 270v | 33.3% | 100v | 80% | 240v | |
| Horseless Headless Horsemann | 133% | 400v | 17.0 mph | N/A | N/A | N/A | N/A | N/A | N/A |
* Note: abs = absolute figures in velocity units (v), or Hammer units per second.
* Note: Direction of movement does not affect speed under water.
Size
All classes have varying height, with the Engineer being the shortest and the Heavy being the tallest of the classes. Classes also have various builds and general body sizes; each class has their own individual set of shaped hitboxes used for bullet-based attacks.
However, for the purposes of collisions with objects, players, melee attacks, and projectiles, all classes are considered to be the same width and height. This also means that no class has an advantage or disadvantage when it comes to navigating corners or tight spaces.
Update history
- Improved prediction of Spy's speed changes when disguising
- Player health increased 100%
- Player health increased 25% (over normal – not the previous 100% increase)
February 11, 2011 Patch (Beta)
- Restored player health to normal values
- Slightly reduced Pyro's weight
| |||||


