Difference between revisions of "Obscure"
(→Additional links: Broken source) |
m (added pickup counts) |
||
| Line 1: | Line 1: | ||
{{Map infobox | {{Map infobox | ||
| − | |game-type=Control Point | + | | game-type= Control Point |
| − | |map-image=CP Obscure 4.jpg | + | | map-image= CP Obscure 4.jpg |
| − | |current-version=Final | + | | current-version= Final |
| − | |developer=[http://forums.tf2maps.net/member.php?u=6504 Ahmad "byte" Fansa] | + | | developer= [http://forums.tf2maps.net/member.php?u=6504 Ahmad "byte" Fansa] |
| − | |download-link=[http://forums.tf2maps.net/showthread.php?t=10687 TF2Maps.net]}} | + | | download-link= [http://forums.tf2maps.net/showthread.php?t=10687 TF2Maps.net] |
| + | | map-health-pickups-small = 15 | ||
| + | | map-health-pickups-medium = 5 | ||
| + | | map-ammo-pickups-small = 14 | ||
| + | | map-ammo-pickups-medium = 4 | ||
| + | }} | ||
'''Obscure''' is a [[Game modes#Standard control point|standard control point]] map. | '''Obscure''' is a [[Game modes#Standard control point|standard control point]] map. | ||
Revision as of 12:59, 15 June 2012
| Obscure | |
|---|---|

| |
| Basic Information | |
| Developer(s): | Unknown |
Obscure is a standard control point map.
To win, your team must capture and control all five control points.
Contents
Locations
Control Point 3
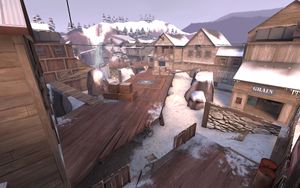
The middle capture point is similar to that of Badlands, which a bridge in the centre and a valley underneath.
- Entrances: Each team has 2 paths to the bridge. One leads directly to each end of the bridge, another leads to a slightly raised platform, to the right of the main bridge entrance
- Under The Bridge: There are 2 entrances that allow players direct access to the valley under the control point. Both are located in the bottom left of the area. These routes allow players into useful flanking areas, via ramps that lead to the raised platform and the main bridge entrance.
- Cover: There are boxes located at each end of the bridge, in front of the main entrance. These provide cover from enemy fire. These boxes can be jumped over by players taking cover in two jumps, because of a slight ledge they form half way up.
Control Points 2 & 4
The second capture point is located in an open area, surrounded by many high vantage points. The point itself is located on a slightly raised platform with ramps leading up to it.
- Entrances From Control Point 3: The second control point can be reached either through the building that leads to the bridge (on the right of the map for defending players), or though two lower routes (on the left of the map for defending players).
- Building: There is a large, most empty, building to the side of the point. There are stairs leading up to a small wooden balcony, which looks over most of the area.
- Ledge: When attacking the point, there is a ledge directly in front of the control point. This ledge is accessible by the attacking team by running across the walkway located near the point, and jumping over. The ledge itself has metal sheets to cover parts of it up, providing cover for players.
Control Points 1 & 5
The final control points are located inside the complexes at either end of the map.
- Entrances From Control Point 2 & 4: There are four paths to the final control point from the second or forth control point. Three of these routes lead into a lobby area, before the room that houses the actual control point. There is the main entrance which leads to the lobby, this door is just to the right of control point 2/4. There is the side entrance, which is to the left of the main entrance, on the side of the building. This route also leads into the lobby. The only route that leads to the final point directly is a low pass, further around the final building than the side entrance to the lobby. This route leads into the bottom left corner off the final room (for players defending the final point).
- Lobby: The three routes stated above lead into this area. It has an upper and lower level. On the bottom floor there is the main entrance into the final capture point room and stairs to the upper level. On the upper level there are 2 routes to access the final capture point room, both of which lead onto the bridge.
- Final Capture Room: In the final room there is a walkway, with a ramp making it accessible from the ground. The upper level of the lobby leads onto this bridge. In the upper right (for defending players), there is a spawn exit. This gives defender a good height advantage for attacking.
Screenshots
Notes
- This map is commonly used for competitive 6v6 matches in ETF2L divisions. Other maps include Badlands, Granary, Gravel Pit, Freight and Gullywash.
Additional links
| ||||||||||||||||||||||||||||||||||||||||||||||||


