Difference between revisions of "Horseless Headless Horsemann"
m |
m (Applied filters to Horseless Headless Horsemann (Review RC#153938)) |
||
| Line 9: | Line 9: | ||
{{Quotation|'''The Soldier''' on undead horseless horsemen|This is my world! You are not welcome in my world!|sound=Soldier_taunts17.wav}} | {{Quotation|'''The Soldier''' on undead horseless horsemen|This is my world! You are not welcome in my world!|sound=Soldier_taunts17.wav}} | ||
| − | The '''Horseless Headless Horsemann''' (often abbreviated to '''HHH''') is a neutral enemy (referred to as "Team Fortress's first boss monster" on the update page) who appears in [[Mann Manor]], released with the [[Scream Fortress]] update. As not-quite-dead form of [[Non-player characters#Silas Mann|Silas Mann]], this character will crawl out of the currently contested [[control point]] after a pre-determined amount of time, before hunting down and killing any player on either team until he is defeated. The amount of damage the Horseless Headless Horsemann deals is equivalent to two times the current health of the character it is striking. It IS however possible to survive a direct strike from it by using the Dead Ringer with a | + | The '''Horseless Headless Horsemann''' (often abbreviated to '''HHH''') is a neutral enemy (referred to as "Team Fortress's first boss monster" on the update page) who appears in [[Mann Manor]], released with the [[Scream Fortress]] update. As not-quite-dead form of [[Non-player characters#Silas Mann|Silas Mann]], this character will crawl out of the currently contested [[control point]] after a pre-determined amount of time, before hunting down and killing any player on either team until he is defeated. The amount of damage the Horseless Headless Horsemann deals is equivalent to two times the current health of the character it is striking. It IS however possible to survive a direct strike from it by using the Dead Ringer with a Spy. |
Players too close to the Horsemann when it makes a kill will be designated as "It," whereupon they become the primary target. The current "It" is marked with a floating white skull-and-crossbones symbol (the same symbol used for the [[G.R.U.]]). The person marked as "It" can pass on their status by striking a player on the opposing team with their [[melee]] weapon or by moving close enough to RED or BLU's spawn. After 30 seconds, the Horsemann will abandon chasing whoever is "It". He will then choose the first player that is within range as the new "It". | Players too close to the Horsemann when it makes a kill will be designated as "It," whereupon they become the primary target. The current "It" is marked with a floating white skull-and-crossbones symbol (the same symbol used for the [[G.R.U.]]). The person marked as "It" can pass on their status by striking a player on the opposing team with their [[melee]] weapon or by moving close enough to RED or BLU's spawn. After 30 seconds, the Horsemann will abandon chasing whoever is "It". He will then choose the first player that is within range as the new "It". | ||
Revision as of 01:47, 6 November 2010
| “Let's go, let's go, let's go!” This article documents a recent addition. It may contain speculation, broken links or errors. You can help improve it by editing this page to include new information. |
| Horseless Headless Horsemann | |
|---|---|

| |
| Basic Information | |
| Icon: | N/A |
| Type: | NPC |
| Health: | 3000+ |
| Speed: | 133% |
| “ | This is my world! You are not welcome in my world!
Click to listen
— The Soldier on undead horseless horsemen
|
” |
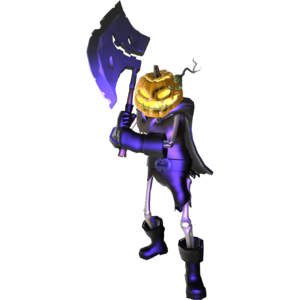
The Horseless Headless Horsemann (often abbreviated to HHH) is a neutral enemy (referred to as "Team Fortress's first boss monster" on the update page) who appears in Mann Manor, released with the Scream Fortress update. As not-quite-dead form of Silas Mann, this character will crawl out of the currently contested control point after a pre-determined amount of time, before hunting down and killing any player on either team until he is defeated. The amount of damage the Horseless Headless Horsemann deals is equivalent to two times the current health of the character it is striking. It IS however possible to survive a direct strike from it by using the Dead Ringer with a Spy.
Players too close to the Horsemann when it makes a kill will be designated as "It," whereupon they become the primary target. The current "It" is marked with a floating white skull-and-crossbones symbol (the same symbol used for the G.R.U.). The person marked as "It" can pass on their status by striking a player on the opposing team with their melee weapon or by moving close enough to RED or BLU's spawn. After 30 seconds, the Horsemann will abandon chasing whoever is "It". He will then choose the first player that is within range as the new "It".
If no one is "It", he may perform a "Boo" taunt. He crouches and then spreads his arms wide, releasing a loud ghostly "BOO!" and scaring anyone in a range of 500 units. This is similar to the Ghost's effect and also grants the Scared Stiff Scarechievement. Wearing the Horseless Headless Horsemann's Head or the Saxton Hale Mask provides immunity from being scared in this way.
Contributing to killing the Horseless Headless Horsemann awards both the Sleepy Holl0wnd scarechievement and the Horseless Headless Horsemann's Head hat. If a player delivers at least a single blow with a melee weapon he will drop an Unusual Haunted Metal Scrap, specifically when the Horsemann "shivers" when he is about to die, or be at least the last three players to strike him. Contributing to the kill is not specific to melee or ranged damage. Dealing damage in any form to him awards you with credit for his death if you are alive at the time of his death.
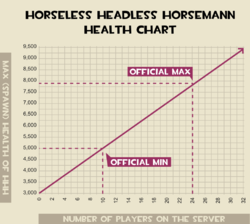
The Horseless Headless Horsemann has a base health of 3000, increasing by 200 per player in the server, making his maximum possible health a massive 7800 (24-player server) or an even higher 9400 (in an increased slot 32-player server). He will not spawn if there are under 10 players in the server meaning, unless the console is used to spawn him manually, his minimum possible health is 5000. The Horsemann spawns roughly every 8 minutes (± 1 minute).
Strategy
- One basic strategy for the player designated "It" is to act as bait for the Horsemann while all other players inflict as much damage as they can.
- Another is to have a Heavy/Medic pair camp the control point where he will spawn next, building up a Kritzkrieg charge, and unleashing it upon him while he is spawning which subsequently kills him after his spawn animation is complete.
- It might be a good idea for a Scout who is "It" to flee while the Horsemann pursues him away from your team's spawn room. If anything, lure the Horsemann towards the enemy team's spawn room to provide a distraction.
- A Scout can keep the Horsemann running back and forth at the Control Point nearest to Red team's spawn by jumping over the bottomless pits, and then jumping back over them when the Horsemann gets close.
- Playing as Scout while being 'It' allows you to dodge the Horsemann's attacks and pursuits due to your agility and ability to double/triple jump. As a Demoman, using the Chargin' Targe it is also possible to outrun him by charging repeatedly in a single direction across open ground.
- The Spy's Dead Ringer will allow a player to survive the Horsemann's attacks. However, the monster will still pursue you relentlessly and kill you as your damage reduction runs out.
- Because the Horsemann does not suffer afterburn damage, using the Pyro against the Horseless Headless Horsemann is not recommended. In addition, the short effective range of the Pyro makes attacking head-on a very deadly prospect. However, using the Backburner while he is distracted can be effective in defeating him.
- Using the Scottish Resistance, the Demoman can deal a considerable amount of damage with multiple stickybombs. Use the increased firing rate of the Scottish Resistance to your advantage. You can also plant stickybombs to the Horsemann's spawning point before he appears. This would deal a huge amount of damage in an instant. This strategy is particularly effective with a Kritzkrieg charge.
- As the Engineer, Sentry Guns will not target the Horsemann. However, you can use the Wrangler to hurt the Horsemann. The Horsemann is not affected by the Sentry Gun's knockback. Also note that the Wrangler's slight auto-aim will not activate, rendering it slightly more difficult to keep the Sentry Gun's fire on-target.
- As a Scout you can use Bonk! Atomic Punch if you are "It" to distract the Horsemann, thus aiding your team. Caution is advised, however, as Bonk has a limited use time.
- The Horsemann has a specific search radius around the active control point. It is possible to stop him chasing you by running away from the control point and evading him until he loses interest in you. This will cause him to attack someone else, or if there is nobody in his search radius, to run back and stand upon the control point to await more victims or to execute a "Boo!" attack.
- The control points are still active while the Horsemann is out. Use this time to take control of the point while the enemy is distracted!
- A strategy regarding RED on C is to stay as close as possible to spawn and retreat into the spawn as soon as a player on said team is "IT." This way, the HHH will spend most of the time chasing BLU, thus defending your point. This strategy works great with Sentry Guns aiming at the point.
- The Horsemann can see through the Spy's Cloak.
- Though the HHH can chase the player designated "It" onto the roof of B, he cannot chase a player onto the roofs of the buildings near it, therefore it is still possible to deal damage without the risk of being killed.
- The Horsemann appears to be completely immune to most, if not all, status ailments such as being coated in Jarate, Mad Milk, afterburn, Natascha slowdown, The Sandman's ball and knockback. However, the Horsemann is affected by Critical damage and damage ramp up/falloff.
- Like a building, the Horsemann does not activate any on-hit effects such as the Buff Banner's rage building, the healing of the Black Box or Blutsauger, or the damage text and hit sound.
- The Horsemann will attack anything blocking his path, this includes untargeted players and buildings. Keep in mind wrangled Sentry Guns can survive a few hits, allowing you and your team to profit from the distraction.
- The Horsemann runs as fast as a Scout.
- The Horsemann's target can trap him by standing on the ledge behind the wall of the shack on the rock outcrop. Standing there while targeted makes the Horsemann attack the wall of the shack and ignore all other players, including those attacking him with melee weapons. Using this method the "Gored!" ghostchievement can be easily obtained.
- The Huntsman deals extra damage on headshots against the Horsemann, of which the same is yet to be confirmed for the Sniper Rifle or the Ambassador.
- Unlike popular belief, a Backstab will not affect the Horsemann in any shape or form. Either Spy knife will simply behave as if it were frontally swiping an opponent.
Related Achievements
|
|
Gallery
Kill icon
Trivia
- The Horseless Headless Horsemann is a parody of the Headless Horseman from the story "The Legend of Sleepy Hollow" by Washington Irving.
- A belt identical to The Horsemann's is attached to the Ghastlier Gibus.
- The Horseless Headless Horsemann's mechanics are similar to a community made mod called VS. Saxton Hale, in which everyone is on RED except Saxton Hale, who is able to instantly kill anybody with a single hit, as well as startle groups of enemies.
- The VS. Saxton Hale Mod has a random chance each round to replace Saxton hale with the Horseless Headless Horsemann.
- The Horsemann appears to use 2 different Demoman animations, specifically, the Bottle animations when turning around on the spot to attack his next target and majority of the Eyelander animations for his attacks and movement.
- The animation the Horsemann uses when walking changes depending on how much health he has. After he loses a certain percentage of health (currently not known, presumably 50%) he stops using the Eyelander/Skullcutter walk animation (two handed) and starts using the Bottle/Pain Train/Frying Pan walk animation (one handed).
- The Horsemann will not cause damage notifications to show up on any player's screen (the same applies with the hit sound).
- The Horsemann is purple and leaves a purple glow, perhaps indicative of the fact that he is on neither RED or BLU and, therefore, targets both teams. Additionally, he leaves a trail of smoking purple footprints, allowing him to be easily tracked.
- By using the console command ent_create headless_hatman, it's possible to spawn the Horseless Headless Horsemann in any map (requires cheats). However, like other bots, he won't move or attack unless the map has nav meshes. Another command to spawn the Horseless Headless Horsemann is the following command: tf_halloween_force_boss_spawn (requires cheats).
- By using the former code to spawn multiple Horsemenn at once they will attack each other as well as players.
- The Horsemann kill's count as environmental deaths. Therefore achievements such as Foul Territory for the Scout can be achieved by stunning some one about to be killed by the Horsemann.
- The Horseless Headless Horsemann is referred to in the game files as "Hatman", presumably because of his role in providing the players with a free hat, should they kill him.
- The Horsemann has several unused animations that can be found in the game files. These include the "Cheers" thumbs up action and Medic calls. This is due to the Horsemann using many of the Demoman's original animations.
- There is also an unused jump animation, also left over from the Demoman. This animation is unused as the Horsemann never actually jumps, though he will fall from a higher level if he is chasing someone. He will otherwise walk around height obstacles or change his target.
- Originally, it was possible to evade the Horsemann by staying on the roof of point B, as he would fall through the playerclip ladder. This was fixed in an update on October 28, 2010.
- Bots will not attack the Horsemann and will completely ignore him, however he may be damaged in the cross-fire.
Demonstration
| |||||||||||||||||||||||||


