Difference between revisions of "Scream Fortress 2014/sv"
m (→Banor) |
m |
||
| Line 1: | Line 1: | ||
| + | {{DISPLAYTITLE:Scream Fortress 2014}} | ||
[[File:Sixth Annual Scream Fortress Special.jpg|right|365px|link=http://www.teamfortress.com/screamfortress6/]] | [[File:Sixth Annual Scream Fortress Special.jpg|right|365px|link=http://www.teamfortress.com/screamfortress6/]] | ||
{{patch info|10|29|2014}} | {{patch info|10|29|2014}} | ||
| − | '''Scream Fortress 2014''' var en stor uppdatering som innehöll en [[Carnival of Carnage|carnival]] styrd av [[Merasmus]]. Den intruducerade Radiobilar som post-round aktivitet, Inehållande 3 olika banor/lägen. Det är den sjätte Scream Fortress uppdateringen. Alla spelare som loggar in efter att ha installerat uppdateringen får en [[Halloween Gift Cauldron]],som inehåller 3 Scream Fortress 2014 objekt, en som alltid är av[[Strange]] och [[Haunted]] kvalité. | + | '''Scream Fortress 2014''' var en stor uppdatering som innehöll en [[Carnival of Carnage/sv|carnival]] styrd av [[Merasmus/sv|Merasmus]]. Den intruducerade Radiobilar som post-round aktivitet, Inehållande 3 olika banor/lägen. Det är den sjätte Scream Fortress uppdateringen. Alla spelare som loggar in efter att ha installerat uppdateringen får en [[Halloween Gift Cauldron/sv|Halloween Gift Cauldron]],som inehåller 3 Scream Fortress 2014 objekt, en som alltid är av[[Strange/sv|Strange]] och [[Haunted/sv|Haunted]] kvalité. |
| − | Uppdateringen innehöll 50 nya hattar/kosmetiska objekt, 6 [[Merasmachievments|achievements]], Halloweenbanan [[Carnival of Carnage]] samt [[Kritz or Treat Canteen]] och [[Necro Smasher]]: ett meleevapen för alla klasser förutom Spy. | + | Uppdateringen innehöll 50 nya hattar/kosmetiska objekt, 6 [[Merasmachievments/sv|achievements]], Halloweenbanan [[Carnival of Carnage/sv|Carnival of Carnage]] samt [[Kritz or Treat Canteen/sv|Kritz or Treat Canteen]] och [[Necro Smasher/sv|Necro Smasher]]: ett meleevapen för alla klasser förutom Spy. |
| − | Uppdateringen "skapade" även Udda Spökbelagda hattar/kosmetiska objekt. Alla Udda Spökbelagda objekt inehåller 2 Udda delar -- "Carnival Games Won" och "Carnival Underworld Kills" (Spelare avkastade av banan). Vanliga kills kan bara räknas på [[Carnival of Carnage]]. | + | Uppdateringen "skapade" även Udda Spökbelagda hattar/kosmetiska objekt. Alla Udda Spökbelagda objekt inehåller 2 Udda delar -- "Carnival Games Won" och "Carnival Underworld Kills" (Spelare avkastade av banan). Vanliga kills kan bara räknas på [[Carnival of Carnage/sv|Carnival of Carnage]]. |
== Additions == | == Additions == | ||
=== Vapen === | === Vapen === | ||
{| class="wikitable collapsible" cellpadding="3" style="text-align:center;" | {| class="wikitable collapsible" cellpadding="3" style="text-align:center;" | ||
| − | | width="60px" style="background: #6A5587;" | {{icon class|All Classes}}<br/>'''[[Classes|<span style="color: #FFF;"> | + | | width="60px" style="background: #6A5587;" | {{icon class|All Classes}}<br/>'''[[Classes/sv|<span style="color: #FFF;">Alla klasser</span>]]''' |
| align="center" style="background: #AD9DC3;" | {{item icon|Necro Smasher|75px}} | | align="center" style="background: #AD9DC3;" | {{item icon|Necro Smasher|75px}} | ||
| − | | style="background: #F1ECF7;"| ''' | + | | style="background: #F1ECF7;"| '''{{item link|Necro Smasher}}'''<sup>†</sup> |
| + | |- | ||
| + | | height="30px" style="background:#6A5587;" | <font color="white">'''Notes'''</font> | ||
| + | | colspan="2" | <sup>†</sup>Not available for the Spy. | ||
|} | |} | ||
| − | |||
=== Kosmetiska objekt === | === Kosmetiska objekt === | ||
{| class="wikitable collapsible" cellpadding="3" style="text-align:center;" | {| class="wikitable collapsible" cellpadding="3" style="text-align:center;" | ||
| − | | width="60px" style="background: #6A5587;" rowspan="6" | {{icon class|Scout}}<br/>'''[[Scout|<span style="color: #FFF;"> | + | | width="60px" style="background: #6A5587;" rowspan="6" | {{icon class|Scout}}<br/>'''[[Scout/sv|<span style="color: #FFF;">{{class name|scout}}</span>]]''' |
| align="center" style="background: #AD9DC3;" | {{item icon|Claws And Infect|75px}} | | align="center" style="background: #AD9DC3;" | {{item icon|Claws And Infect|75px}} | ||
| − | | style="background: #F1ECF7;"| ''' | + | | style="background: #F1ECF7;"| '''{{item link|Claws And Infect}}''' |
|- | |- | ||
| align="center" style="background: #AD9DC3;" | {{item icon|Crazy Legs|75px}} | | align="center" style="background: #AD9DC3;" | {{item icon|Crazy Legs|75px}} | ||
| − | | style="background: #F1ECF7;"| ''' | + | | style="background: #F1ECF7;"| '''{{item link|Crazy Legs}}''' |
|- | |- | ||
| align="center" style="background: #AD9DC3;" | {{item icon|Fowl Fists|75px}} | | align="center" style="background: #AD9DC3;" | {{item icon|Fowl Fists|75px}} | ||
| − | | style="background: #F1ECF7;"| ''' | + | | style="background: #F1ECF7;"| '''{{item link|Fowl Fists}}''' |
|- | |- | ||
| align="center" style="background: #AD9DC3;" | {{item icon|Head Hunter|75px}} | | align="center" style="background: #AD9DC3;" | {{item icon|Head Hunter|75px}} | ||
| − | | style="background: #F1ECF7;"| ''' | + | | style="background: #F1ECF7;"| '''{{item link|Head Hunter}}''' |
|- | |- | ||
| align="center" style="background: #AD9DC3;" | {{item icon|Nugget Noggin|75px}} | | align="center" style="background: #AD9DC3;" | {{item icon|Nugget Noggin|75px}} | ||
| − | | style="background: #F1ECF7;"| ''' | + | | style="background: #F1ECF7;"| '''{{item link|Nugget Noggin}}''' |
|- | |- | ||
| align="center" style="background: #AD9DC3;" | {{item icon|Talon Trotters|75px}} | | align="center" style="background: #AD9DC3;" | {{item icon|Talon Trotters|75px}} | ||
| − | | style="background: #F1ECF7;"| ''' | + | | style="background: #F1ECF7;"| '''{{item link|Talon Trotters}}''' |
|- | |- | ||
| − | | width="60px" style="background: #6A5587;" rowspan="4" | {{icon class|Soldier}}<br/>'''[[Soldier|<span style="color: #FFF;">Soldier</span>]]''' | + | | width="60px" style="background: #6A5587;" rowspan="4" | {{icon class|Soldier}}<br/>'''[[Soldier/sv|<span style="color: #FFF;">{{class name|Soldier}}</span>]]''' |
| align="center" style="background: #AD9DC3;" | {{item icon|Battle Bird|75px}} | | align="center" style="background: #AD9DC3;" | {{item icon|Battle Bird|75px}} | ||
| − | | style="background: #F1ECF7;"| ''' | + | | style="background: #F1ECF7;"| '''{{item link|Battle Bird}}''' |
|- | |- | ||
| align="center" style="background: #AD9DC3;" | {{item icon|Ghoul Gibbin' Gear|75px}} | | align="center" style="background: #AD9DC3;" | {{item icon|Ghoul Gibbin' Gear|75px}} | ||
| − | | style="background: #F1ECF7;"| ''' | + | | style="background: #F1ECF7;"| '''{{item link|Ghoul Gibbin' Gear}}''' |
|- | |- | ||
| align="center" style="background: #AD9DC3;" | {{item icon|Hellhunter's Headpiece|75px}} | | align="center" style="background: #AD9DC3;" | {{item icon|Hellhunter's Headpiece|75px}} | ||
| − | | style="background: #F1ECF7;"| ''' | + | | style="background: #F1ECF7;"| '''{{item link|Hellhunter's Headpiece}}''' |
|- | |- | ||
| align="center" style="background: #AD9DC3;" | {{item icon|Supernatural Stalker|75px}} | | align="center" style="background: #AD9DC3;" | {{item icon|Supernatural Stalker|75px}} | ||
| − | | style="background: #F1ECF7;"| ''' | + | | style="background: #F1ECF7;"| '''{{item link|Supernatural Stalker}}''' |
|- | |- | ||
| − | | width="60px" style="background: #6A5587;" rowspan="6" | {{icon class|Pyro}}<br/>'''[[Pyro|<span style="color: #FFF;">Pyro</span>]]''' | + | | width="60px" style="background: #6A5587;" rowspan="6" | {{icon class|Pyro}}<br/>'''[[Pyro/sv|<span style="color: #FFF;">{{class name|Pyro}}</span>]]''' |
| align="center" style="background: #AD9DC3;" | {{item icon|Arsonist Apparatus|75px}} | | align="center" style="background: #AD9DC3;" | {{item icon|Arsonist Apparatus|75px}} | ||
| − | | style="background: #F1ECF7;"| ''' | + | | style="background: #F1ECF7;"| '''{{item link|Arsonist Apparatus}}''' |
|- | |- | ||
| align="center" style="background: #AD9DC3;" | {{item icon|Creature's Grin|75px}} | | align="center" style="background: #AD9DC3;" | {{item icon|Creature's Grin|75px}} | ||
| − | | style="background: #F1ECF7;"| ''' | + | | style="background: #F1ECF7;"| '''{{item link|Creature's Grin}}''' |
|- | |- | ||
| align="center" style="background: #AD9DC3;" | {{item icon|Lollichop Licker|75px}} | | align="center" style="background: #AD9DC3;" | {{item icon|Lollichop Licker|75px}} | ||
| − | | style="background: #F1ECF7;"| ''' | + | | style="background: #F1ECF7;"| '''{{item link|Lollichop Licker}}''' |
|- | |- | ||
| align="center" style="background: #AD9DC3;" | {{item icon|Moccasin Machinery|75px}} | | align="center" style="background: #AD9DC3;" | {{item icon|Moccasin Machinery|75px}} | ||
| − | | style="background: #F1ECF7;"| ''' | + | | style="background: #F1ECF7;"| '''{{item link|Moccasin Machinery}}''' |
|- | |- | ||
| align="center" style="background: #AD9DC3;" | {{item icon|Mr. Juice|75px}} | | align="center" style="background: #AD9DC3;" | {{item icon|Mr. Juice|75px}} | ||
| − | | style="background: #F1ECF7;"| ''' | + | | style="background: #F1ECF7;"| '''{{item link|Mr. Juice}}''' |
|- | |- | ||
| align="center" style="background: #AD9DC3;" | {{item icon|Vampyro|75px}} | | align="center" style="background: #AD9DC3;" | {{item icon|Vampyro|75px}} | ||
| − | | style="background: #F1ECF7;"| ''' | + | | style="background: #F1ECF7;"| '''{{item link|Vampyro}}''' |
|- | |- | ||
| − | | width="60px" style="background: #6A5587;" rowspan="4" | {{icon class|Demoman}}<br/>'''[[Demoman|<span style="color: #FFF;">Demoman</span>]]''' | + | | width="60px" style="background: #6A5587;" rowspan="4" | {{icon class|Demoman}}<br/>'''[[Demoman/sv|<span style="color: #FFF;">{{class name|Demoman}}</span>]]''' |
| align="center" style="background: #AD9DC3;" | {{item icon|Eyeborg|75px}} | | align="center" style="background: #AD9DC3;" | {{item icon|Eyeborg|75px}} | ||
| − | | style="background: #F1ECF7;"| ''' | + | | style="background: #F1ECF7;"| '''{{item link|Eyeborg}}''' |
|- | |- | ||
| align="center" style="background: #AD9DC3;" | {{item icon|Forgotten King's Pauldrons|75px}} | | align="center" style="background: #AD9DC3;" | {{item icon|Forgotten King's Pauldrons|75px}} | ||
| − | | style="background: #F1ECF7;"| ''' | + | | style="background: #F1ECF7;"| '''{{item link|Forgotten King's Pauldrons}}''' |
|- | |- | ||
| align="center" style="background: #AD9DC3;" | {{item icon|Forgotten King's Restless Head|75px}} | | align="center" style="background: #AD9DC3;" | {{item icon|Forgotten King's Restless Head|75px}} | ||
| − | | style="background: #F1ECF7;"| ''' | + | | style="background: #F1ECF7;"| '''{{item link|Forgotten King's Restless Head}}''' |
|- | |- | ||
| align="center" style="background: #AD9DC3;" | {{item icon|Mannhattan Project|75px}} | | align="center" style="background: #AD9DC3;" | {{item icon|Mannhattan Project|75px}} | ||
| − | | style="background: #F1ECF7;"| ''' | + | | style="background: #F1ECF7;"| '''{{item link|Mannhattan Project}}''' |
|- | |- | ||
| − | | width="60px" style="background: #6A5587;" rowspan="4" | {{icon class|Heavy}}<br/>'''[[Heavy|<span style="color: #FFF;">Heavy</span>]]''' | + | | width="60px" style="background: #6A5587;" rowspan="4" | {{icon class|Heavy}}<br/>'''[[Heavy/sv|<span style="color: #FFF;">{{class name|Heavy}}</span>]]''' |
| align="center" style="background: #AD9DC3;" | {{item icon|Bone-Cut Belt|75px}} | | align="center" style="background: #AD9DC3;" | {{item icon|Bone-Cut Belt|75px}} | ||
| − | | style="background: #F1ECF7;"| ''' | + | | style="background: #F1ECF7;"| '''{{item link|Bone-Cut Belt}}''' |
|- | |- | ||
| align="center" style="background: #AD9DC3;" | {{item icon|Bull Locks|75px}} | | align="center" style="background: #AD9DC3;" | {{item icon|Bull Locks|75px}} | ||
| − | | style="background: #F1ECF7;"| ''' | + | | style="background: #F1ECF7;"| '''{{item link|Bull Locks}}''' |
|- | |- | ||
| align="center" style="background: #AD9DC3;" | {{item icon|Immobile Suit|75px}} | | align="center" style="background: #AD9DC3;" | {{item icon|Immobile Suit|75px}} | ||
| − | | style="background: #F1ECF7;"| ''' | + | | style="background: #F1ECF7;"| '''{{item link|Immobile Suit}}''' |
|- | |- | ||
| align="center" style="background: #AD9DC3;" | {{item icon|Minsk Beef|75px}} | | align="center" style="background: #AD9DC3;" | {{item icon|Minsk Beef|75px}} | ||
| − | | style="background: #F1ECF7;"| ''' | + | | style="background: #F1ECF7;"| '''{{item link|Minsk Beef}}''' |
|- | |- | ||
| − | | width="60px" style="background: #6A5587;" rowspan="5" | {{icon class|Engineer}}<br/>'''[[Engineer|<span style="color: #FFF;">Engineer</span>]]''' | + | | width="60px" style="background: #6A5587;" rowspan="5" | {{icon class|Engineer}}<br/>'''[[Engineer/sv|<span style="color: #FFF;">{{class name|Engineer}}</span>]]''' |
| align="center" style="background: #AD9DC3;" | {{item icon|Beep Man|75px}} | | align="center" style="background: #AD9DC3;" | {{item icon|Beep Man|75px}} | ||
| − | | style="background: #F1ECF7;"| ''' | + | | style="background: #F1ECF7;"| '''{{item link|Beep Man}}''' |
|- | |- | ||
| align="center" style="background: #AD9DC3;" | {{item icon|Garden Bristles|75px}} | | align="center" style="background: #AD9DC3;" | {{item icon|Garden Bristles|75px}} | ||
| − | | style="background: #F1ECF7;"| ''' | + | | style="background: #F1ECF7;"| '''{{item link|Garden Bristles}}''' |
|- | |- | ||
| align="center" style="background: #AD9DC3;" | {{item icon|Iron Fist|75px}} | | align="center" style="background: #AD9DC3;" | {{item icon|Iron Fist|75px}} | ||
| − | | style="background: #F1ECF7;"| ''' | + | | style="background: #F1ECF7;"| '''{{item link|Iron Fist}}''' |
|- | |- | ||
| align="center" style="background: #AD9DC3;" | {{item icon|Soul of 'Spensers Past|75px}} | | align="center" style="background: #AD9DC3;" | {{item icon|Soul of 'Spensers Past|75px}} | ||
| − | | style="background: #F1ECF7;"| ''' | + | | style="background: #F1ECF7;"| '''{{item link|Soul of 'Spensers Past}}''' |
|- | |- | ||
| align="center" style="background: #AD9DC3;" | {{item icon|Tiny Texan|75px}} | | align="center" style="background: #AD9DC3;" | {{item icon|Tiny Texan|75px}} | ||
| − | | style="background: #F1ECF7;"| ''' | + | | style="background: #F1ECF7;"| '''{{item link|Tiny Texan}}''' |
|- | |- | ||
| − | | width="60px" style="background: #6A5587;" rowspan="7" | {{icon class|Medic}}<br/>'''[[Medic|<span style="color: #FFF;">Medic</span>]]''' | + | | width="60px" style="background: #6A5587;" rowspan="7" | {{icon class|Medic}}<br/>'''[[Medic/sv|<span style="color: #FFF;">{{class name|Medic}}</span>]]''' |
| align="center" style="background: #AD9DC3;" | {{item icon|Herzensbrecher|75px}} | | align="center" style="background: #AD9DC3;" | {{item icon|Herzensbrecher|75px}} | ||
| − | | style="background: #F1ECF7;"| ''' | + | | style="background: #F1ECF7;"| '''{{item link|Herzensbrecher}}''' |
|- | |- | ||
| align="center" style="background: #AD9DC3;" | {{item icon|Hundkopf|75px}} | | align="center" style="background: #AD9DC3;" | {{item icon|Hundkopf|75px}} | ||
| − | | style="background: #F1ECF7;"| ''' | + | | style="background: #F1ECF7;"| '''{{item link|Hundkopf}}''' |
|- | |- | ||
| align="center" style="background: #AD9DC3;" | {{item icon|Kriegsmaschine-9000|75px}} | | align="center" style="background: #AD9DC3;" | {{item icon|Kriegsmaschine-9000|75px}} | ||
| − | | style="background: #F1ECF7;"| ''' | + | | style="background: #F1ECF7;"| '''{{item link|Kriegsmaschine-9000}}''' |
|- | |- | ||
| align="center" style="background: #AD9DC3;" | {{item icon|Templar's Spirit|75px}} | | align="center" style="background: #AD9DC3;" | {{item icon|Templar's Spirit|75px}} | ||
| − | | style="background: #F1ECF7;"| ''' | + | | style="background: #F1ECF7;"| '''{{item link|Templar's Spirit}}''' |
|- | |- | ||
| align="center" style="background: #AD9DC3;" | {{item icon|Vampire Makeover|75px}} | | align="center" style="background: #AD9DC3;" | {{item icon|Vampire Makeover|75px}} | ||
| − | | style="background: #F1ECF7;"| ''' | + | | style="background: #F1ECF7;"| '''{{item link|Vampire Makeover}}''' |
|- | |- | ||
| align="center" style="background: #AD9DC3;" | {{item icon|Vampiric Vesture|75px}} | | align="center" style="background: #AD9DC3;" | {{item icon|Vampiric Vesture|75px}} | ||
| − | | style="background: #F1ECF7;"| ''' | + | | style="background: #F1ECF7;"| '''{{item link|Vampiric Vesture}}''' |
|- | |- | ||
| align="center" style="background: #AD9DC3;" | {{item icon|Wings of Purity|75px}} | | align="center" style="background: #AD9DC3;" | {{item icon|Wings of Purity|75px}} | ||
| − | | style="background: #F1ECF7;"| ''' | + | | style="background: #F1ECF7;"| '''{{item link|Wings of Purity}}''' |
|- | |- | ||
| − | | width="60px" style="background: #6A5587;" rowspan="7" | {{icon class|Sniper}}<br/>'''[[Sniper|<span style="color: #FFF;">Sniper</span>]]''' | + | | width="60px" style="background: #6A5587;" rowspan="7" | {{icon class|Sniper}}<br/>'''[[Sniper/sv|<span style="color: #FFF;">{{class name|Sniper}}</span>]]''' |
| align="center" style="background: #AD9DC3;" | {{item icon|Cranial Conspiracy|75px}} | | align="center" style="background: #AD9DC3;" | {{item icon|Cranial Conspiracy|75px}} | ||
| − | | style="background: #F1ECF7;"| ''' | + | | style="background: #F1ECF7;"| '''{{item link|Cranial Conspiracy}}''' |
|- | |- | ||
| align="center" style="background: #AD9DC3;" | {{item icon|Kanga Kickers|75px}} | | align="center" style="background: #AD9DC3;" | {{item icon|Kanga Kickers|75px}} | ||
| − | | style="background: #F1ECF7;"| ''' | + | | style="background: #F1ECF7;"| '''{{item link|Kanga Kickers}}''' |
|- | |- | ||
| align="center" style="background: #AD9DC3;" | {{item icon|Marsupial Man|75px}} | | align="center" style="background: #AD9DC3;" | {{item icon|Marsupial Man|75px}} | ||
| − | | style="background: #F1ECF7;"| ''' | + | | style="background: #F1ECF7;"| '''{{item link|Marsupial Man}}''' |
|- | |- | ||
| align="center" style="background: #AD9DC3;" | {{item icon|Marsupial Muzzle|75px}} | | align="center" style="background: #AD9DC3;" | {{item icon|Marsupial Muzzle|75px}} | ||
| − | | style="background: #F1ECF7;"| ''' | + | | style="background: #F1ECF7;"| '''{{item link|Marsupial Muzzle}}''' |
|- | |- | ||
| align="center" style="background: #AD9DC3;" | {{item icon|Mr. Mundee's Wild Ride|75px}} | | align="center" style="background: #AD9DC3;" | {{item icon|Mr. Mundee's Wild Ride|75px}} | ||
| − | | style="background: #F1ECF7;"| ''' | + | | style="background: #F1ECF7;"| '''{{item link|Mr. Mundee's Wild Ride}}''' |
|- | |- | ||
| align="center" style="background: #AD9DC3;" | {{item icon|Roo Rippers|75px}} | | align="center" style="background: #AD9DC3;" | {{item icon|Roo Rippers|75px}} | ||
| − | | style="background: #F1ECF7;"| ''' | + | | style="background: #F1ECF7;"| '''{{item link|Roo Rippers}}''' |
|- | |- | ||
| align="center" style="background: #AD9DC3;" | {{item icon|Scaly Scrapers|75px}} | | align="center" style="background: #AD9DC3;" | {{item icon|Scaly Scrapers|75px}} | ||
| − | | style="background: #F1ECF7;"| ''' | + | | style="background: #F1ECF7;"| '''{{item link|Scaly Scrapers}}''' |
|- | |- | ||
| − | | width="60px" style="background: #6A5587;" rowspan="4" | {{icon class|Spy}}<br/>'''[[Spy|<span style="color: #FFF;">Spy</span>]]''' | + | | width="60px" style="background: #6A5587;" rowspan="4" | {{icon class|Spy}}<br/>'''[[Spy/sv|<span style="color: #FFF;">{{class name|Spy}}</span>]]''' |
| align="center" style="background: #AD9DC3;" | {{item icon|Facepeeler|75px}} | | align="center" style="background: #AD9DC3;" | {{item icon|Facepeeler|75px}} | ||
| − | | style="background: #F1ECF7;"| ''' | + | | style="background: #F1ECF7;"| '''{{item link|Facepeeler}}''' |
|- | |- | ||
| align="center" style="background: #AD9DC3;" | {{item icon|Nightmare Hunter|75px}} | | align="center" style="background: #AD9DC3;" | {{item icon|Nightmare Hunter|75px}} | ||
| − | | style="background: #F1ECF7;"| ''' | + | | style="background: #F1ECF7;"| '''{{item link|Nightmare Hunter}}''' |
|- | |- | ||
| align="center" style="background: #AD9DC3;" | {{item icon|Rogue's Rabbit|75px}} | | align="center" style="background: #AD9DC3;" | {{item icon|Rogue's Rabbit|75px}} | ||
| − | | style="background: #F1ECF7;"| ''' | + | | style="background: #F1ECF7;"| '''{{item link|Rogue's Rabbit}}''' |
|- | |- | ||
| align="center" style="background: #AD9DC3;" | {{item icon|Shadowman's Shade|75px}} | | align="center" style="background: #AD9DC3;" | {{item icon|Shadowman's Shade|75px}} | ||
| − | | style="background: #F1ECF7;"| ''' | + | | style="background: #F1ECF7;"| '''{{item link|Shadowman's Shade}}''' |
|- | |- | ||
| − | | width="60px" style="background: #6A5587;" rowspan="3" | {{icon class|All Classes}}<br/>'''[[Classes|<span style="color: #FFF;"> | + | | width="60px" style="background: #6A5587;" rowspan="3" | {{icon class|All Classes}}<br/>'''[[Classes/sv|<span style="color: #FFF;">Alla klasser</span>]]''' |
| align="center" style="background: #AD9DC3;" | {{item icon|Ghost of Spies Checked Past|75px}} | | align="center" style="background: #AD9DC3;" | {{item icon|Ghost of Spies Checked Past|75px}} | ||
| − | | style="background: #F1ECF7;"| ''' | + | | style="background: #F1ECF7;"| '''{{item link|Ghost of Spies Checked Past}}''' |
|- | |- | ||
| align="center" style="background: #AD9DC3;" | {{item icon|Hooded Haunter|75px}} | | align="center" style="background: #AD9DC3;" | {{item icon|Hooded Haunter|75px}} | ||
| − | | style="background: #F1ECF7;"| ''' | + | | style="background: #F1ECF7;"| '''{{item link|Hooded Haunter}}''' |
|- | |- | ||
| align="center" style="background: #AD9DC3;" | {{item icon|Li'l Dutchman|75px}} | | align="center" style="background: #AD9DC3;" | {{item icon|Li'l Dutchman|75px}} | ||
| − | | style="background: #F1ECF7;"| ''' | + | | style="background: #F1ECF7;"| '''{{item link|Li'l Dutchman}}''' |
|- | |- | ||
|} | |} | ||
| Line 184: | Line 187: | ||
=== Paket === | === Paket === | ||
{| class="wikitable collapsible" cellpadding="2" style="text-align:center;" | {| class="wikitable collapsible" cellpadding="2" style="text-align:center;" | ||
| − | | width="70px" style="background:#6A5587;" rowspan="6" | {{icon class|Scout}}<br/>'''[[Scout | + | | width="70px" style="background:#6A5587;" rowspan="6" | {{icon class|Scout}}<br/>'''[[Scout/sv|<span style="color:#FFF;">{{class name|scout}}</span>]]''' |
| − | | style="background:#E8E2F0;" rowspan="3" |''' | + | | style="background:#E8E2F0;" rowspan="3" |'''{{item link|The Deep-Fried Dummy}}'''<br/> |
| align="center" style="background:#AD9DC3;" | {{icon item|Nugget Noggin|75px}} | | align="center" style="background:#AD9DC3;" | {{icon item|Nugget Noggin|75px}} | ||
| − | | style="background:#F1ECF7;" | ''' | + | | style="background:#F1ECF7;" | '''{{item link|Nugget Noggin}}''' |
|- | |- | ||
| align="center" style="background:#AD9DC3;" | {{icon item|Fowl Fists|75px}} | | align="center" style="background:#AD9DC3;" | {{icon item|Fowl Fists|75px}} | ||
| − | | style="background:#F1ECF7;" | ''' | + | | style="background:#F1ECF7;" | '''{{item link|Fowl Fists}}''' |
|- | |- | ||
| align="center" style="background:#AD9DC3;" | {{icon item|Talon Trotters|75px}} | | align="center" style="background:#AD9DC3;" | {{icon item|Talon Trotters|75px}} | ||
| − | | style="background:#F1ECF7;" | ''' | + | | style="background:#F1ECF7;" | '''{{item link|Talon Trotters}}''' |
|- | |- | ||
| − | | style="background:#E8E2F0;" rowspan="3" |''' | + | | style="background:#E8E2F0;" rowspan="3" |'''{{item link|The Rooftop Rebel}}'''<br/> |
| align="center" style="background:#AD9DC3;" | {{icon item|Head Hunter|75px}} | | align="center" style="background:#AD9DC3;" | {{icon item|Head Hunter|75px}} | ||
| − | | style="background:#F1ECF7;" | ''' | + | | style="background:#F1ECF7;" | '''{{item link|Head Hunter}}''' |
|- | |- | ||
| align="center" style="background:#AD9DC3;" | {{icon item|Claws And Infect|75px}} | | align="center" style="background:#AD9DC3;" | {{icon item|Claws And Infect|75px}} | ||
| − | | style="background:#F1ECF7;" | ''' | + | | style="background:#F1ECF7;" | '''{{item link|Claws And Infect}}''' |
|- | |- | ||
| align="center" style="background:#AD9DC3;" | {{icon item|Crazy Legs|75px}} | | align="center" style="background:#AD9DC3;" | {{icon item|Crazy Legs|75px}} | ||
| − | | style="background:#F1ECF7;" | ''' | + | | style="background:#F1ECF7;" | '''{{item link|Crazy Legs}}''' |
|- | |- | ||
| − | | width="70px" style="background:#6A5587;" rowspan="3" | {{icon class|Soldier}}<br/>'''[[Soldier | + | | width="70px" style="background:#6A5587;" rowspan="3" | {{icon class|Soldier}}<br/>'''[[Soldier/sv|<span style="color:#FFF;">{{class name|soldier}}</span>]]''' |
| − | | style="background:#E8E2F0;" rowspan="3" |''' | + | | style="background:#E8E2F0;" rowspan="3" |'''{{item link|The Sgt. Helsing}}'''<br/> |
| align="center" style="background:#AD9DC3;" | {{icon item|Hellhunter's Headpiece|75px}} | | align="center" style="background:#AD9DC3;" | {{icon item|Hellhunter's Headpiece|75px}} | ||
| − | | style="background:#F1ECF7;" | ''' | + | | style="background:#F1ECF7;" | '''{{item link|Hellhunter's Headpiece}}''' |
|- | |- | ||
| align="center" style="background:#AD9DC3;" | {{icon item|Supernatural Stalker|75px}} | | align="center" style="background:#AD9DC3;" | {{icon item|Supernatural Stalker|75px}} | ||
| − | | style="background:#F1ECF7;" | ''' | + | | style="background:#F1ECF7;" | '''{{item link|Supernatural Stalker}}''' |
|- | |- | ||
| align="center" style="background:#AD9DC3;" | {{icon item|Ghoul Gibbin' Gear|75px}} | | align="center" style="background:#AD9DC3;" | {{icon item|Ghoul Gibbin' Gear|75px}} | ||
| − | | style="background:#F1ECF7;" | ''' | + | | style="background:#F1ECF7;" | '''{{item link|Ghoul Gibbin' Gear}}''' |
|- | |- | ||
| − | | width="70px" style="background:#6A5587;" rowspan="2" | {{icon class|Pyro}}<br/>'''[[Pyro | + | | width="70px" style="background:#6A5587;" rowspan="2" | {{icon class|Pyro}}<br/>'''[[Pyro/sv|<span style="color:#FFF;">Pyro</span>]]''' |
| − | | style="background:#E8E2F0;" rowspan="2" | ''' | + | | style="background:#E8E2F0;" rowspan="2" | '''{{item link|The Automated Abnormality}}'''<br/> |
| align="center" style="background:#AD9DC3;" | {{icon item|Moccasin Machinery|75px}} | | align="center" style="background:#AD9DC3;" | {{icon item|Moccasin Machinery|75px}} | ||
| − | | style="background:#F1ECF7;" | ''' | + | | style="background:#F1ECF7;" | '''{{item link|Moccasin Machinery}}''' |
|- | |- | ||
| align="center" style="background:#AD9DC3;" | {{icon item|Arsonist Apparatus|75px}} | | align="center" style="background:#AD9DC3;" | {{icon item|Arsonist Apparatus|75px}} | ||
| − | | style="background:#F1ECF7;" | ''' | + | | style="background:#F1ECF7;" | '''{{item link|Arsonist Apparatus}}''' |
|- | |- | ||
| − | | width="70px" style="background:#6A5587;" rowspan="2" | {{icon class|Demoman}}<br/>'''[[Demoman | + | | width="70px" style="background:#6A5587;" rowspan="2" | {{icon class|Demoman}}<br/>'''[[Demoman/sv|<span style="color:#FFF;">{{class name|demoman}}</span>]]''' |
| − | | style="background:#E8E2F0;" rowspan="2" | ''' | + | | style="background:#E8E2F0;" rowspan="2" | '''{{item link|The Forgotten King}}'''<br/> |
| align="center" style="background:#AD9DC3;" | {{icon item|Forgotten King's Restless Head|75px}} | | align="center" style="background:#AD9DC3;" | {{icon item|Forgotten King's Restless Head|75px}} | ||
| − | | style="background:#F1ECF7;" | ''' | + | | style="background:#F1ECF7;" | '''{{item link|Forgotten King's Restless Head}}''' |
|- | |- | ||
| align="center" style="background:#AD9DC3;" | {{icon item|Forgotten King's Pauldrons|75px}} | | align="center" style="background:#AD9DC3;" | {{icon item|Forgotten King's Pauldrons|75px}} | ||
| − | | style="background:#F1ECF7;" | ''' | + | | style="background:#F1ECF7;" | '''{{item link|Forgotten King's Pauldrons}}''' |
|- | |- | ||
| − | | width="70px" style="background:#6A5587;" rowspan="3" | {{icon class|Heavy}}<br/>'''[[Heavy | + | | width="70px" style="background:#6A5587;" rowspan="3" | {{icon class|Heavy}}<br/>'''[[Heavy/sv|<span style="color:#FFF;">{{class name|heavy}}</span>]]''' |
| − | | style="background:#E8E2F0;" rowspan="3" | ''' | + | | style="background:#E8E2F0;" rowspan="3" | '''{{item link|The Minsk Beast}}'''<br/> |
| align="center" style="background:#AD9DC3;" | {{icon item|Minsk Beef|75px}} | | align="center" style="background:#AD9DC3;" | {{icon item|Minsk Beef|75px}} | ||
| − | | style="background:#F1ECF7;" | ''' | + | | style="background:#F1ECF7;" | '''{{item link|Minsk Beef}}''' |
|- | |- | ||
| align="center" style="background:#AD9DC3;" | {{icon item|Bull Locks|75px}} | | align="center" style="background:#AD9DC3;" | {{icon item|Bull Locks|75px}} | ||
| − | | style="background:#F1ECF7;" | ''' | + | | style="background:#F1ECF7;" | '''{{item link|Bull Locks}}''' |
|- | |- | ||
| align="center" style="background:#AD9DC3;" | {{icon item|Bone-Cut Belt|75px}} | | align="center" style="background:#AD9DC3;" | {{icon item|Bone-Cut Belt|75px}} | ||
| − | | style="background:#F1ECF7;" | ''' | + | | style="background:#F1ECF7;" | '''{{item link|Bone-Cut Belt}}''' |
|- | |- | ||
| − | | style="background:#6A5587;" rowspan="7" | {{icon class|Medic}}<br/>'''[[Medic | + | | style="background:#6A5587;" rowspan="7" | {{icon class|Medic}}<br/>'''[[Medic/sv|<span style="color:#FFF;">{{class name|medic}}</span>]]''' |
| − | | style="background:#E8E2F0;" rowspan="3" | ''' | + | | style="background:#E8E2F0;" rowspan="3" | '''{{item link|Canis Ex Machina}}'''<br/> |
| align="center" style="background:#AD9DC3;" | {{icon item|Hundkopf|75px}} | | align="center" style="background:#AD9DC3;" | {{icon item|Hundkopf|75px}} | ||
| − | | style="background:#F1ECF7;" | ''' | + | | style="background:#F1ECF7;" | '''{{item link|Hundkopf}}''' |
|- | |- | ||
| align="center" style="background:#AD9DC3;" | {{icon item|Herzensbrecher|75px}} | | align="center" style="background:#AD9DC3;" | {{icon item|Herzensbrecher|75px}} | ||
| − | | style="background:#F1ECF7;" | ''' | + | | style="background:#F1ECF7;" | '''{{item link|Herzensbrecher}}''' |
|- | |- | ||
| align="center" style="background:#AD9DC3;" | {{icon item|Kriegsmaschine-9000|75px}} | | align="center" style="background:#AD9DC3;" | {{icon item|Kriegsmaschine-9000|75px}} | ||
| − | | style="background:#F1ECF7;" | ''' | + | | style="background:#F1ECF7;" | '''{{item link|Kriegsmaschine-9000}}''' |
|- | |- | ||
| − | | style="background:#E8E2F0;" rowspan="2" | ''' | + | | style="background:#E8E2F0;" rowspan="2" | '''{{item link|Dr. Acula}}'''<br/> |
| align="center" style="background:#AD9DC3;" | {{icon item|Vampire Makeover|75px}} | | align="center" style="background:#AD9DC3;" | {{icon item|Vampire Makeover|75px}} | ||
| − | | style="background:#F1ECF7;" | ''' | + | | style="background:#F1ECF7;" | '''{{item link|Vampire Makeover}}''' |
|- | |- | ||
| align="center" style="background:#AD9DC3;" | {{icon item|Vampiric Vesture|75px}} | | align="center" style="background:#AD9DC3;" | {{icon item|Vampiric Vesture|75px}} | ||
| − | | style="background:#F1ECF7;" | ''' | + | | style="background:#F1ECF7;" | '''{{item link|Vampiric Vesture}}''' |
|- | |- | ||
| − | | style="background:#E8E2F0;" rowspan="2" | ''' | + | | style="background:#E8E2F0;" rowspan="2" | '''{{item link|The Templar}}'''<br/> |
| align="center" style="background:#AD9DC3;" | {{icon item|Templar's Spirit|75px}} | | align="center" style="background:#AD9DC3;" | {{icon item|Templar's Spirit|75px}} | ||
| − | | style="background:#F1ECF7;" | ''' | + | | style="background:#F1ECF7;" | '''{{item link|Templar's Spirit}}''' |
|- | |- | ||
| align="center" style="background:#AD9DC3;" | {{icon item|Wings of Purity|75px}} | | align="center" style="background:#AD9DC3;" | {{icon item|Wings of Purity|75px}} | ||
| − | | style="background:#F1ECF7;" | ''' | + | | style="background:#F1ECF7;" | '''{{item link|Wings of Purity}}''' |
|- | |- | ||
| − | | style="background:#6A5587;" rowspan="5" | {{icon class|Sniper}}<br/>'''[[Sniper | + | | style="background:#6A5587;" rowspan="5" | {{icon class|Sniper}}<br/>'''[[Sniper/sv|<span style="color:#FFF;">{{class name|sniper}}</span>]]''' |
| − | | style="background:#E8E2F0;" rowspan="3" | ''' | + | | style="background:#E8E2F0;" rowspan="3" | '''{{item link|The Manngaroo}}'''<br/> |
| align="center" style="background:#AD9DC3;" | {{icon item|Marsupial Muzzle|75px}} | | align="center" style="background:#AD9DC3;" | {{icon item|Marsupial Muzzle|75px}} | ||
| − | | style="background:#F1ECF7;" | ''' | + | | style="background:#F1ECF7;" | '''{{item link|Marsupial Muzzle}}''' |
|- | |- | ||
| align="center" style="background:#AD9DC3;" | {{icon item|Kanga Kickers|75px}} | | align="center" style="background:#AD9DC3;" | {{icon item|Kanga Kickers|75px}} | ||
| − | | style="background:#F1ECF7;" | ''' | + | | style="background:#F1ECF7;" | '''{{item link|Kanga Kickers}}''' |
|- | |- | ||
| align="center" style="background:#AD9DC3;" | {{icon item|Roo Rippers|75px}} | | align="center" style="background:#AD9DC3;" | {{icon item|Roo Rippers|75px}} | ||
| − | | style="background:#F1ECF7;" | ''' | + | | style="background:#F1ECF7;" | '''{{item link|Roo Rippers}}''' |
|- | |- | ||
| − | | style="background:#E8E2F0;" rowspan="2" | ''' | + | | style="background:#E8E2F0;" rowspan="2" | '''{{item link|The Reptiloid}}'''<br/> |
| align="center" style="background:#AD9DC3;" | {{icon item|Scaly Scrapers|75px}} | | align="center" style="background:#AD9DC3;" | {{icon item|Scaly Scrapers|75px}} | ||
| − | | style="background:#F1ECF7;" | ''' | + | | style="background:#F1ECF7;" | '''{{item link|Scaly Scrapers}}''' |
|- | |- | ||
| align="center" style="background:#AD9DC3;" | {{icon item|Cranial Conspiracy|75px}} | | align="center" style="background:#AD9DC3;" | {{icon item|Cranial Conspiracy|75px}} | ||
| − | | style="background:#F1ECF7;" | ''' | + | | style="background:#F1ECF7;" | '''{{item link|Cranial Conspiracy}}''' |
|- | |- | ||
|} | |} | ||
| Line 290: | Line 293: | ||
=== Action objekt === | === Action objekt === | ||
{| class="wikitable collapsible" cellpadding="3" style="text-align:center;" | {| class="wikitable collapsible" cellpadding="3" style="text-align:center;" | ||
| − | | width="60px" style="background: #6A5587;" | {{icon class|Scout}}<br/>'''[[Scout|<span style="color: #FFF;">Scout</span>]]''' | + | | width="60px" style="background: #6A5587;" | {{icon class|Scout}}<br/>'''[[Scout/sv|<span style="color: #FFF;">{{class name|Scout}}</span>]]''' |
| align="center" style="background: #AD9DC3;" | {{item icon|Unlocked Creepy Scout Crate|75px}} | | align="center" style="background: #AD9DC3;" | {{item icon|Unlocked Creepy Scout Crate|75px}} | ||
| − | | style="background: #F1ECF7;"| ''' | + | | style="background: #F1ECF7;"| '''{{item link|Unlocked Creepy Scout Crate}}''' |
|- | |- | ||
| − | | width="60px" style="background: #6A5587;" | {{icon class|Soldier}}<br/>'''[[Soldier|<span style="color: #FFF;">Soldier</span>]]''' | + | | width="60px" style="background: #6A5587;" | {{icon class|Soldier}}<br/>'''[[Soldier/sv|<span style="color: #FFF;">{{class name|Soldier}}</span>]]''' |
| align="center" style="background: #AD9DC3;" | {{item icon|Unlocked Creepy Soldier Crate|75px}} | | align="center" style="background: #AD9DC3;" | {{item icon|Unlocked Creepy Soldier Crate|75px}} | ||
| − | | style="background: #F1ECF7;"| ''' | + | | style="background: #F1ECF7;"| '''{{item link|Unlocked Creepy Soldier Crate}}''' |
|- | |- | ||
| − | | width="60px" style="background: #6A5587;" | {{icon class|Pyro}}<br/>'''[[Pyro|<span style="color: #FFF;">Pyro</span>]]''' | + | | width="60px" style="background: #6A5587;" | {{icon class|Pyro}}<br/>'''[[Pyro/sv|<span style="color: #FFF;">{{class name|Pyro}}</span>]]''' |
| align="center" style="background: #AD9DC3;" | {{item icon|Unlocked Creepy Pyro Crate|75px}} | | align="center" style="background: #AD9DC3;" | {{item icon|Unlocked Creepy Pyro Crate|75px}} | ||
| − | | style="background: #F1ECF7;"| ''' | + | | style="background: #F1ECF7;"| '''{{item link|Unlocked Creepy Pyro Crate}}''' |
|- | |- | ||
| − | | width="60px" style="background: #6A5587;" | {{icon class|Demoman}}<br/>'''[[Demoman|<span style="color: #FFF;">Demoman</span>]]''' | + | | width="60px" style="background: #6A5587;" | {{icon class|Demoman}}<br/>'''[[Demoman/sv|<span style="color: #FFF;">{{class name|Demoman}}</span>]]''' |
| align="center" style="background: #AD9DC3;" | {{item icon|Unlocked Creepy Demo Crate|75px}} | | align="center" style="background: #AD9DC3;" | {{item icon|Unlocked Creepy Demo Crate|75px}} | ||
| − | | style="background: #F1ECF7;"| ''' | + | | style="background: #F1ECF7;"| '''{{item link|Unlocked Creepy Demo Crate}}''' |
|- | |- | ||
| − | | width="60px" style="background: #6A5587;" | {{icon class|Heavy}}<br/>'''[[Heavy|<span style="color: #FFF;">Heavy</span>]]''' | + | | width="60px" style="background: #6A5587;" | {{icon class|Heavy}}<br/>'''[[Heavy/sv|<span style="color: #FFF;">{{class name|Heavy}}</span>]]''' |
| align="center" style="background: #AD9DC3;" | {{item icon|Unlocked Creepy Heavy Crate|75px}} | | align="center" style="background: #AD9DC3;" | {{item icon|Unlocked Creepy Heavy Crate|75px}} | ||
| − | | style="background: #F1ECF7;"| ''' | + | | style="background: #F1ECF7;"| '''{{item link|Unlocked Creepy Heavy Crate}}''' |
|- | |- | ||
| − | | width="60px" style="background: #6A5587;" | {{icon class|Engineer}}<br/>'''[[Engineer|<span style="color: #FFF;">Engineer</span>]]''' | + | | width="60px" style="background: #6A5587;" | {{icon class|Engineer}}<br/>'''[[Engineer/sv|<span style="color: #FFF;">{{class name|Engineer}}</span>]]''' |
| align="center" style="background: #AD9DC3;" | {{item icon|Unlocked Creepy Engineer Crate|75px}} | | align="center" style="background: #AD9DC3;" | {{item icon|Unlocked Creepy Engineer Crate|75px}} | ||
| − | | style="background: #F1ECF7;"| ''' | + | | style="background: #F1ECF7;"| '''{{item link|Unlocked Creepy Engineer Crate}}''' |
|- | |- | ||
| − | | width="60px" style="background: #6A5587;" | {{icon class|Medic}}<br/>'''[[Medic|<span style="color: #FFF;">Medic</span>]]''' | + | | width="60px" style="background: #6A5587;" | {{icon class|Medic}}<br/>'''[[Medic/sv|<span style="color: #FFF;">{{class name|Medic}}</span>]]''' |
| align="center" style="background: #AD9DC3;" | {{item icon|Unlocked Creepy Medic Crate|75px}} | | align="center" style="background: #AD9DC3;" | {{item icon|Unlocked Creepy Medic Crate|75px}} | ||
| − | | style="background: #F1ECF7;"| ''' | + | | style="background: #F1ECF7;"| '''{{item link|Unlocked Creepy Medic Crate}}''' |
|- | |- | ||
| − | | width="60px" style="background: #6A5587;" | {{icon class|Sniper}}<br/>'''[[Sniper|<span style="color: #FFF;">Sniper</span>]]''' | + | | width="60px" style="background: #6A5587;" | {{icon class|Sniper}}<br/>'''[[Sniper/sv|<span style="color: #FFF;">{{class name|Sniper}}</span>]]''' |
| align="center" style="background: #AD9DC3;" | {{item icon|Unlocked Creepy Sniper Crate|75px}} | | align="center" style="background: #AD9DC3;" | {{item icon|Unlocked Creepy Sniper Crate|75px}} | ||
| − | | style="background: #F1ECF7;"| ''' | + | | style="background: #F1ECF7;"| '''{{item link|Unlocked Creepy Sniper Crate}}''' |
|- | |- | ||
| − | | width="60px" style="background: #6A5587;" | {{icon class|Spy}}<br/>'''[[Spy|<span style="color: #FFF;">Spy</span>]]''' | + | | width="60px" style="background: #6A5587;" | {{icon class|Spy}}<br/>'''[[Spy/sv|<span style="color: #FFF;">{{class name|Spy}}</span>]]''' |
| align="center" style="background: #AD9DC3;" | {{item icon|Unlocked Creepy Spy Crate|75px}} | | align="center" style="background: #AD9DC3;" | {{item icon|Unlocked Creepy Spy Crate|75px}} | ||
| − | | style="background: #F1ECF7;"| ''' | + | | style="background: #F1ECF7;"| '''{{item link|Unlocked Creepy Spy Crate}}''' |
|- | |- | ||
| − | | width="60px" style="background: #6A5587;" rowspan=2 | {{icon class|All Classes}}<br/>'''[[Classes|<span style="color: #FFF;"> | + | | width="60px" style="background: #6A5587;" rowspan=2 | {{icon class|All Classes}}<br/>'''[[Classes/sv|<span style="color: #FFF;">Alla klasser</span>]]''' |
| align="center" style="background: #AD9DC3;" | {{item icon|Halloween Gift Cauldron|75px}} | | align="center" style="background: #AD9DC3;" | {{item icon|Halloween Gift Cauldron|75px}} | ||
| − | | style="background: #F1ECF7;"| ''' | + | | style="background: #F1ECF7;"| '''{{item link|Halloween Gift Cauldron}}''' |
|- | |- | ||
| align="center" style="background: #AD9DC3;" | {{item icon|Kritz or Treat Canteen|75px}} | | align="center" style="background: #AD9DC3;" | {{item icon|Kritz or Treat Canteen|75px}} | ||
| − | | style="background: #F1ECF7;"| ''' | + | | style="background: #F1ECF7;"| '''{{item link|Kritz or Treat Canteen}}''' |
|- | |- | ||
|} | |} | ||
| Line 344: | Line 347: | ||
! style="background: #6A5587;" class="header" | {{common string|file name}} | ! style="background: #6A5587;" class="header" | {{common string|file name}} | ||
|- | |- | ||
| − | | style="background: #AD9DC3;" | '''[[Carnival of Carnage | + | | style="background: #AD9DC3;" | '''[[Carnival of Carnage/sv|Carnival of Carnage]]''' |
| − | | width="100px" | [[File:Carnival of Carnage.jpg|160px|link=Carnival of Carnage | + | | width="100px" | [[File:Carnival of Carnage.jpg|160px|link=Carnival of Carnage/sv]] |
| − | | style="background: #F1ECF7;" align="center" | '''[[Special Delivery (game mode) | + | | style="background: #F1ECF7;" align="center" | '''[[Special Delivery (game mode)/sv|Special Delivery]]''' |
| style="background: #F1ECF7;" | {{code|sd_doomsday_event}} | | style="background: #F1ECF7;" | {{code|sd_doomsday_event}} | ||
|- | |- | ||
|} | |} | ||
| − | === [[Merasmachievements]] === | + | === [[Merasmachievements/sv|Merasmachievements]] === |
{{Halloween 2014 achievement list}} | {{Halloween 2014 achievement list}} | ||
Revision as of 10:16, 20 September 2015
Scream Fortress 2014 var en stor uppdatering som innehöll en carnival styrd av Merasmus. Den intruducerade Radiobilar som post-round aktivitet, Inehållande 3 olika banor/lägen. Det är den sjätte Scream Fortress uppdateringen. Alla spelare som loggar in efter att ha installerat uppdateringen får en Halloween Gift Cauldron,som inehåller 3 Scream Fortress 2014 objekt, en som alltid är avStrange och Haunted kvalité.
Uppdateringen innehöll 50 nya hattar/kosmetiska objekt, 6 achievements, Halloweenbanan Carnival of Carnage samt Kritz or Treat Canteen och Necro Smasher: ett meleevapen för alla klasser förutom Spy.
Uppdateringen "skapade" även Udda Spökbelagda hattar/kosmetiska objekt. Alla Udda Spökbelagda objekt inehåller 2 Udda delar -- "Carnival Games Won" och "Carnival Underworld Kills" (Spelare avkastade av banan). Vanliga kills kan bara räknas på Carnival of Carnage.
Innehåll
Additions
Vapen
Alla klasser |
Kusliga klubban† | |
| Notes | †Not available for the Spy. | |
Kosmetiska objekt
Paket
Action objekt
Banor
| Namn | Bild | Spelläge | Filnamn |
|---|---|---|---|
| Carnival of Carnage | 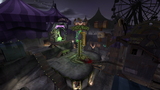
|
Special Delivery | sd_doomsday_event
|
Merasmachievements
|
|


Trivia
- Agathodaimon symbols were used on the update's page to write the spells names. These symbols were also used in the previous Halloween updates of 2012 and 2013.
Externa länkar
| |||||||||||||||||||||||||||||||||||||||||||||||||||||||||||||||||||||||||||||||||||||||||||||||