Difference between revisions of "Eruption"
ShadowMan44 (talk | contribs) (Initial post, not done. I had NO idea what to call some of these areas in here.) |
(No difference)
|
Revision as of 07:29, 2 April 2024
| “You are so small! Is funny to me!” This article is a stub. As such, it is not complete. You can help Team Fortress Wiki by expanding it. |
 | “I built that.” This page contains information about a custom map that is not an officially released Team Fortress 2 map. All released Valve and Community-made TF2 maps can be found on the list of maps. |
| Eruption | |
|---|---|

| |
| Basic Information | |
| Map type: | Payload |
| File name: | pl_eruption_b13
|
| Version: | Beta 13 |
| Released: | April 30, 2023 |
| Last updated: | November 1, 2023 |
| Developer(s): | Billo radarhead Suna Jeddyk |
| Map Info | |
| Environment: | Jungle |
| Setting: | Daytime, sunny |
| Hazards: | Pitfall/Payload cart explosion |
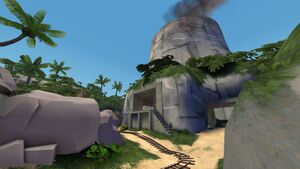
Eruption is a community-created custom Payload map. A Halloween variant was added in the Scream Fortress 2023 update.
Contents
Locations
- First BLU Spawn: BLU's first spawn has three exits. The left exit takes players to the Water, the middle exit is directly behind the cart, and the right exit is protected from RED by the Shack.
- The Water: the lowest point in the area. Located right in front of BLU spawn's left exit, it is illuminated by a single lamppost, only has a large rock as cover, and has shallow water.
- The Shack: a wooden shack with a red brick chimney that serves as cover for BLU's right spawn exit.
- The Building: a building with a U-shaped interior.
- The Brick Walls: an elevated area with two brick walls for cover, a straight one with a candle sconce and a curved one with an electric lamppost.
- A Wall: a wooden wall with the sign for Checkpoint A's location.
First BLU Spawn.
Checkpoint B – The Midway Building
- The Cart's Entrance: the cart enters the Midway Building through a big gate first and a smaller gate second. It then turns left and heads to the BLU team's second spawn point.
- The Midway: an elevated path to the left of the Payload's tracks, where BLU's second spawn is located, which offers access to a vantage point over checkpoint B.
- The Water Corridor: the lowest point of the Midway Building. It is a straight corridor with shallow water that the cart must cross. The end closest to the tracks has a medium health kit and a large ammo pack in front of a metal gate, while the other end has a medium health kit and ammo pack in front of a wooden wall.
- BLU's Second Spawn: Activated if checkpoint B is captured. It has two exits and one resupply cabinet.
- The Metal Catwalk: a metal catwalk that oversees the checkpoint, passing above the tracks just past it, and part of the Water Corridor, where a short staircase connects it to the Cart's Entrance.
- The Drop: a small and square hole in the ground beneath the Catwalk, the grate that covered it was removed, allowing players to jump down from the checkpoint to the Water Corridor.
- The Perch: a wooden platform just outside one of BLU's Second Spawn's exits, it offers the highest vantage point over checkpoint B.
Checkpoint C – The Volcano Entrance
- The Arched Building: a projected part of the Volcano, which forms an arch that the cart must pass through.
- The Wooden Catwalk: a wooden catwalk that connects the Midway Building's exit and the Security Room, passing over the cart's tracks.
- The Security Room: RED's first spawn and BLU's final spawn (if they capture C). It has a big door facing the Midway Building, a small door facing the Fountain, and a single resupply cabinet.
- The C Platform: the roof covering the entrance to the Botanical Gardens serves as a platform, with a short and curved white wall offering some cover.
Checkpoint D – The Volcano
- The Entry Gate: a low chokepoint the cart must go through in order to enter the Asylum.
- The Windows Corridor: a corridor that passes over the Asylum's Entry Gate and connects its two side paths. It has two windows, though one of them is blocked by a shutter; the one that is not offers an overview of the last point.
- Second RED Spawn: a small room right next to the Grate Catwalk, activated if BLU captures checkpoint B. It has one exit and one resupply cabinet.
- The Entrance: a small roofed cover for RED that faces the Entry Gate.
- The Grate Catwalk: a catwalk that passes over the tracks just before their end.
- The Meeting Room: RED's final spawn, activated if BLU captures checkpoint C. It has two lower exits, with a resupply cabinet in-between them, and one upper exit, with a resupply cabinet and a window overseeing the point.
- The Maintenance Room: a small room, with brown walls and filled with machinery, with stairs that connect the first and second floors.
- The Checkpoint: a big hole on the floor that has revealed a "volcano" below. The orange and black stripes on the ramp above it indicate it is a steep incline, meaning the cart rolls back if left unattended on it.
| ||||||||||||||||||||||||||||||||||||||||||||||||


