Heads-up display

The Head-up display, or HUD, is a system for quickly relaying important information to the user. It appears as various tabs surrounding the player's view in-game. A minimal version of the default HUD can be enabled in advanced multiplayer options. The game also allows for the addition of HUD modification files (or "custom HUDs") to suit the player's taste (see section below).
Contents
General HUD Display
Bottom left corner
Bottom center
- Capture the Flag mode – The locations and status of the Intelligence briefcase of BLU and RED (depicted by a rotating arrow, and one of three status indicators: dropped, taken and secure) and the current score
- Control Point, Arena, Territorial Control, King of the Hill modes – The status of the Capture point/s on the map (untaken, neutral, capturing, or locked)
- Payload and Payload Race modes – Progression of cart, cart idle timer, cart reverse indicator, status of checkpoints and slopes (Payload Race only)
Bottom right corner
- Your Ammo (currently loaded / total rounds carried)
- Voice chat (displays along with a player's name in the middle right to show when they are using voice chat)
Other elements
- Your crosshair – center of screen
- The time left in the match (accompanied by a pie chart) – top center of screen
- Kill reporter (with names and icons showing method of death as well as objectives completed) – top right of screen
- Inventory select menu (displayed by pressing your weapon select key) – center right of screen
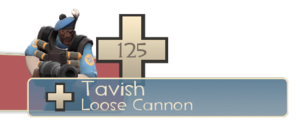
- Your teammate's player name and health – displayed by directing your view onto player
Class-specific elements
Scout
- Baseball respawn timer for Sandman (slowly recharges after every launched baseball) – bottom right corner
- Recharge timer for Bonk! Atomic Punch or Crit-a-Cola drinks (slowly recharges) – bottom right corner
- Mad Milk respawn timer (slowly recharges after every toss) – bottom right corner
Soldier
- Rage meter for Buff Banner (progresses with the damage inflicted by the player) – bottom right corner
- Rage meter for Battalion's Backup (progresses with the damage inflicted to the player) – bottom right corner
Demoman

Bottom: Number of heads and charge meter for Chargin' Targe
- Sticky bomb charge for Stickybomb Launcher and Scottish Resistance (fills up the longer you hold the fire button to determine the its launch distance. When full charge is reached it will fire automatically) – bottom right corner beneath your ammo display
- Currently placed Sticky bombs for Stickybomb Launcher (max 8) and Scottish Resistance (max 14) – bottom right corner
- Charge meter for Chargin' Targe (slowly regenerates after every charge) – bottom right corner
- Heads counter for Eyelander (more heads contribute to more health and increased speed) – bottom right corner
Engineer
- Metal count – bottom left corner
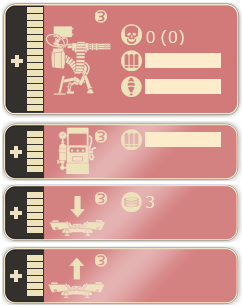
- Engineer panel (displays information about your various buildings) – top left corner
- Sentry Gun status (displays health, number of kills, number of assists in parenthesis, bullet ammo, rocket ammo, upgrade meter, and whether or not your turret is being sapped or is in need of repair)
- Dispenser status (displays health, metal stock, upgrade meter and whether or not your Dispenser is being sapped or is in need of repair)
- Teleporter Entrance and Exit status (displays health, number of times used, upgrade meter and whether or not your Teleporter/s are being sapped or are in need of repair. There are individual panels for your entrance and exit)
Medic
- ÜberCharge progress/drain meter for Medigun, Kritzkreig or Übersaw (shows the progress of your charge when healing friendly (or enemy Spy) players and flashes when it's 100% ready. When the ÜberCharge is activated, it shows you the charge you have left before your meter resets) – bottom right corner
- Medic! calls – shown above any nearby friendly (or enemy Spy) players that call for medical assistance.
Sniper
- Shot charge (charges when scoped, amount of charge determines the damage output of your shot) – right of your crosshair when scoped with Sniper Rifle or underneath ammo count with Huntsman
- Jarate respawn timer (slowly recharges after every toss) – bottom right corner
Spy
- Your current Disguise – bottom left corner appearing over your own class picture
- Your Cloak drain/regen charge for Invisibility Watch, Cloak and Dagger or Dead Ringer – bottom right corner
- Your cloaking visibility (the translucency of your class/disguise picture changes to reflect this)
- The health of currently sapped buildings. – top left corner
HUD modification
Team Fortress 2 allows players to modify their HUD from the default layout. Many community members have made modifications that are shared with the public. Reasons for using custom HUDs vary widely, but most agree that they are primarily to improve visibility of important information (e.g. health, ammo or ÜberCharge meters) and move non-vital HUD panels aside. Which custom HUD you choose or choose not to use is all up to personal preference; there is no one HUD that is "better" than another, though many would disagree. Custom HUDs can also be used on servers with an sv_pure setting.
- Note: custom HUD modifications will often break after game updates. If your current HUD is not displaying properly, check the website of your custom HUD for an update, or delete the custom HUD files and restart your game to use the default HUD.
Installation
Each custom HUD contains different files and their correct destination may vary (see their individual documentation for exact locations). However, custom HUD modifications generally only modify files in two folders:
/tf/resource/tf/scripts
After placing all files in their correct destinations, restart the game and play with your new HUD.
External links
- Flame's HUD Guide (PDF) – a starter's guide to modifying the HUD.
- Popular custom HUDs
- Flame's Community HUD: Official site – Screenshots – Download
- Povohat's HUD (PVHUD) : Official site – Screenshots – Download
- BroeselHUD (updated m0reHUD): Official site – Screenshots – Download
- G-Mang HUD: Official site – Screenshots – Download
- Revan XP HUD: Official site – Screenshots – Download
- Oxide HUD: Official site – Screenshots – Download
- A Toasty HUD: Official site – Screenshots – Download
- FrankenHUD: Official site – Screenshots – Download


