Defense

| “ | Must I defend zis point myself?!
Click to listen
— The Medic to his incompetent teammates
|
” |
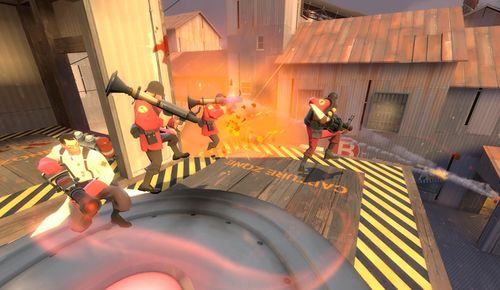
A Defense is earned when a player somehow impedes an enemy from accomplishing an objective. There are various ways to achieve this:
- Killing the only enemy capturing a control point or pushing the Payload. If there are multiple enemies doing this, then you must kill them all to receive the Defense.
- Standing in range of the enemy Payload while an enemy is pushing it. Doing so will also stop the progress of the Payload. (There is a time delay before you can be awarded another defense for doing this again.)
- Standing on one of your control points which is being captured by the enemy. This will stop the capture progress, but you will only be awarded the defense if the point was more than half captured before you stepped on it.
- Killing the enemy Intelligence carrier.
It is possible to block captures while invulnerable from a Medic's ÜberCharge, but not while under the effects of Bonk! Atomic Punch. Disguises will not block captures.
Contents
Defense Strategy
Defense is also a tactic employed in Team Fortress 2. It usually encompasses denying the enemy from reaching a specific point or completing their objective. A good defense is crucial to virtually every team; otherwise it will most likely fall.
Here are a few defense strategies:
Class-Specific
A Scout's Defensive strategy basically boils down to harassing the stronger classes and picking off the weak and injured ones. The Force-A-Nature gives a Scout a very powerful hit-and-run weapon, allowing for a near-instant kill at close range for many classes. Double-jumping allows the Scout to reach places few others can in order to kill Snipers, outflank attackers, and destroy Teleporter entrances. The Sandman can be useful in stunning a high-profile enemy such as a Heavy or Soldier that may have otherwise caused a lot of damage to your team. Also, your speed allows you to deny the enemy valuable resources (Health and Ammo) by taking them for yourself.
Good as an "every-man"; he can fill most roles well, from forward base smasher to camper. Aside from the Heavy, the Soldier is probably the most feared class to go up against single-handed. A Soldier's presence can be enough to force enemies to retreat and find another way in. The Rocket jump allows a Soldier to flank unaware enemies and to get to advantageous high ground. The Direct Hit has limited usefulness in defense, but may be used to pick-off Medics and faraway Snipers.
A Pyro's role on defense is mostly to give the Engineers on your team an extra hand in area denial. Spy checking is the job you're best at, so give every teammate you see a puff of flames to keep Spy encounters to a very minimum. The Homewrecker is also very useful in removing Sappers from friendly Engineer's buildings. Pyros with the Flamethrower can also use their air-compression blast to clear fields of Stickybombs or to keep an Ubercharged enemy away, with a Dispenser giving them all the ammo they need. If encounters from enemy Spies are running thin, the Pyro can do his normal job in a defensive manner — Flanking. Taking an alternate route to get behind the enemy team and flaming like crazy can rank up a few kills, leaving the burning enemies to be dealt with by your team. You may even get the Medics to pop an ÜberCharge early, stalling them from taking out your team's Sentry Guns. The other thing that the Pyro does on defense is to light enemies on fire, making them not only more visible and therefore easier targets to spot for the other classes, but also induce panic in the enemy, causing them to be more likely to flee.
Also, enemies on fire are far more likely to retreat and heal rather than to continue a push, especially without nearby Medics.
Very obvious choice, his stickies work well on Control Points and in narrow hallways. Stickybomb traps can also be used to kill unaware attackers as they rush towards their objective. His Scottish Resistance works particularly well in this role, as the addition of six more stickies active as well as the ability to set multiple bomb traps allows for near-complete defense of an area. Demomen are also good at destroying forward bases with his grenades from around corners or through windows.
Makes a great "Anvil" for a defense as the enemy team attempts a rush. The Heavy works best with a Medic or Dispenser keeping his health high and ammo full. Natascha is particularly useful if the opposing team is using fast-moving classes like Scouts and Pyros to try and rush past the other defenses. The Heavy's slow speed renders attempts at flanking a hit-or-miss idea, as he can easily be killed while attempting to maneuver into position. However, the Heavy does not always have to expose his position; the Tomislav allows him to hide around corners with his weapon silently primed, ready to ambush anyone who crosses his path.
The bread of a defender's Sandvich, the Engineer (and his Sentry Gun) is usually the one to hold off wave after waves of opponents, but only if his team protects him from certain attacks. A well-timed ÜberCharge can easily destroy your sentry nest without a Pyro using compression blasts to knock it away or explosive classes to separate the Medic. Spies are always a danger to the lone Engineer, but they are easily countered by keen observation and a good Spy-checker. If you have multiple Engineers it's recommended to build you Sentry Guns in different locations so that not both can be taken down that easily by a spamming demo or Soldier.
Both a Medic & Patient combo and a "Combat Medic" are good choices for a Defense. A Kritzkrieg may also be more valuable for a defense role than the Medi Gun. While an ÜberCharge will put a temporary stop to an enemy offensive, wise opponents will retreat from the ÜberCharged team to regroup. A well-placed ambush Kritzkrieg, however, will quickly destroy the majority of an assault. ÜberCharges are still very useful, however, in countering opposing ÜberCharges and in destroying the attackers' forward bases.
A Sniper's role on defense is obvious: sniping. If you see an enemy force heading towards your base, try and get as many headshots as possible, diminishing the amount of support the enemy team has in their attack. Consider switching from the Sniper Rifle to the Huntsman if there is limited cover and the map focuses on close quarters. Jarate is very effective on defense, as the attackers frequently move as a team. A well-placed throw can allow your team to quickly destroy what may have been a successful push. When sniping, Medics are of the highest priority, especially those with ÜberCharges ready. A single headshot to an enemy Medic can sometimes mean the difference between success and failure. Heavies are a devastating offensive force, but your rifle can lay them to waste.
While the Spy is made for support, he does well on defense. Sneaking behind an attacking mob of enemies and backstabbing key targets such as Medics and Heavies can sometimes save your team. Like the Sniper, backstabbing Medics close to an ÜberCharge can cripple an opposing team's offense. Heavies and Soldiers are also good front-liners, and both of them, due to their slow walking speed, will fall easily to a backstab from your knife. Stabbing Demomen while they are focused on destroying Sentry Guns can also be an effective way to save your Engineers and their buildings. In addition, Spies are well equipped to destroy the offensive team's Teleporters, slowing their reinforcements.
General Defense
- Watch every entrance. Almost always there's a way into the your base that your team isn't going to watch, making it easy for Spies and Pyro/Medics to get in and tear your team to bits. Keeping an equal defense at every area is the key to success.
- Every map has points at which open spaces narrow down into passages. These 'choke-points' can be camped to effectively shut the enemy team out.
- Ambushing is another good Defense tactic. Crouching next to a doorway or behind a corner on the way to an Objective is an effective way to take down classes with more firepower than you. For example, a Heavy caught by surprise is almost invariably doomed.
- Flanking also works just as well on defense as on offense. While the enemy team pushes against the team's defense, a small strike-force can come around behind them and cripple, or even kill, the entire offensive push.
- On "Push" five control point maps such as Badlands and Granary, the best defense is often a good offense. "Suiciding" key players such as Medics, Soldiers and Demomen is a very effective strategy to delay if not prevent an offensive push altogether. Suiciding involves getting in close to the opponent and killing key players even if your own death is inevitable. This is usually preformed by a Scout, Spy or Pyro. This may seem reckless but if you remove enough of the core opposition before they can attack they will often abort an attack and give your team to regroup also.
- Having more team members than your enemy is always useful in a defensive situation. If you huddle together, however, players such as the Soldier and Demoman will find it easier to break through your defense, so spread out.
- A Spy behind enemy lines can devastate even the most unbreakable defenses. Regular Spy checks will ensure that you don't get backstabbed while trying to defend.
- Keep moving. Standing still makes it easier for the offensive force to hit you, especially Snipers.
- If the offensive team's Medics manage to trigger an Übercharge on players such as Heavies, Soldiers, Pyros or Demomen, your defense will be annihilated. The enemy Medics also keep the offensive team healed and therefore able to fight for longer. To prevent these from happening, target enemy Medics right away.
Related achievements
 Scout
Scout
| Block the Plate Block 50 point captures. |
 Soldier
| Hamburger Hill Defend a cap point 30 times. |
 Demoman
| Bravehurt Kill 25 players defending a capture point or cart. |
 Heavy
Heavy
|
|
 Medic
Medic
| Preventive Medicine Block the enemy from capturing a control point with an ÜberCharged teammate. |


