Difference between revisions of "Scream Fortress 2022/zh-hans"
BrazilianNut (talk | contribs) m |
BrazilianNut (talk | contribs) m (New table colors.) |
||
| Line 18: | Line 18: | ||
{|class="wikitable" cellpadding=2 style="text-align:center;" | {|class="wikitable" cellpadding=2 style="text-align:center;" | ||
|-style="height:20px;" | |-style="height:20px;" | ||
| − | ! class="header" style="background:# | + | ! class="header" style="background:#BD0BB4;color:#FFFFFF;" | {{common string|Name}} |
| − | ! class="header" style="background:# | + | ! class="header" style="background:#BD0BB4;color:#FFFFFF;" | {{common string|Picture}} |
| − | ! class="header" style="background:# | + | ! class="header" style="background:#BD0BB4;color:#FFFFFF;" | {{common string|Game mode}} |
| − | ! class="header" style="background:# | + | ! class="header" style="background:#BD0BB4;color:#FFFFFF;" | {{common string|File name}} |
|- | |- | ||
| − | | width="90px" style="background:# | + | | width="90px" style="background:#FD52FF;" | '''[[Bonesaw (map){{if lang}}|<font color="white">Bonesaw</font>]]''' |
| − | | style="background:# | + | | style="background:#DDC9E1;" | [[File:Plr hacksaw event.png|160px|link=Bonesaw (map){{if lang}}]] |
| − | | style="background:# | + | | style="background:#DDC9E1;" | '''[[Payload Race{{if lang}}|{{common string|Payload Race}}]]'''<br>[[File:Hoodoo Bombcart.png|50px|link=Payload#Payload_Race_2{{if lang}}]] |
| {{code|plr_hacksaw_event}} | | {{code|plr_hacksaw_event}} | ||
|- | |- | ||
| − | | style="background:# | + | | style="background:#FD52FF;" | '''[[Crasher{{if lang}}|<font color="white">Crasher</font>]]''' |
| − | | style="background:# | + | | style="background:#DDC9E1;" | [[File:Ctf crasher.png|160px|link=Crasher{{if lang}}]] |
| − | | style="background:# | + | | style="background:#DDC9E1;" | '''[[Capture the Flag{{if lang}}|{{common string|Capture the Flag}}]]'''<br>[[File:Intel blu idle.png|50px|link=Capture the Flag{{if lang}}]] |
| {{code|ctf_crasher}} | | {{code|ctf_crasher}} | ||
|- | |- | ||
| − | | style="background:# | + | | style="background:#FD52FF;" | '''[[Ghoulpit{{if lang}}|<font color="white">Ghoulpit</font>]]''' |
| − | | style="background:# | + | | style="background:#DDC9E1;" | [[File:Pl sludgepit event.png|160px|link=Ghoulpit{{if lang}}]] |
| − | | style="background:# | + | | style="background:#DDC9E1;" | '''[[Payload{{if lang}}|{{common string|Payload}}]]'''<br>[[File:Hoodoo Bombcart.png|50px|link=Payload{{if lang}}]] |
| {{code|pl_sludgepit_event}} | | {{code|pl_sludgepit_event}} | ||
|- | |- | ||
| − | | style="background:# | + | | style="background:#FD52FF;" | '''[[Helltrain{{if lang}}|<font color="white">Helltrain</font>]]''' |
| − | | style="background:# | + | | style="background:#DDC9E1;" | [[File:Ctf helltrain event.png|160px|link=Helltrain{{if lang}}]] |
| − | | style="background:# | + | | style="background:#DDC9E1;" | '''[[Capture the Flag{{if lang}}|{{common string|Capture the Flag}}]]'''<br>[[File:Intel blu idle.png|50px|link=Capture the Flag{{if lang}}]] |
| {{code|ctf_helltrain_event}} | | {{code|ctf_helltrain_event}} | ||
|- | |- | ||
| − | | style="background:# | + | | style="background:#FD52FF;" | '''[[Soul-Mill{{if lang}}|<font color="white">Soul-Mill</font>]]''' |
| − | | style="background:# | + | | style="background:#DDC9E1;" | [[File:Koth sawmill event.png|160px|link=Soul-Mill{{if lang}}]] |
| − | | style="background:# | + | | style="background:#DDC9E1;" | '''[[King of the Hill{{if lang}}|{{common string|King of the Hill}}]]'''<br>[[File:Controlpoint.png|50px|link=King of the Hill{{if lang}}]] |
| {{code|koth_sawmill_event}} | | {{code|koth_sawmill_event}} | ||
|- | |- | ||
| − | | style="background:# | + | | style="background:#FD52FF;" | '''[[Spookeyridge{{if lang}}|<font color="white">Spookeyridge</font>]]''' |
| − | | style="background:# | + | | style="background:#DDC9E1;" | [[File:Cp spookeyridge.png|160px|link=Spookeyridge{{if lang}}]] |
| − | | style="background:# | + | | style="background:#DDC9E1;" | '''[[Control Point (game mode){{if lang}}|{{common string|Attack/Defend}}]]'''<br>[[File:Controlpoint.png|50px|link=Control Point (game mode){{if lang}}]] |
| {{code|cp_spookeyridge}} | | {{code|cp_spookeyridge}} | ||
|} | |} | ||
| Line 57: | Line 57: | ||
{{main|Cosmetic items/zh-hans|l1={{item name|Cosmetic items}}}} | {{main|Cosmetic items/zh-hans|l1={{item name|Cosmetic items}}}} | ||
{| class="wikitable collapsible" cellpadding="3" style="text-align:center;" | {| class="wikitable collapsible" cellpadding="3" style="text-align:center;" | ||
| − | | width="90px" style="background:# | + | | width="90px" style="background:#BD0BB4;" rowspan="2" | '''{{class link|Scout|br=yes|color=white}}''' |
| style="background:#4B69FF;" | {{item icon|Imp's Imprint|75px}} | | style="background:#4B69FF;" | {{item icon|Imp's Imprint|75px}} | ||
| − | | style="background:# | + | | style="background:#DDC9E1;" | '''{{item link|Imp's Imprint}}''' |
|- | |- | ||
| style="background:#8847FF;" | {{item icon|Masked Fiend|75px}} | | style="background:#8847FF;" | {{item icon|Masked Fiend|75px}} | ||
| − | | style="background:# | + | | style="background:#DDC9E1;" | '''{{item link|Masked Fiend}}''' |
|- | |- | ||
| − | | style="background:# | + | | style="background:#BD0BB4;" rowspan="3" | '''{{class link|Soldier|br=yes|color=white}}''' |
| style="background:#D32CE6;" | {{item icon|Cranial Cowl|75px}} | | style="background:#D32CE6;" | {{item icon|Cranial Cowl|75px}} | ||
| − | | style="background:# | + | | style="background:#DDC9E1;" | '''{{item link|Cranial Cowl}}''' |
|- | |- | ||
| style="background:#4B69FF;" | {{item icon|Firearm Protector|75px}} | | style="background:#4B69FF;" | {{item icon|Firearm Protector|75px}} | ||
| − | | style="background:# | + | | style="background:#DDC9E1;" | '''{{item link|Firearm Protector}}''' |
|- | |- | ||
| style="background:#8847FF;" | {{item icon|Safety Stripes|75px}} | | style="background:#8847FF;" | {{item icon|Safety Stripes|75px}} | ||
| − | | style="background:# | + | | style="background:#DDC9E1;" | '''{{item link|Safety Stripes}}''' |
|- | |- | ||
| − | | style="background:# | + | | style="background:#BD0BB4;" rowspan="3" | '''{{class link|Pyro|br=yes|color=white}}''' |
| style="background:#FFD700;" | {{item icon|Fire Breather|75px}} | | style="background:#FFD700;" | {{item icon|Fire Breather|75px}} | ||
| − | | style="background:# | + | | style="background:#DDC9E1;" | '''{{item link|Fire Breather}}''' |
|- | |- | ||
| style="background:#FFD700;" | {{item icon|Magical Mount|75px}} | | style="background:#FFD700;" | {{item icon|Magical Mount|75px}} | ||
| − | | style="background:# | + | | style="background:#DDC9E1;" | '''{{item link|Magical Mount}}''' |
|- | |- | ||
| style="background:#EB4B4B;" | {{item icon|Propaniac|75px}} | | style="background:#EB4B4B;" | {{item icon|Propaniac|75px}} | ||
| − | | style="background:# | + | | style="background:#DDC9E1;" | '''{{item link|Propaniac}}''' |
|- | |- | ||
| − | | style="background:# | + | | style="background:#BD0BB4;" rowspan="3" | '''{{class link|Demoman|br=yes|color=white}}''' |
| style="background:#D32CE6;" | {{item icon|Alcoholic Automaton|75px}} | | style="background:#D32CE6;" | {{item icon|Alcoholic Automaton|75px}} | ||
| − | | style="background:# | + | | style="background:#DDC9E1;" | '''{{item link|Alcoholic Automaton}}''' |
|- | |- | ||
| style="background:#4B69FF;" | {{item icon|Bombard Brigadier|75px}} | | style="background:#4B69FF;" | {{item icon|Bombard Brigadier|75px}} | ||
| − | | style="background:# | + | | style="background:#DDC9E1;" | '''{{item link|Bombard Brigadier}}''' |
|- | |- | ||
| style="background:#4B69FF;" | {{item icon|Nightbane Brim|75px}} | | style="background:#4B69FF;" | {{item icon|Nightbane Brim|75px}} | ||
| − | | style="background:# | + | | style="background:#DDC9E1;" | '''{{item link|Nightbane Brim}}''' |
|- | |- | ||
| − | | style="background:# | + | | style="background:#BD0BB4;" rowspan="4" | '''{{class link|Heavy|br=yes|color=white}}''' |
| style="background:#4B69FF;" | {{item icon|Horror Shawl|75px}} | | style="background:#4B69FF;" | {{item icon|Horror Shawl|75px}} | ||
| − | | style="background:# | + | | style="background:#DDC9E1;" | '''{{item link|Horror Shawl}}''' |
|- | |- | ||
| style="background:#FFD700;" | {{item icon|Misha's Maw|75px}} | | style="background:#FFD700;" | {{item icon|Misha's Maw|75px}} | ||
| − | | style="background:# | + | | style="background:#DDC9E1;" | '''{{item link|Misha's Maw}}''' |
|- | |- | ||
| style="background:#8847FF;" | {{item icon|Road Block|75px}} | | style="background:#8847FF;" | {{item icon|Road Block|75px}} | ||
| − | | style="background:# | + | | style="background:#DDC9E1;" | '''{{item link|Road Block}}''' |
|- | |- | ||
| style="background:#D32CE6;" | {{item icon|Road Rage|75px}} | | style="background:#D32CE6;" | {{item icon|Road Rage|75px}} | ||
| − | | style="background:# | + | | style="background:#DDC9E1;" | '''{{item link|Road Rage}}''' |
|- | |- | ||
| − | | style="background:# | + | | style="background:#BD0BB4;" rowspan="4" | '''{{class link|Engineer|br=yes|color=white}}''' |
| style="background:#FFD700;" | {{item icon|Cabinet Mann|75px}} | | style="background:#FFD700;" | {{item icon|Cabinet Mann|75px}} | ||
| − | | style="background:# | + | | style="background:#DDC9E1;" | '''{{item link|Cabinet Mann}}''' |
|- | |- | ||
| style="background:#8847FF;" | {{item icon|Dustbowl Devil|75px}} | | style="background:#8847FF;" | {{item icon|Dustbowl Devil|75px}} | ||
| − | | style="background:# | + | | style="background:#DDC9E1;" | '''{{item link|Dustbowl Devil}}''' |
|- | |- | ||
| style="background:#4B69FF;" | {{item icon|More Gun Marshal|75px}} | | style="background:#4B69FF;" | {{item icon|More Gun Marshal|75px}} | ||
| − | | style="background:# | + | | style="background:#DDC9E1;" | '''{{item link|More Gun Marshal}}''' |
|- | |- | ||
| style="background:#FFD700;" | {{item icon|Pony Express|75px}} | | style="background:#FFD700;" | {{item icon|Pony Express|75px}} | ||
| − | | style="background:# | + | | style="background:#DDC9E1;" | '''{{item link|Pony Express}}''' |
|- | |- | ||
| − | | style="background:# | + | | style="background:#BD0BB4;" rowspan="2" | '''{{class link|Medic|br=yes|color=white}}''' |
| style="background:#8847FF;" | {{item icon|Lavish Labwear|75px}} | | style="background:#8847FF;" | {{item icon|Lavish Labwear|75px}} | ||
| − | | style="background:# | + | | style="background:#DDC9E1;" | '''{{item link|Lavish Labwear}}''' |
|- | |- | ||
| style="background:#D32CE6;" | {{item icon|Victorian Villainy|75px}} | | style="background:#D32CE6;" | {{item icon|Victorian Villainy|75px}} | ||
| − | | style="background:# | + | | style="background:#DDC9E1;" | '''{{item link|Victorian Villainy}}''' |
|- | |- | ||
| − | | style="background:# | + | | style="background:#BD0BB4;" rowspan="2" | '''{{class link|Sniper|br=yes|color=white}}''' |
| style="background:#8847FF;" | {{item icon|Headhunter's Brim|75px}} | | style="background:#8847FF;" | {{item icon|Headhunter's Brim|75px}} | ||
| − | | style="background:# | + | | style="background:#DDC9E1;" | '''{{item link|Headhunter's Brim}}''' |
|- | |- | ||
| style="background:#4B69FF;" | {{item icon|Hunting Cloak|75px}} | | style="background:#4B69FF;" | {{item icon|Hunting Cloak|75px}} | ||
| − | | style="background:# | + | | style="background:#DDC9E1;" | '''{{item link|Hunting Cloak}}''' |
|- | |- | ||
| − | | style="background:# | + | | style="background:#BD0BB4;" rowspan="1" | '''{{class link|Spy|br=yes|color=white}}''' |
| style="background:#4B69FF;" | {{item icon|Turncoat|75px}} | | style="background:#4B69FF;" | {{item icon|Turncoat|75px}} | ||
| − | | style="background:# | + | | style="background:#DDC9E1;" | '''{{item link|Turncoat}}''' |
|- | |- | ||
| − | | style="background:# | + | | style="background:#BD0BB4;" rowspan="3" | '''{{class link|All Classes|br=yes|color=white}}''' |
| style="background:#4B69FF;" | {{item icon|Beaten and Bruised|75px}} | | style="background:#4B69FF;" | {{item icon|Beaten and Bruised|75px}} | ||
| − | | style="background:# | + | | style="background:#DDC9E1;" | '''{{item link|Beaten and Bruised}}''' |
|- | |- | ||
| style="background:#EB4B4B;" | {{item icon|Onimann|75px}} | | style="background:#EB4B4B;" | {{item icon|Onimann|75px}} | ||
| − | | style="background:# | + | | style="background:#DDC9E1;" | '''{{item link|Onimann}}''' |
|- | |- | ||
| style="background:#4B69FF;" | {{item icon|Starlight Sorcerer|75px}} | | style="background:#4B69FF;" | {{item icon|Starlight Sorcerer|75px}} | ||
| − | | style="background:# | + | | style="background:#DDC9E1;" | '''{{item link|Starlight Sorcerer}}''' |
|} | |} | ||
| Line 170: | Line 170: | ||
{{main|Taunts/zh-hans|l1={{item name|Taunts}}}} | {{main|Taunts/zh-hans|l1={{item name|Taunts}}}} | ||
{| class="wikitable collapsible" cellpadding="3" style="text-align:center;" | {| class="wikitable collapsible" cellpadding="3" style="text-align:center;" | ||
| − | | width="90px" style="background:# | + | | width="90px" style="background:#BD0BB4;" rowspan="2" | '''{{class link|Demoman|br=yes|color=white}}''' |
| − | | style="background:# | + | | style="background:#FD52FF;" | {{item icon|Drunk Mann's Cannon|75px}} |
| − | | style="background:# | + | | style="background:#DDC9E1;" | '''{{item link|Drunk Mann's Cannon}}''' |
|- | |- | ||
| − | | style="background:# | + | | style="background:#FD52FF;" | {{item icon|Shanty Shipmate|75px}} |
| − | | style="background:# | + | | style="background:#DDC9E1;" | '''{{item link|Shanty Shipmate}}''' |
|- | |- | ||
| − | | style="background:# | + | | style="background:#BD0BB4;" | '''{{class link|Engineer|br=yes|color=white}}''' |
| − | | style="background:# | + | | style="background:#FD52FF;" | {{item icon|Texas Twirl 'Em|75px}} |
| − | | style="background:# | + | | style="background:#DDC9E1;" | '''{{item link|Texas Twirl 'Em}}''' |
|- | |- | ||
| − | | style="background:# | + | | style="background:#BD0BB4;" | '''{{class link|Spy|br=yes|color=white}}''' |
| − | | style="background:# | + | | style="background:#FD52FF;" | {{item icon|Travel Agent|75px}} |
| − | | style="background:# | + | | style="background:#DDC9E1;" | '''{{item link|Travel Agent}}''' |
|- | |- | ||
| − | | style="background:# | + | | style="background:#BD0BB4;" | '''{{class link|All classes|br=yes|color=white}}''' |
| − | | style="background:# | + | | style="background:#FD52FF;" | {{item icon|Scaredy-cat!|75px}} |
| − | | style="background:# | + | | style="background:#DDC9E1;" | '''{{item link|Scaredy-cat!}}''' |
|} | |} | ||
| Line 193: | Line 193: | ||
{{main|Tools|l1={{item name|Tools}}}} | {{main|Tools|l1={{item name|Tools}}}} | ||
{| class="wikitable collapsible" cellpadding="3" style="text-align:center;" | {| class="wikitable collapsible" cellpadding="3" style="text-align:center;" | ||
| − | | width="90px" style="background:# | + | | width="90px" style="background:#FD52FF;" | {{item icon|Ghoulish Gains Case|75px}} |
| − | | style="background:# | + | | style="background:#DDC9E1;" | '''{{item link|Ghoulish Gains Case}}''' |
|- | |- | ||
| − | | style="background:# | + | | style="background:#FD52FF;" | {{item icon|Ghoulish Gains Key|75px}} |
| − | | style="background:# | + | | style="background:#DDC9E1;" | '''{{item link|Ghoulish Gains Key}}''' |
|- | |- | ||
| − | | style="background:# | + | | style="background:#FD52FF;" | {{item icon|Scream Fortress XIV War Paint Case|75px}} |
| − | | style="background:# | + | | style="background:#DDC9E1;" | '''{{item link|Scream Fortress XIV War Paint Case}}''' |
|- | |- | ||
| − | | style="background:# | + | | style="background:#FD52FF;" | {{item icon|Scream Fortress XIV War Paint Key|75px}} |
| − | | style="background:# | + | | style="background:#DDC9E1;" | '''{{item link|Scream Fortress XIV War Paint Key}}''' |
|} | |} | ||
Revision as of 12:18, 8 October 2022
| “你好小啊!真是笑死我了!” 此条目是个小条目。因此,它还未完成。 您可以通过扩充它来帮助军团要塞维基。 |
本条目介绍的是该更新所发布的内容。关于补丁本身,请参见2022年10月5日补丁。
尖叫要塞2022或尖叫要塞XIV是一个于2022年10月1日开始的万圣节活动以及大型更新,游戏激活了万圣节模式,玩家可以使用各种节日限制饰品。四天后,大型更新2022年10月5日补丁添加了6个新的社区万圣节地图、22个全新社区饰品、5个全新社区节日限制饰品、5个全新社区嘲讽、25种全新稀有特效、以及11种全新的战绘。合同追踪器中免费的万圣节合同也被自动重新激活,并为新的万圣节地图添加了6个新的合同。
时间线
2022年10月1日,节日限制饰品被激活,特殊活动菜单也被添加至休闲模式匹配选项中,内含了以往万圣节活动中的地图。
2022年10月5日,万圣节合同被激活,特殊活动菜单中更新添加了新的万圣节地图,摄魂石像鬼开始收集灵魂。摄魂石像鬼会被自动给予没有该物品并在活动期间打开游戏的玩家。
活动计划在2022年11月7日结束。
新增内容
地图
主条目: 地图列表
| 名称 | 图片 | 游戏模式 | 文件名 |
|---|---|---|---|
| Bonesaw | 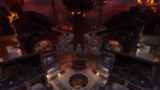
|
推车竞赛
|
plr_hacksaw_event
|
| Crasher | 
|
夺旗 |
ctf_crasher
|
| Ghoulpit | 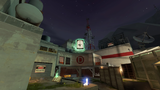
|
推车
|
pl_sludgepit_event
|
| Helltrain | 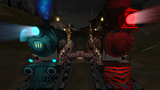
|
夺旗 |
ctf_helltrain_event
|
| Soul-Mill | 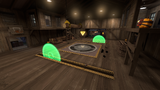
|
山丘之王 |
koth_sawmill_event
|
| Spookeyridge | 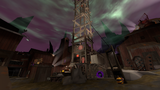
|
攻防型 |
cp_spookeyridge
|
饰品
主条目: 饰品
| 怪衫酷孩 | ||
| 覆面小鬼 | ||
| 颅骨兜帽 | ||
| 消防保护盔 | ||
| 安保条纹服 | ||
| 炎息小龙 | ||
| 独角兽坐骑 | ||
| 喷焰莫西干 | ||
| 嗜酒机体 | ||
| Bombard Brigadier | ||
| 暗夜之魇 | ||
| 骇然硕物 | ||
| 巨熊米沙 | ||
| 拦路恶霸 | ||
| 公路暴徒 | ||
| 头号街机 | ||
| 沙场鬼才 | ||
| 枪多势众 | ||
| 小马快跑 | ||
| 竭谋肆恶 | ||
| 邪智典范 | ||
| 猎头者的宽檐帽 | ||
| 猎头者的潜行服 | ||
| 无间道大衣 | ||
| 鼻青脸肿 | ||
| 鬼侍假面 | ||
| 星辉术士 |
战绘
主条目: 战绘
尖叫要塞 XIV 收藏品
 Sacred Slayer
 Bonzo Gnawed
 Ghoul Blaster
 Metalized Soul
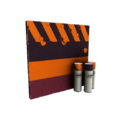 Pumpkin Plastered
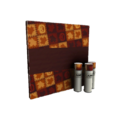 Chilly Autumn
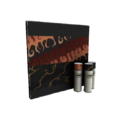 Sunriser
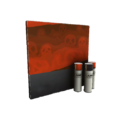 Health and Hell
 Health and Hell (Green)
 Hypergon
 Cream Corned


_War_Paint_Factory_New.png)


嘲讽
主条目: 嘲讽
| Drunk Mann's Cannon | ||
| Shanty Shipmate | ||
| Texas Twirl 'Em | ||
| Travel Agent | ||
| Scaredy-cat! |
工具
主条目: 工具
| Ghoulish Gains Case | |
| Ghoulish Gains Key | |
| Scream Fortress XIV War Paint Case | |
| Scream Fortress XIV War Paint Key |
稀有特效
主条目: 稀有特效
| 尖叫要塞 2022 稀有特效列表 | ||||||
|---|---|---|---|---|---|---|
| 饰品特效 |  |
 |
 |
 |
 |
 |
| Haunted Kraken | Eerie Kraken | Soulful Slice | Horsemann's Hack | 红队 | 蓝队 | |
| Haunted Forever! | ||||||
 |
 |
 |
 |
 |
 | |
| 永恒诅咒!(Forever and Forever!) | Cursed Forever! | Moth Plague | Malevolent Monoculi | 红队 | 蓝队 | |
| Haunted Wick | ||||||
 |
 | |||||
| Wicked Wick | Spectral Wick | |||||
| 嘲讽特效 |  |
 |
 |
 |
 |
 |
| 红队 | 蓝队 | Pungent Poison | Blazed Brew | Mysterious Mixture | Linguistic Deviation | |
| Marigold Ritual | ||||||
 |
 |
 |
 |
 |
 | |
| Aurelian Seal | 红队 | 蓝队 | Prismatic Haze | 红队 | 蓝队 | |
| Runic Imprisonment | Rising Ritual | |||||
 |
 |
 |
 |
 | ||
| 红队 | 蓝队 | Toxic Grip | Infernal Grip | Death Grip | ||
| Bloody Grip | ||||||
画廊
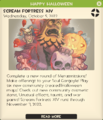
活动开始的游戏内通知

另见
外部链接
- 《Scream Fortress XIV has arrived!》(英语),TF2官方网站,2022年10月5日
| ||||||||||||||||||||||
| |||||
| ||||||||||||||||||||||||||||||||||||||||||||||||||||||||||||||||||||||||||||||||||||||||||||||||||