Difference between revisions of "Waste"
m |
m |
||
| (20 intermediate revisions by 16 users not shown) | |||
| Line 1: | Line 1: | ||
| − | {{ | + | {{custom map}} |
{{Map infobox | {{Map infobox | ||
| − | |game-type=Payload | + | | map-status = custom |
| − | |developer=Eric "[[User:Icarus|Icarus]]" Wong | + | | map-name = Waste |
| − | |map-image=Waste.jpg | + | | map-game-type = Payload |
| − | | | + | | map-developer = Eric "[[User:Icarus|Icarus]]" Wong |
| − | | | + | | map-image = Waste.jpg |
| + | | map-file-name = pl_waste_v2 | ||
| + | | map-version = 2 | ||
| + | | map-environment = Industrial | ||
| + | | map-setting = Midday, cloudy | ||
| + | | map-released = {{patch name|1|28|2009|date-only=yes}} | ||
| + | | map-links = [http://www.gamebanana.com/maps/78364 GameBanana] | ||
| + | }} | ||
| + | |||
[[Image:pl waste finalb.jpg|thumb|top|Waste's payload.]] | [[Image:pl waste finalb.jpg|thumb|top|Waste's payload.]] | ||
| − | |||
| − | Waste, unlike other Payload maps, both teams must escort the single [[Payload]] to the enemy base and can only win if they push it all the way to the enemy's final terminus. | + | {{Quotation|'''The Scout'''|Let's waste 'em!|sound=Scout_battlecry05.wav}} |
| + | |||
| + | '''Waste''' is a [[Community maps|Community-made map]] consisting of a new [[Game modes|game mode]] in the form of a [[Payload]] that is capable of being pushed by either team. It plays similarly to other [[Control Point (game mode)| 5-Point Control Point]] maps, such as [[Well (Control Point)]], except that it places a stronger emphasis on teamwork to push the cart and coordination to flank the enemy. These alternate routes, although longer, usually provide [[Health]] and [[Ammo]] pickups not normally present on the main Payload track. | ||
| + | |||
| + | In Waste, unlike other Payload maps, both teams must attempt to escort the single [[Payload]] to the enemy base in a "tug of war," and can only win if they push it all the way to the enemy's final terminus. | ||
| + | |||
| + | There are also [[Arena]] and [[King of the Hill]] versions of Waste. | ||
== Introduction Video == | == Introduction Video == | ||
| Line 16: | Line 29: | ||
==Locations== | ==Locations== | ||
=== Terminals 1 & 5 (Headquarters) === | === Terminals 1 & 5 (Headquarters) === | ||
| − | Eventually the track winds down into the heart of the enemy operation and the final terminus. Attackers assault the enemy headquarters from multiple levels. | + | Eventually the track winds down into the heart of the enemy operation and the final terminus. Attackers assault the enemy headquarters from multiple levels. |
=== Checkpoints 2 & 4 (Factory) === | === Checkpoints 2 & 4 (Factory) === | ||
| − | As the track winds down to more tighter spaces indoors, control over the higher perches becomes more critical. Naturally, these perches are occupied by defending | + | As the track winds down to more tighter spaces indoors, control over the higher perches becomes more critical. Naturally, these perches are occupied by defending [[Engineer]]s that need to be taken down before hand, and replaced with attacking Engineers to secure a foothold in the enemy base. |
=== Checkpoint 3 (Courtyard) === | === Checkpoint 3 (Courtyard) === | ||
| − | After the setup gates are open, there is a large arena where the Payload lays at rest in the middle. Multiple access points are available to both teams: the high ground with plenty of pickups and Sniper cover, or the sparsely traveled sewers for stealthy players. | + | After the setup gates are open, there is a large arena where the Payload lays at rest in the middle. Multiple access points are available to both teams: the high ground with plenty of pickups and [[Sniper]] cover, or the sparsely traveled sewers for stealthy players. |
| + | |||
| + | ==Strategy== | ||
| + | === Checkpoint 3 (Courtyard) === | ||
| + | *Spies can sneak behind the enemy by using the bottom sewer path, allowing them to attack Engineer nests and Sniping positions overlooking the central checkpoint. | ||
| + | |||
| + | == Screenshots == | ||
| + | <gallery> | ||
| + | File:Waste 01.png | ||
| + | File:Waste 02.png | ||
| + | File:Waste 03.png | ||
| + | File:Waste 04.png | ||
| + | File:Waste 05.png | ||
| + | File:Waste 06.png | ||
| + | File:Waste 07.png | ||
| + | File:Waste 08.png | ||
| + | File:Waste 09.png | ||
| + | File:Waste 10.png | ||
| + | File:Waste 11.png | ||
| + | File:Waste 12.png | ||
| + | File:Waste 13.png | ||
| + | File:Waste 14.png | ||
| + | File:Waste 15.png | ||
| + | File:Waste 16.png | ||
| + | File:Waste 17.png | ||
| + | File:Waste 18.png | ||
| + | File:Waste 19.png | ||
| + | File:Waste 20.png | ||
| + | File:Waste 21.png | ||
| + | File:Waste 22.png | ||
| + | File:Waste 23.png | ||
| + | File:Waste 24.png | ||
| + | File:Waste 25.png | ||
| + | </gallery> | ||
| − | |||
| − | |||
{{CustomMapNav}} | {{CustomMapNav}} | ||
| − | |||
Latest revision as of 01:03, 18 January 2024
 | “I built that.” This page contains information about a custom map that is not an officially released Team Fortress 2 map. All released Valve and Community-made TF2 maps can be found on the list of maps. |
| Waste | |
|---|---|

| |
| Basic Information | |
| Map type: | Payload |
| File name: | pl_waste_v2
|
| Version: | 2 |
| Released: | January 28, 2009 |
| Developer(s): | Eric "Icarus" Wong |
| Link(s): | GameBanana |
| Map Info | |
| Environment: | Industrial |
| Setting: | Midday, cloudy |
| “ | Let's waste 'em!
Click to listen
— The Scout
|
” |
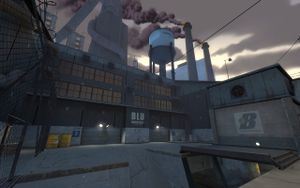
Waste is a Community-made map consisting of a new game mode in the form of a Payload that is capable of being pushed by either team. It plays similarly to other 5-Point Control Point maps, such as Well (Control Point), except that it places a stronger emphasis on teamwork to push the cart and coordination to flank the enemy. These alternate routes, although longer, usually provide Health and Ammo pickups not normally present on the main Payload track.
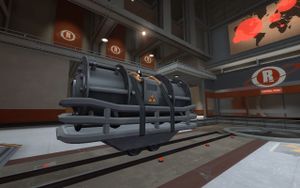
In Waste, unlike other Payload maps, both teams must attempt to escort the single Payload to the enemy base in a "tug of war," and can only win if they push it all the way to the enemy's final terminus.
There are also Arena and King of the Hill versions of Waste.
Contents
Introduction Video
Locations
Terminals 1 & 5 (Headquarters)
Eventually the track winds down into the heart of the enemy operation and the final terminus. Attackers assault the enemy headquarters from multiple levels.
Checkpoints 2 & 4 (Factory)
As the track winds down to more tighter spaces indoors, control over the higher perches becomes more critical. Naturally, these perches are occupied by defending Engineers that need to be taken down before hand, and replaced with attacking Engineers to secure a foothold in the enemy base.
Checkpoint 3 (Courtyard)
After the setup gates are open, there is a large arena where the Payload lays at rest in the middle. Multiple access points are available to both teams: the high ground with plenty of pickups and Sniper cover, or the sparsely traveled sewers for stealthy players.
Strategy
Checkpoint 3 (Courtyard)
- Spies can sneak behind the enemy by using the bottom sewer path, allowing them to attack Engineer nests and Sniping positions overlooking the central checkpoint.
Screenshots
| ||||||||||||||||||||||||||||||||||||||||||||||||


