Difference between revisions of "Upward (competitive)/ko"
Toaster5360 (talk | contribs) |
m (Auto: Sync Map infobox) |
||
| (4 intermediate revisions by 3 users not shown) | |||
| Line 2: | Line 2: | ||
{{DISPLAYTITLE:Upward (경쟁전)}} | {{DISPLAYTITLE:Upward (경쟁전)}} | ||
{{Map infobox | {{Map infobox | ||
| − | |game-type=Payload | + | | map-status = official |
| − | |file-name=pl_upward | + | | map-name = Upward |
| − | |map-image=PL Upward.PNG | + | | map-game-type = Payload |
| − | | map-environment = | + | | map-file-name = pl_upward |
| − | | map-setting = | + | | map-image = PL Upward.PNG |
| − | | map-hazards = [[Environmental_death#Pitfalls| | + | | map-environment = 사막 |
| − | | map-health | + | | map-setting = 낮, 맑음 |
| − | | map-health | + | | map-hazards = [[Environmental_death/ko#Pitfalls|구덩이]] |
| − | | map-health | + | | map-pickups-health-small = 5 |
| − | | map-ammo | + | | map-pickups-health-medium = 7 |
| − | | map-ammo | + | | map-pickups-health-large = 1 |
| − | | map-ammo | + | | map-pickups-ammo-small = 1 |
| − | + | | map-pickups-ammo-medium = 15 | |
| + | | map-pickups-ammo-large = 1 | ||
}} | }} | ||
Upward는 4개의 경유지가 있는 하나의 스테이지로 구성된 [[수레밀기]] 맵으로, 공격 팀은 승리하기 위해 이 모든 경유지를 점령해야 하고, 수비 팀은 시간이 끝날 때까지 마지막 경유지를 막아야합니다. 모든 경유지를 점령할 때마다 추가 시간을 줍니다. 많은 맵들처럼, [[레드]] 팀은 경유지를 지켜야하고 [[블루]] 팀은 수레 옆에 서있는 것으로 경유지를 점령하고 공격해야합니다. 이 맵은 대부분의 [[하이랜더]] 리그에서 쓰이는 맵이면서 매우 인기 있는 수레밀기 맵 중 하나입니다만, [[6v6]]에서는 쓰이는 경우가 매우 드뭅니다. | Upward는 4개의 경유지가 있는 하나의 스테이지로 구성된 [[수레밀기]] 맵으로, 공격 팀은 승리하기 위해 이 모든 경유지를 점령해야 하고, 수비 팀은 시간이 끝날 때까지 마지막 경유지를 막아야합니다. 모든 경유지를 점령할 때마다 추가 시간을 줍니다. 많은 맵들처럼, [[레드]] 팀은 경유지를 지켜야하고 [[블루]] 팀은 수레 옆에 서있는 것으로 경유지를 점령하고 공격해야합니다. 이 맵은 대부분의 [[하이랜더]] 리그에서 쓰이는 맵이면서 매우 인기 있는 수레밀기 맵 중 하나입니다만, [[6v6]]에서는 쓰이는 경우가 매우 드뭅니다. | ||
| Line 22: | Line 23: | ||
== 장소 == | == 장소 == | ||
=== 경유지 A === | === 경유지 A === | ||
| − | *'''왼쪽 바위 | + | *'''왼쪽 바위 비탈길:''' 작은 바위들이 깔린 비탈길로 주로 공격팀 [[헤비]], [[데모맨]] 그리고 [[메딕]]이 전진할 때 쓰는 경로입니다. |
| − | *'''오른쪽 나무 다리:''' | + | *'''오른쪽 나무 다리:''' 오른쪽 측면으로 향하는 나무 다리로, 더 오른쪽에는 [[구덩이]]가 있습니다. |
| − | *''' | + | *'''골짜기:''' 수레가 밀려 내려오는 곳으로, 강철 구조물은 점프로 갈 수 있으며 [[스나이퍼]]가 적의 중요 인물을 처치하기 위해 주로 쓰는 곳입니다. |
<gallery widths=140px heights=80px> | <gallery widths=140px heights=80px> | ||
| − | Image:Upward1. | + | Image:Upward1.png|첫 번째 경유지 |
</gallery> | </gallery> | ||
| − | === | + | === 경유지 B === |
| − | *''' | + | *'''망루:''' ('''헛간'''이나 '''오른쪽 창문'''으로도 불리는) 망루는 활짝 열린 창문이 달린 감시용 방으로 이어지는 나무 계단으로 되어있습니다. 여기는 [[Combo (competitive)/ko|콤보]]들이 전선을 밀기 위해 주로 애용하는 곳으로, 특히 [[übercharge/ko|우버]]를 받은 헤비가 창문에서 뛰어내리는 식으로 많이 사용하는 통로입니다. 수비 팀 엔지니어는 주로 경유지 B를 수비하기 위해 "공용 부활 지점" 근처인 망루의 창문 아래에 농사를 지어놓습니다. 이 경우에는 아래에 센트리를 지어서 매우 가까이서 올 수 있는 우버를 효과적으로 막는 식으로 운용합니다. |
| − | *''' | + | *'''터널:''' 수레는 이 터널을 거쳐서 경유지에 도달하는데, 터널에는 나무로 된 지지대가 있고 왼쪽과 오른쪽에 지상으로 올라갈 수 있는 두 곳의 샛길이 있습니다. 터널 위에는 나무 구조물과 언덕이 있고 여기는 수비 팀 [[엔지니어]]들이 경유지 A를 수비하고 농사를 지을 때 매우 애용하는 자리이기도 합니다. 터널 안에는 나무로 된 발코니가 있는데 레드 팀에게는 완벽한 매복용 자리가 되며 블루 팀의 다음 부활 지점이 되는 곳입니다. |
| + | *'''판잣집:''' 판잣집은 2층 구조로 되어있는데 1층은 철판으로 벽이 세워져있어 잘 보이지 않지만 2층은 계단을 타고 올라가면 중형 치료제와 중향 탄약 상자가 놓여 있고 탁 트여있지만 공격과 수비 팀 모두에게 노출되어 있습니다. 넓은 시야와 바로 옆의 치료제 덕에 레드 팀 스나이퍼들이 여기서 저격을 많이 하며 양 팀 다 여기에 적(특히 스나이퍼)이 있음을 알게 되면 화력공세를 당하는 곳이기도 합니다. | ||
<gallery> | <gallery> | ||
| − | Image:Upward2. | + | Image:Upward2.png|두 번째 경유지 |
</gallery> | </gallery> | ||
=== 경유지 C === | === 경유지 C === | ||
*'''나무 발코니:''' The Balcony consists of a long wooden structure to a flanking root inside the house. It is common for the Blu team to push through this way and also underneath it. It also makes a good spot for the attacking Engineer to place a Teleporter and a Dispenser as it is close to an ammo pack and a [[health pack]]. The Balcony also allows the Blu team to flank behind the Red team too their last point. | *'''나무 발코니:''' The Balcony consists of a long wooden structure to a flanking root inside the house. It is common for the Blu team to push through this way and also underneath it. It also makes a good spot for the attacking Engineer to place a Teleporter and a Dispenser as it is close to an ammo pack and a [[health pack]]. The Balcony also allows the Blu team to flank behind the Red team too their last point. | ||
| − | *''' | + | *'''비계:''' 수레는 밀면 "나무 비계" 위 선로를 따라 올라가며 경유지 C와 매우 가까이 있으며 수레를 밀지 않으면 뒤로 밀려나는 작은 경사로들이 있습니다. 아래에는 중형 치료제가 있는 나무 통로가 있는데 주로 [[Spy/ko|스파이]]들이 탈출용도로 이용합니다. |
| − | *''' | + | *'''작은 집:''' 왼쪽 측면에 있는 집으로, 작은 양철 집으로 안에는 [[탄약 상자]]가 있고 치료제가 있는 '''비계''' 아래 통로까지 이어집니다. 이 집은 데모맨이 안에 있는 적을 쉽게 스패밍해서 처리할 수 있는 곳이라 잘 사용되지 않는 곳입니다. |
<gallery> | <gallery> | ||
| − | Image:Upward3. | + | Image:Upward3.png|세 번째 경유지 |
</gallery> | </gallery> | ||
=== 경유지 D (마지막 경유지) === | === 경유지 D (마지막 경유지) === | ||
*'''레드 팀 발코니:''' The Balcony is a long stretch of high ground opposite too the Red's final [[spawn room]]. It is a common place for the attacking combo too hold and allows for the attacking Sniper too have an over view of the enemy team. | *'''레드 팀 발코니:''' The Balcony is a long stretch of high ground opposite too the Red's final [[spawn room]]. It is a common place for the attacking combo too hold and allows for the attacking Sniper too have an over view of the enemy team. | ||
| − | *'''중앙 입구:''' The | + | *'''중앙 입구:''' The Payload cart will come through this large entrance onto more scaffolding to be finally dropped into a large pitfall hazard. Attacking Scouts can easily push the cart into the pitfall without being damaged due to his small [[hitbox]] size. |
*'''The under-passage:''' Underneath the '''main entrance''' is a small platform which leads too Checkpoint C, it is commonly used by Spies to escape or flank the opposing team. | *'''The under-passage:''' Underneath the '''main entrance''' is a small platform which leads too Checkpoint C, it is commonly used by Spies to escape or flank the opposing team. | ||
<gallery> | <gallery> | ||
| − | Image:Upward4. | + | Image:Upward4.png|Final Terminus |
</gallery> | </gallery> | ||
| Line 74: | Line 76: | ||
* Some of your team members should suicide on the hill top above the tunnel so the Engineer can build more quickly. | * Some of your team members should suicide on the hill top above the tunnel so the Engineer can build more quickly. | ||
* Hold on the left cliff with the combo, make sure you Soldier and your Scout watches the flanks. | * Hold on the left cliff with the combo, make sure you Soldier and your Scout watches the flanks. | ||
| − | * As Soldier, hiding behind the house is a good place to get a pick on the Medic before he | + | * As Soldier, hiding behind the house is a good place to get a pick on the Medic before he ÜberCharges. |
;Second Point | ;Second Point | ||
* Your Engineer should build underneath the hut. However, it should only be temporary as an über can easily dispose of your [[Sentry Gun]]. | * Your Engineer should build underneath the hut. However, it should only be temporary as an über can easily dispose of your [[Sentry Gun]]. | ||
| − | * Always watch the side-path as Snipers can easily pick off team mates out of the Sentry's range. | + | * Always watch the side-path as Snipers can easily pick off team mates out of the Sentry Gun's range. |
;Third Point | ;Third Point | ||
| Line 86: | Line 88: | ||
;Final Point | ;Final Point | ||
* As Sniper, watch for the enemy Sniper ''at all times'' as he is a large threat to your team mates. | * As Sniper, watch for the enemy Sniper ''at all times'' as he is a large threat to your team mates. | ||
| − | * A | + | * A Dispenser should be placed on the side to the entrance so your combo can easily get ammo and health. |
* Watch for Scouts hiding behind the cart as they won’t be spotted by the Sentry Gun. | * Watch for Scouts hiding behind the cart as they won’t be spotted by the Sentry Gun. | ||
Latest revision as of 04:12, 19 January 2024
경쟁전 문서는 현재 작성 단계에 있습니다. 문의가 있으시면, 토론 페이지(영어)를 이용해 주시기 바랍니다.
| Upward | |
|---|---|

| |
| 기본 정보 | |
| 맵 종류: | 수레 밀기 |
| 파일명: | pl_upward
|
| Variants: | Hassle Castle |
| 제작: | Valve |
| 맵 정보 | |
| 환경: | 사막 |
| 설정: | 낮, 맑음 |
| 위험 요소: | 구덩이 |
| 맵 아이템 | |
| 맵 사진 | |
| 맵 전경 | |
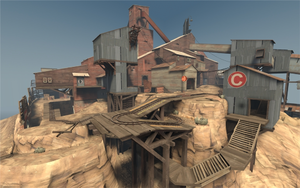
Upward는 4개의 경유지가 있는 하나의 스테이지로 구성된 수레밀기 맵으로, 공격 팀은 승리하기 위해 이 모든 경유지를 점령해야 하고, 수비 팀은 시간이 끝날 때까지 마지막 경유지를 막아야합니다. 모든 경유지를 점령할 때마다 추가 시간을 줍니다. 많은 맵들처럼, 레드 팀은 경유지를 지켜야하고 블루 팀은 수레 옆에 서있는 것으로 경유지를 점령하고 공격해야합니다. 이 맵은 대부분의 하이랜더 리그에서 쓰이는 맵이면서 매우 인기 있는 수레밀기 맵 중 하나입니다만, 6v6에서는 쓰이는 경우가 매우 드뭅니다.
장소
경유지 A
- 왼쪽 바위 비탈길: 작은 바위들이 깔린 비탈길로 주로 공격팀 헤비, 데모맨 그리고 메딕이 전진할 때 쓰는 경로입니다.
- 오른쪽 나무 다리: 오른쪽 측면으로 향하는 나무 다리로, 더 오른쪽에는 구덩이가 있습니다.
- 골짜기: 수레가 밀려 내려오는 곳으로, 강철 구조물은 점프로 갈 수 있으며 스나이퍼가 적의 중요 인물을 처치하기 위해 주로 쓰는 곳입니다.
경유지 B
- 망루: (헛간이나 오른쪽 창문으로도 불리는) 망루는 활짝 열린 창문이 달린 감시용 방으로 이어지는 나무 계단으로 되어있습니다. 여기는 콤보들이 전선을 밀기 위해 주로 애용하는 곳으로, 특히 우버를 받은 헤비가 창문에서 뛰어내리는 식으로 많이 사용하는 통로입니다. 수비 팀 엔지니어는 주로 경유지 B를 수비하기 위해 "공용 부활 지점" 근처인 망루의 창문 아래에 농사를 지어놓습니다. 이 경우에는 아래에 센트리를 지어서 매우 가까이서 올 수 있는 우버를 효과적으로 막는 식으로 운용합니다.
- 터널: 수레는 이 터널을 거쳐서 경유지에 도달하는데, 터널에는 나무로 된 지지대가 있고 왼쪽과 오른쪽에 지상으로 올라갈 수 있는 두 곳의 샛길이 있습니다. 터널 위에는 나무 구조물과 언덕이 있고 여기는 수비 팀 엔지니어들이 경유지 A를 수비하고 농사를 지을 때 매우 애용하는 자리이기도 합니다. 터널 안에는 나무로 된 발코니가 있는데 레드 팀에게는 완벽한 매복용 자리가 되며 블루 팀의 다음 부활 지점이 되는 곳입니다.
- 판잣집: 판잣집은 2층 구조로 되어있는데 1층은 철판으로 벽이 세워져있어 잘 보이지 않지만 2층은 계단을 타고 올라가면 중형 치료제와 중향 탄약 상자가 놓여 있고 탁 트여있지만 공격과 수비 팀 모두에게 노출되어 있습니다. 넓은 시야와 바로 옆의 치료제 덕에 레드 팀 스나이퍼들이 여기서 저격을 많이 하며 양 팀 다 여기에 적(특히 스나이퍼)이 있음을 알게 되면 화력공세를 당하는 곳이기도 합니다.
경유지 C
- 나무 발코니: The Balcony consists of a long wooden structure to a flanking root inside the house. It is common for the Blu team to push through this way and also underneath it. It also makes a good spot for the attacking Engineer to place a Teleporter and a Dispenser as it is close to an ammo pack and a health pack. The Balcony also allows the Blu team to flank behind the Red team too their last point.
- 비계: 수레는 밀면 "나무 비계" 위 선로를 따라 올라가며 경유지 C와 매우 가까이 있으며 수레를 밀지 않으면 뒤로 밀려나는 작은 경사로들이 있습니다. 아래에는 중형 치료제가 있는 나무 통로가 있는데 주로 스파이들이 탈출용도로 이용합니다.
- 작은 집: 왼쪽 측면에 있는 집으로, 작은 양철 집으로 안에는 탄약 상자가 있고 치료제가 있는 비계 아래 통로까지 이어집니다. 이 집은 데모맨이 안에 있는 적을 쉽게 스패밍해서 처리할 수 있는 곳이라 잘 사용되지 않는 곳입니다.
경유지 D (마지막 경유지)
- 레드 팀 발코니: The Balcony is a long stretch of high ground opposite too the Red's final spawn room. It is a common place for the attacking combo too hold and allows for the attacking Sniper too have an over view of the enemy team.
- 중앙 입구: The Payload cart will come through this large entrance onto more scaffolding to be finally dropped into a large pitfall hazard. Attacking Scouts can easily push the cart into the pitfall without being damaged due to his small hitbox size.
- The under-passage: Underneath the main entrance is a small platform which leads too Checkpoint C, it is commonly used by Spies to escape or flank the opposing team.
전략
공격
- First Point
- Your Medic should stay in spawn until it is safe to prevent wasting an Übercharge.
- Pushing with an übered Demoman or Heavy is effective for this part as the defending team will usually be in tight spaces grouped together.
- Avoid pushing on the right flank near the bridge as a Pyro can easily dispatch of you by pushing you into the pitfall hazard.
- Second Point
- Pushing with an übered Heavy is extremely effective as the hut near the Red spawn room allows the Heavy to easily drop onto the Engineer's Sentry Gun and his team mates.
- Your Scout can hide behind the cart and not take damage if you can cover him, if he can capture the second point your team will spawn closer to them allowing you to put more pressure on them.
- Third Point
- Your Sniper should be able to get picks by hiding behind the cart whilst it goes up the scaffolding.
- Push through the house near the balcony on the left too close the distance between you and them.
- Final Point
- Use the balcony too hold as it gives you a height advantage.
- An Übercharged Demoman is more effective to push with.
수비
- First Point
- Some of your team members should suicide on the hill top above the tunnel so the Engineer can build more quickly.
- Hold on the left cliff with the combo, make sure you Soldier and your Scout watches the flanks.
- As Soldier, hiding behind the house is a good place to get a pick on the Medic before he ÜberCharges.
- Second Point
- Your Engineer should build underneath the hut. However, it should only be temporary as an über can easily dispose of your Sentry Gun.
- Always watch the side-path as Snipers can easily pick off team mates out of the Sentry Gun's range.
- Third Point
- As Engineer, try to get the Sentry Gun's range as close to the cart as possible to prevent the Sniper from peeking.
- Your combo should hold in the small house as it provides ammo, health cover and a height advantage.
- Final Point
- As Sniper, watch for the enemy Sniper at all times as he is a large threat to your team mates.
- A Dispenser should be placed on the side to the entrance so your combo can easily get ammo and health.
- Watch for Scouts hiding behind the cart as they won’t be spotted by the Sentry Gun.
갤러리
롤아웃
- 데모맨
The Upward rollout is very easy due to the open area and high sky box of the map, the Demoman can reach the front lines with 3 or less jumps, normally jumping to the door, then over the tunnel and then to the front. Collecting health packs on the way there, do not however pick up ammo packs where the Engineer is setting up on the way.
- 솔저
Similar to the Demoman's rollout, jumping towards the door and over the tunnel to the enemy spawn room. However it is unlikely you will need to get to the front lines quickly unless you want to hide in a position.
같이 보기
| |||||||||||||||||||||||||||||||


