Difference between revisions of "Scream Fortress 2016/it"
BrazilianNut (talk | contribs) m |
|||
| Line 11: | Line 11: | ||
== Aggiunte == | == Aggiunte == | ||
=== Cosmetici === | === Cosmetici === | ||
| − | {{main|Cosmetic items}} | + | {{main|Cosmetic items{{if lang}}|l1={{common string|Cosmetic items}}}} |
{| class="wikitable collapsible" cellpadding="3" style="text-align:center;" | {| class="wikitable collapsible" cellpadding="3" style="text-align:center;" | ||
| − | | width="60px" style="background: #6A5587;" rowspan="1" | {{icon class|Scout}}<br/>'''[[Scout | + | | width="60px" style="background: #6A5587;" rowspan="1" | {{icon class|Scout}}<br/>'''[[Scout{{if lang}}|<span style="color: #FFF;">{{class name|Scout}}</span>]]''' |
| − | | align="center" style="background: # | + | | align="center" style="background: #4B69FF;" | {{item icon|Wing Mann|75px}} |
| − | | style="background: #F1ECF7;"| ''' | + | | style="background: #F1ECF7;"| '''{{item link|Wing Mann}}''' |
|- | |- | ||
| − | | width="60px" style="background: #6A5587;" rowspan="3" | {{icon class|Pyro}}<br/>'''[[Pyro | + | | width="60px" style="background: #6A5587;" rowspan="3" | {{icon class|Pyro}}<br/>'''[[Pyro{{if lang}}|<span style="color: #FFF;">{{class name|Pyro}}</span>]]''' |
| − | | align="center" style="background: # | + | | align="center" style="background: #EB4B4B;" | {{item icon|Combustible Cutie|75px}} |
| − | | style="background: #F1ECF7;"| ''' | + | | style="background: #F1ECF7;"| '''{{item link|Combustible Cutie}}''' |
|- | |- | ||
| − | | align="center" style="background: # | + | | align="center" style="background: #4B69FF;" | {{item icon|Cranial Carcharodon|75px}} |
| − | | style="background: #F1ECF7;"| ''' | + | | style="background: #F1ECF7;"| '''{{item link|Cranial Carcharodon}}''' |
|- | |- | ||
| − | | align="center" style="background: # | + | | align="center" style="background: #FFD700;" | {{item icon|Hovering Hotshot|75px}} |
| − | | style="background: #F1ECF7;"| ''' | + | | style="background: #F1ECF7;"| '''{{item link|Hovering Hotshot}}''' |
|- | |- | ||
| − | | width="60px" style="background: #6A5587;" rowspan="2" | {{icon class|Demoman}}<br/>'''[[Demoman | + | | width="60px" style="background: #6A5587;" rowspan="2" | {{icon class|Demoman}}<br/>'''[[Demoman{{if lang}}|<span style="color: #FFF;">{{class name|Demoman}}</span>]]''' |
| − | | align="center" style="background: # | + | | align="center" style="background: #FFD700;" | {{item icon|Aerobatics Demonstrator|75px}} |
| − | | style="background: #F1ECF7;"| ''' | + | | style="background: #F1ECF7;"| '''{{item link|Aerobatics Demonstrator}}''' |
|- | |- | ||
| − | | align="center" style="background: # | + | | align="center" style="background: #8847FF;" | {{item icon|Spirit of the Bombing Past|75px}} |
| − | | style="background: #F1ECF7;"| ''' | + | | style="background: #F1ECF7;"| '''{{item link|Spirit of the Bombing Past}}''' |
|- | |- | ||
| − | | width="60px" style="background: #6A5587;" rowspan="3" | {{icon class|Heavy}}<br/>'''[[Heavy | + | | width="60px" style="background: #6A5587;" rowspan="3" | {{icon class|Heavy}}<br/>'''[[Heavy{{if lang}}|<span style="color: #FFF;">{{class name|Heavy}}</span>]]''' |
| − | | align="center" style="background: # | + | | align="center" style="background: #8847FF;" | {{item icon|Heavy Tourism|75px}} |
| − | | style="background: #F1ECF7;"| ''' | + | | style="background: #F1ECF7;"| '''{{item link|Heavy Tourism}}''' |
|- | |- | ||
| − | | align="center" style="background: # | + | | align="center" style="background: #4B69FF;" | {{item icon|Mad Mask|75px}} |
| − | | style="background: #F1ECF7;"| ''' | + | | style="background: #F1ECF7;"| '''{{item link|Mad Mask}}''' |
|- | |- | ||
| − | | align="center" style="background: # | + | | align="center" style="background: #D32CE6;" | {{item icon|Mo'Horn|75px}} |
| − | | style="background: #F1ECF7;"| ''' | + | | style="background: #F1ECF7;"| '''{{item link|Mo'Horn}}''' |
|- | |- | ||
| − | | width="60px" style="background: #6A5587;" rowspan="4" | {{icon class|Engineer}}<br/>'''[[Engineer | + | | width="60px" style="background: #6A5587;" rowspan="4" | {{icon class|Engineer}}<br/>'''[[Engineer{{if lang}}|<span style="color: #FFF;">{{class name|Engineer}}</span>]]''' |
| − | | align="center" style="background: # | + | | align="center" style="background: #8847FF;" | {{item icon|Corpus Christi Cranium|75px}} |
| − | | style="background: #F1ECF7;"| ''' | + | | style="background: #F1ECF7;"| '''{{item link|Corpus Christi Cranium}}''' |
|- | |- | ||
| − | | align="center" style="background: # | + | | align="center" style="background: #4B69FF;" | {{item icon|El Paso Poncho|75px}} |
| − | | style="background: #F1ECF7;"| ''' | + | | style="background: #F1ECF7;"| '''{{item link|El Paso Poncho}}''' |
|- | |- | ||
| − | | align="center" style="background: # | + | | align="center" style="background: #FFD700;" | {{item icon|Final Frontier Freighter|75px}} |
| − | | style="background: #F1ECF7;"| ''' | + | | style="background: #F1ECF7;"| '''{{item link|Final Frontier Freighter}}''' |
|- | |- | ||
| − | | align="center" style="background: # | + | | align="center" style="background: #4B69FF;" | {{item icon|Wide-Brimmed Bandito|75px}} |
| − | | style="background: #F1ECF7;"| ''' | + | | style="background: #F1ECF7;"| '''{{item link|Wide-Brimmed Bandito}}''' |
|- | |- | ||
| − | | width="60px" style="background: #6A5587;" rowspan="3" | {{icon class|Medic}}<br/>'''[[Medic | + | | width="60px" style="background: #6A5587;" rowspan="3" | {{icon class|Medic}}<br/>'''[[Medic{{if lang}}|<span style="color: #FFF;">{{class name|Medic}}</span>]]''' |
| − | | align="center" style="background: # | + | | align="center" style="background: #D32CE6;" | {{item icon|Burly Beast|75px}} |
| − | | style="background: #F1ECF7;"| ''' | + | | style="background: #F1ECF7;"| '''{{item link|Burly Beast}}''' |
|- | |- | ||
| − | | align="center" style="background: # | + | | align="center" style="background: #4B69FF;" | {{item icon|Colossal Cranium|75px}} |
| − | | style="background: #F1ECF7;"| ''' | + | | style="background: #F1ECF7;"| '''{{item link|Colossal Cranium}}''' |
|- | |- | ||
| − | | align="center" style="background: # | + | | align="center" style="background: #4B69FF;" | {{item icon|Surgeon's Sidearms|75px}} |
| − | | style="background: #F1ECF7;"| ''' | + | | style="background: #F1ECF7;"| '''{{item link|Surgeon's Sidearms}}''' |
|- | |- | ||
| − | | width="60px" style="background: #6A5587;" rowspan="2" | {{icon class|Spy}}<br/>'''[[Spy | + | | width="60px" style="background: #6A5587;" rowspan="2" | {{icon class|Spy}}<br/>'''[[Spy{{if lang}}|<span style="color: #FFF;">{{class name|Spy}}</span>]]''' |
| − | | align="center" style="background: # | + | | align="center" style="background: #8847FF;" | {{item icon|Big Topper|75px}} |
| − | | style="background: #F1ECF7;"| ''' | + | | style="background: #F1ECF7;"| '''{{item link|Big Topper}}''' |
|- | |- | ||
| − | | align="center" style="background: # | + | | align="center" style="background: #4B69FF;" | {{item icon|Showstopper|75px}} |
| − | | style="background: #F1ECF7;"| ''' | + | | style="background: #F1ECF7;"| '''{{item link|Showstopper}}''' |
|- | |- | ||
| − | | width="60px" style="background: #6A5587;" rowspan="1" | {{icon class|Scout}}<br/>'''[[Scout | + | | width="60px" style="background: #6A5587;" rowspan="1" | {{icon class|Scout}}<br/>'''[[Scout{{if lang}}|<span style="color: #FFF;">{{class name|Scout}}</span>]]'''<br>{{icon class|Soldier}}<br/>'''[[Soldier{{if lang}}|<span style="color: #FFF;">{{class name|Soldier}}</span>]]'''<br>{{icon class|Pyro}}<br/>'''[[Pyro{{if lang}}|<span style="color: #FFF;">{{class name|Pyro}}</span>]]'''<br>{{icon class|Heavy}}<br/>'''[[Heavy{{if lang}}|<span style="color: #FFF;">{{class name|Heavy}}</span>]]''' |
| − | | align="center" style="background: # | + | | align="center" style="background: #D32CE6;" | {{item icon|Pestering Jester|75px}} |
| − | | style="background: #F1ECF7;"| ''' | + | | style="background: #F1ECF7;"| '''{{item link|Pestering Jester}}''' |
|- | |- | ||
| − | | width="60px" style="background: #6A5587;" rowspan="5" | {{icon class|All Classes}}<br/>'''[[Classes | + | | width="60px" style="background: #6A5587;" rowspan="5" | {{icon class|All Classes}}<br/>'''[[Classes{{if lang}}|<span style="color: #FFF;">{{class name|All Classes}}</span>]]''' |
| − | | align="center" style="background: # | + | | align="center" style="background: #EB4B4B;" | {{item icon|Class Crown|75px}} |
| − | | style="background: #F1ECF7;"| ''' | + | | style="background: #F1ECF7;"| '''{{item link|Class Crown}}''' |
|- | |- | ||
| − | | align="center" style="background: # | + | | align="center" style="background: #8847FF;" | {{item icon|Lil' Bitey|75px}} |
| − | | style="background: #F1ECF7;"| ''' | + | | style="background: #F1ECF7;"| '''{{item link|Lil' Bitey}}''' |
|- | |- | ||
| − | | align="center" style="background: # | + | | align="center" style="background: #4B69FF;" | {{item icon|Nasty Norsemann|75px}} |
| − | | style="background: #F1ECF7;"| ''' | + | | style="background: #F1ECF7;"| '''{{item link|Nasty Norsemann}}''' |
|- | |- | ||
| − | | align="center" style="background: # | + | | align="center" style="background: #4B69FF;" | {{item icon|Spooktacles|75px}} |
| − | | style="background: #F1ECF7;"| ''' | + | | style="background: #F1ECF7;"| '''{{item link|Spooktacles}}''' |
| − | |||
| − | |||
| − | |||
|- | |- | ||
| + | | align="center" style="background: #8847FF;" | {{item icon|Toadstool Topper|75px}} | ||
| + | | style="background: #F1ECF7;"| '''{{item link|Toadstool Topper}}''' | ||
|} | |} | ||
=== Provocazioni === | === Provocazioni === | ||
| − | {{main|Taunts}} | + | {{main|Taunts/it|l1=Provocazioni}} |
{| class="wikitable collapsible" cellpadding=2 style="text-align:center;" | {| class="wikitable collapsible" cellpadding=2 style="text-align:center;" | ||
| style="background-color:#6A5587;" width:"90px;" rowspan="2"| {{icon class|All Classes}}<br/>'''[[Classes/it|<span style="color: #FFF;">Tutte le classi</span>]]''' | | style="background-color:#6A5587;" width:"90px;" rowspan="2"| {{icon class|All Classes}}<br/>'''[[Classes/it|<span style="color: #FFF;">Tutte le classi</span>]]''' | ||
| Line 105: | Line 104: | ||
| align="center" style="background-color:#AD9DC3;" | {{Icon item|Victory Lap|75px}} | | align="center" style="background-color:#AD9DC3;" | {{Icon item|Victory Lap|75px}} | ||
| style="background-color:#F1ECF7;"| '''[[Victory Lap/it|Il giro della vittoria]]''' | | style="background-color:#F1ECF7;"| '''[[Victory Lap/it|Il giro della vittoria]]''' | ||
| − | |||
|} | |} | ||
=== Strumenti === | === Strumenti === | ||
| − | {{main|Tools}} | + | {{main|Tools/it|l1=Strumenti}} |
{| class="wikitable collapsible" cellpadding="3" style="text-align:center;" | {| class="wikitable collapsible" cellpadding="3" style="text-align:center;" | ||
| align="center" style="background: #AD9DC3;" | {{item icon|Creepy Crawly Case|75px}} | | align="center" style="background: #AD9DC3;" | {{item icon|Creepy Crawly Case|75px}} | ||
| Line 119: | Line 117: | ||
| align="center" style="background: #AD9DC3;" | {{item icon|Unusualifier|75px}} | | align="center" style="background: #AD9DC3;" | {{item icon|Unusualifier|75px}} | ||
| style="background: #F1ECF7;"| '''[[Unusualifier/it|Insolitificatore]]''' | | style="background: #F1ECF7;"| '''[[Unusualifier/it|Insolitificatore]]''' | ||
| − | |||
|} | |} | ||
=== Mappe === | === Mappe === | ||
| − | {{main|List of maps}} | + | {{main|List of maps{{if lang}}|l1=List of maps}} |
{|class="wikitable" cellpadding=2 style="text-align:center;" | {|class="wikitable" cellpadding=2 style="text-align:center;" | ||
|-style="height:20px;" | |-style="height:20px;" | ||
| Line 148: | Line 145: | ||
=== Effetti Insoliti === | === Effetti Insoliti === | ||
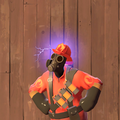
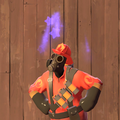
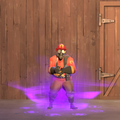
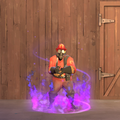
| − | {{main|Unusual effects}} | + | {{main|Unusual effects/it|l1=Effetti Insoliti}} |
<gallery perrow="4"> | <gallery perrow="4"> | ||
File:Unusual Neutron Star.png| Stella di Neutroni | File:Unusual Neutron Star.png| Stella di Neutroni | ||
| Line 168: | Line 165: | ||
{{Scream Fortress 2016 Nav}} | {{Scream Fortress 2016 Nav}} | ||
| + | {{Scream Fortress Events Nav}} | ||
{{Major updates nav}} | {{Major updates nav}} | ||
| + | [[Category:Scream Fortress 2016/it]] | ||
[[Category:Events/it]] | [[Category:Events/it]] | ||
| + | [[Category:Major updates/it]] | ||
Revision as of 05:25, 3 November 2019
Questo articolo riguarda il contenuto rilasciato con l'aggiornamento. Per la patch vedi Patch del 21 ottobre 2016.

Scream Fortress 2016 è un aggiornamento rilasciato il 21 Ottobre 2016. Nell'aggiornamento sono state incluse 2 nuove provocazioni, 3 nuove mappe, 24 nuovi cosmetici, un nuovo strumento l'Insolitificatore, oltre al ritorno delle Merasmissioni dall'evento dell'anno scorso.
Indice
Timeline
L'evento originariamente dovrebbe essere durato dal 21 Ottobre 2016 fino al 9 Novembre 2016 ma è stato esteso fino al 16 Novembre 2016.
Aggiunte
Cosmetici
Articolo principale: Oggetti decorativi
Provocazioni
Articolo principale: Provocazioni
Tutte le classi |
Stregoneria di seconda mano | |
| Il giro della vittoria |
Strumenti
Articolo principale: Strumenti
| Cassa della Vedova Nera | |
| Chiave per Casse della Vedova Nera | |
| Insolitificatore |
Mappe
Articolo principale: List of maps
| Nome | Foto | Modalità di gioco | Nome file |
|---|---|---|---|
| Brimstone | 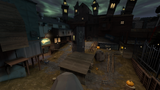
|
Carrello
|
pl_fifthcurve_event
|
| Maple Ridge Event | 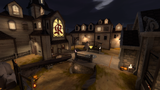
|
Re della collina |
koth_maple_ridge_event
|
| Pit of Death | 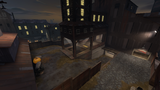
|
Player Destruction
|
pd_pit_of_death_event
|
Effetti Insoliti
Articolo principale: Effetti Insoliti
Stella di Neutroni
Bobina di Tesla

Insonnia Stellare
Torpore Stellare

Inferno Infernale
Il Turbine Spettrale
Fiammi Infernali

Fumo Infernale


Galleria
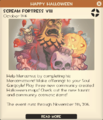
Notifica in gioco riguardante l'inizio dell'evento.
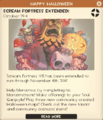
Notifica in gioco riguardante l'estensione dell'evento.
- User Twolfe Halloween2016.png
Immagine d'anteprima pre-evento.


| |||||
| ||||||||||||||||||||||||||||||||||||||||||||||||||||||||||||||||||||||||||||||||||||||||||||||||||