Difference between revisions of "Scream Fortress 2019/sv"
BrazilianNut (talk | contribs) m (→Tidslinje) |
BrazilianNut (talk | contribs) m (→Tillägg) |
||
| Line 17: | Line 17: | ||
{{main|Cosmetic items/sv|l1=Kosmetiska föremål}} | {{main|Cosmetic items/sv|l1=Kosmetiska föremål}} | ||
{| class="wikitable collapsible" cellpadding="3" style="text-align:center;" | {| class="wikitable collapsible" cellpadding="3" style="text-align:center;" | ||
| − | | width=" | + | | width="85px" style="background:#6A5587;" rowspan="3" | '''{{class link|Scout|br=yes|color=white}}''' |
| − | | | + | | style="background:#4B69FF;" | {{item icon|Fuel Injector|75px}} |
| − | | style="background: #F1ECF7;"| '''{{item link|Fuel Injector}}''' | + | | style="background:#F1ECF7;" | '''{{item link|Fuel Injector}}''' |
|- | |- | ||
| − | | | + | | style="background:#FFD700;" | {{item icon|Remorseless Raptor|75px}} |
| − | | style="background: #F1ECF7;"| '''{{item link|Remorseless Raptor}}''' | + | | style="background:#F1ECF7;" | '''{{item link|Remorseless Raptor}}''' |
|- | |- | ||
| − | | | + | | style="background:#FFD700;" | {{item icon|Wild Whip|75px}} |
| − | | style="background: #F1ECF7;"| '''{{item link|Wild Whip}}''' | + | | style="background:#F1ECF7;" | '''{{item link|Wild Whip}}''' |
|- | |- | ||
| − | | | + | | style="background:#6A5587;" rowspan="3" | '''{{class link|Soldier|br=yes|color=white}}''' |
| − | | | + | | style="background:#8847FF;" | {{item icon|El Zapateador|75px}} |
| − | | style="background: #F1ECF7;"| '''{{item link|El Zapateador}}''' | + | | style="background:#F1ECF7;" | '''{{item link|El Zapateador}}''' |
|- | |- | ||
| − | | | + | | style="background:#4B69FF;" | {{item icon|Party Poncho|75px}} |
| − | | style="background: #F1ECF7;"| '''{{item link|Party Poncho}}''' | + | | style="background:#F1ECF7;" | '''{{item link|Party Poncho}}''' |
|- | |- | ||
| − | | | + | | style="background:#D32CE6;" | {{item icon|Racc Mann|75px}} |
| − | | style="background: #F1ECF7;"| '''{{item link|Racc Mann}}''' | + | | style="background:#F1ECF7;" | '''{{item link|Racc Mann}}''' |
|- | |- | ||
| − | | | + | | style="background:#6A5587;" rowspan="5" | '''{{class link|Pyro|br=yes|color=white}}''' |
| − | | | + | | style="background:#4B69FF;" | {{item icon|Candy Cranium|75px}} |
| − | | style="background: #F1ECF7;"| '''{{item link|Candy Cranium}}''' | + | | style="background:#F1ECF7;" | '''{{item link|Candy Cranium}}''' |
|- | |- | ||
| − | | | + | | style="background:#D32CE6;" | {{item icon|Head of the Dead|75px}} |
| − | | style="background: #F1ECF7;"| '''{{item link|Head of the Dead}}''' | + | | style="background:#F1ECF7;" | '''{{item link|Head of the Dead}}''' |
|- | |- | ||
| − | | | + | | style="background:#EB4B4B;" | {{item icon|Pyr'o Lantern|75px}} |
| − | | style="background: #F1ECF7;"| '''{{item link|Pyr'o Lantern}}''' | + | | style="background:#F1ECF7;" | '''{{item link|Pyr'o Lantern}}''' |
|- | |- | ||
| − | | | + | | style="background:#FFD700;" | {{item icon|Pyro Shark|75px}} |
| − | | style="background: #F1ECF7;"| '''{{item link|Pyro Shark}}''' | + | | style="background:#F1ECF7;" | '''{{item link|Pyro Shark}}''' |
|- | |- | ||
| − | | | + | | style="background:#8847FF;" | {{item icon|Skullbrero|75px}} |
| − | | style="background: #F1ECF7;"| '''{{item link|Skullbrero}}''' | + | | style="background:#F1ECF7;" | '''{{item link|Skullbrero}}''' |
|- | |- | ||
| − | | | + | | style="background:#6A5587;" rowspan="2" | '''{{class link|Heavy|br=yes|color=white}}''' |
| − | | | + | | style="background:#4B69FF;" | {{item icon|Convict Cap|75px}} |
| − | | style="background: #F1ECF7;"| '''{{item link|Convict Cap}}''' | + | | style="background:#F1ECF7;" | '''{{item link|Convict Cap}}''' |
|- | |- | ||
| − | | | + | | style="background:#8847FF;" | {{item icon|Soviet Strongmann|75px}} |
| − | | style="background: #F1ECF7;"| '''{{item link|Soviet Strongmann}}''' | + | | style="background:#F1ECF7;" | '''{{item link|Soviet Strongmann}}''' |
|- | |- | ||
| − | | | + | | style="background:#6A5587;" rowspan="2" | '''{{class link|Engineer|br=yes|color=white}}''' |
| − | | | + | | style="background:#FFD700;" | {{item icon|Eingineer|75px}} |
| − | | style="background: #F1ECF7;"| '''{{item link|Eingineer}}''' | + | | style="background:#F1ECF7;" | '''{{item link|Eingineer}}''' |
|- | |- | ||
| − | | | + | | style="background:#4B69FF;" | {{item icon|El Mostacho|75px}} |
| − | | style="background: #F1ECF7;"| '''{{item link|El Mostacho}}''' | + | | style="background:#F1ECF7;" | '''{{item link|El Mostacho}}''' |
|- | |- | ||
| − | | | + | | style="background:#6A5587;" rowspan="2" | '''{{class link|Medic|br=yes|color=white}}''' |
| − | | | + | | style="background:#4B69FF;" | {{item icon|Derangement Garment|75px}} |
| − | | style="background: #F1ECF7;"| '''{{item link|Derangement Garment}}''' | + | | style="background:#F1ECF7;" | '''{{item link|Derangement Garment}}''' |
|- | |- | ||
| − | | | + | | style="background:#8847FF;" | {{item icon|Madmann's Muzzle|75px}} |
| − | | style="background: #F1ECF7;"| '''{{item link|Madmann's Muzzle}}''' | + | | style="background:#F1ECF7;" | '''{{item link|Madmann's Muzzle}}''' |
|- | |- | ||
| − | | | + | | style="background:#6A5587;" rowspan="1" | '''{{class link|Sniper|br=yes|color=white}}''' |
| − | | | + | | style="background:#D32CE6;" | {{item icon|Elizabeth the Third|75px}} |
| − | | style="background: #F1ECF7;"| '''{{item link|Elizabeth the Third}}''' | + | | style="background:#F1ECF7;" | '''{{item link|Elizabeth the Third}}''' |
|- | |- | ||
| − | | | + | | style="background:#6A5587;" rowspan="2" | '''{{class link|Spy|br=yes|color=white}}''' |
| − | | | + | | style="background:#FFD700;" | {{item icon|Avian Amante|75px}} |
| − | | style="background: #F1ECF7;"| '''{{item link|Avian Amante}}''' | + | | style="background:#F1ECF7;" | '''{{item link|Avian Amante}}''' |
|- | |- | ||
| − | | | + | | style="background:#8847FF;" | {{item icon|Voodoo Vizier|75px}} |
| − | | style="background: #F1ECF7;"| '''{{item link|Voodoo Vizier}}''' | + | | style="background:#F1ECF7;" | '''{{item link|Voodoo Vizier}}''' |
|- | |- | ||
| − | | | + | | align="left" style="background:#6A5587;" | '''{{class link|Pyro|color=white}}'''<br>'''{{class link|Engineer|color=white}}''' |
| − | | | + | | style="background:#D32CE6;" | {{item icon|Trick Stabber|75px}} |
| − | | style="background: #F1ECF7;"| '''{{item link|Trick Stabber}}''' | + | | style="background:#F1ECF7;" | '''{{item link|Trick Stabber}}''' |
|- | |- | ||
| − | | | + | | style="background:#6A5587;" rowspan="6" | '''{{class link|All Classes|br=yes|color=white}}''' |
| − | | | + | | style="background:#4B69FF;" | {{item icon|Bat Hat|75px}} |
| − | | style="background: #F1ECF7;"| '''{{item link|Bat Hat}}''' | + | | style="background:#F1ECF7;" | '''{{item link|Bat Hat}}''' |
|- | |- | ||
| − | | | + | | style="background:#4B69FF;" | {{item icon|BINOCULUS!|75px}} |
| − | | style="background: #F1ECF7;"| '''{{item link|BINOCULUS!}}''' | + | | style="background:#F1ECF7;" | '''{{item link|BINOCULUS!}}''' |
|- | |- | ||
| − | | | + | | style="background:#4B69FF;" | {{item icon|Bread Biter|75px}} |
| − | | style="background: #F1ECF7;"| '''{{item link|Bread Biter}}''' | + | | style="background:#F1ECF7;" | '''{{item link|Bread Biter}}''' |
|- | |- | ||
| − | | | + | | style="background:#8847FF;" | {{item icon|Horrible Horns|75px}} |
| − | | style="background: #F1ECF7;"| '''{{item link|Horrible Horns}}''' | + | | style="background:#F1ECF7;" | '''{{item link|Horrible Horns}}''' |
|- | |- | ||
| − | | | + | | style="background:#EB4B4B;" | {{item icon|Mister Bones|75px}} |
| − | | style="background: #F1ECF7;"| '''{{item link|Mister Bones}}''' | + | | style="background:#F1ECF7;" | '''{{item link|Mister Bones}}''' |
|- | |- | ||
| − | | | + | | style="background:#4B69FF;" | {{item icon|Pocket Halloween Boss|75px}} |
| − | | style="background: #F1ECF7;"| '''{{item link|Pocket Halloween Boss}}''' | + | | style="background:#F1ECF7;" | '''{{item link|Pocket Halloween Boss}}''' |
|} | |} | ||
| Line 112: | Line 112: | ||
{{main|Tools/sv|l1=Verktyg}} | {{main|Tools/sv|l1=Verktyg}} | ||
{| class="wikitable collapsible" cellpadding="3" style="text-align:center;" | {| class="wikitable collapsible" cellpadding="3" style="text-align:center;" | ||
| − | | | + | | width="85px" style="background:#AD9DC3;" | {{item icon|Spooky Spoils Case|75px}} |
| − | | style="background: #F1ECF7;"| '''{{item link|Spooky Spoils Case}}''' | + | | style="background:#F1ECF7;" | '''{{item link|Spooky Spoils Case}}''' |
|- | |- | ||
| − | | | + | | style="background:#AD9DC3;" | {{item icon|Spooky Spoils Key|75px}} |
| − | | style="background: #F1ECF7;"| '''{{item link|Spooky Spoils Key}}''' | + | | style="background:#F1ECF7;" | '''{{item link|Spooky Spoils Key}}''' |
|} | |} | ||
| Line 123: | Line 123: | ||
{|class="wikitable" cellpadding=2 style="text-align:center;" | {|class="wikitable" cellpadding=2 style="text-align:center;" | ||
|-style="height:20px;" | |-style="height:20px;" | ||
| − | !class="header" style="background-color:#6A5587;color:#FFFFFF;" |{{common string|Name}} | + | ! class="header" style="background-color:#6A5587;color:#FFFFFF;" |{{common string|Name}} |
| − | !class="header" style="background-color:#6A5587;color:#FFFFFF;" |{{common string|Picture}} | + | ! class="header" style="background-color:#6A5587;color:#FFFFFF;" |{{common string|Picture}} |
| − | !class="header" style="background-color:#6A5587;color:#FFFFFF;" |{{common string|Game mode}} | + | ! class="header" style="background-color:#6A5587;color:#FFFFFF;" |{{common string|Game mode}} |
| − | !class="header" style="background-color:#6A5587;color:#FFFFFF;" |{{common string|File name}} | + | ! class="header" style="background-color:#6A5587;color:#FFFFFF;" |{{common string|File name}} |
|- | |- | ||
| − | |style="background-color:#AD9DC3;" |'''[[Laughter{{if lang}}|Laughter]]''' | + | | width="85px" style="background-color:#AD9DC3;" | '''[[Laughter{{if lang}}|Laughter]]''' |
| − | | | + | | style="background:#F1ECF7" | [[File:Koth_slaughter_event.png|160px|link=Laughter{{if lang}}]] |
| − | | | + | | style="background:#F1ECF7" | '''[[King of the Hill{{if lang}}|{{common string|King of the Hill}}]]'''<br>[[File:Controlpoint.png|50px|link=King of the Hill{{if lang}}]] |
| − | + | | {{code|koth_slaughter_event}} | |
|- | |- | ||
| − | |style="background-color:#AD9DC3;" |'''[[Precipice{{if lang}}|Precipice]]''' | + | | style="background-color:#AD9DC3;" | '''[[Precipice{{if lang}}|Precipice]]''' |
| − | | | + | | style="background:#F1ECF7" | [[File:Pl_precipice_event_final.png|160px|link=Precipice{{if lang}}]] |
| − | | | + | | style="background:#F1ECF7" | '''[[Payload{{if lang}}|{{common string|Payload}}]]'''<br>[[File:Hoodoo Bombcart.png|50px|link=Payload{{if lang}}]] |
| − | + | | {{code|pl_precipice_event_final}} | |
|} | |} | ||
Revision as of 17:51, 25 November 2019
Scream Fortress XI eller Scream Fortress 2019 är ett Halloween event som tog sin början den 1 oktober 2019. Halloween-kartorna återvände tillsammans med säsongsbegränsade kosmetiska föremål. En veckan senare, med Oktober 10, 2019 Patch lades två nya Halloween-kartor till, 22 nya kosmetiska föremål, 5 nya säsongsbegränsade kosmetiska föremål av gemenskapen, och 20 nya ovanliga effekter. Gratis Halloween-kontrakt återaktiverades i Contrackern för eventet med 2 nya kontrakt för de 2 nya kartorna.
Innehåll
Tidslinje
Den 1 oktober, 2019, blev säsongsbegränsade kosmetiska föremål aktiverade och Själgargoyles började samla in själar. Speciella Events Menyn blev tillagt till Vanligt spelläge där dom gamla Halloween-kartorna dök upp.
Den 10 oktober, 2019, aktiverades Halloween-kontrakt och Speciella Events Menyn utökades med de två nya kartorna.
Eventet fortlöper fram till 7 november 2019.
Eventet avslutades den 7 november 2019.
Tillägg
Kosmetiska föremål
Verktyg
| Spöklik skattväska | |
| Spöklik skattnyckel |
Karta
| Namn | Bild | Spelläge | Filnamn |
|---|---|---|---|
| Laughter | 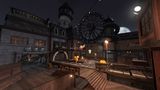
|
Herre på Täppan |
koth_slaughter_event
|
| Precipice | 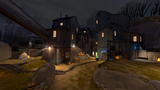
|
Bomb
|
pl_precipice_event_final
|
Ovanliga Effekter

Femte dimensionen

Våldsam virvelvind

Mystisk miasma

Abyssal aura

Spökande skog

Dunkel dunge

Mystisk magi

Eterisk essens

Strålande sken

Violett virvelvind

Smaragdgrön storm

Tapper turbulens

Förhäxad

Fördömd

Förtrollad
Statiskt skimmer
Otäckt oväder
Demoniskt dunder
Jaratechock
Transcendental portal


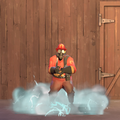
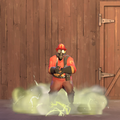
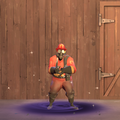
Galleri
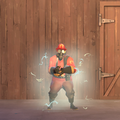
Notifikation i spelet om aktiveringen av Halloween-läge på officiella servrar och den inkommande uppdateringen.
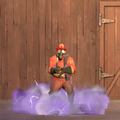
Notifikation i spelet om starten av Halloween.


Se även
Externa länkar
- "Scream Fortress XI has arrived!" (Engelska), Officiella TF2 Hemsidan, 10 oktober, 2019
| |||||
| ||||||||||||||||||||||||||||||||||||||||||||||||||||||||||||||||||||||||||||||||||||||||||||||||||