Difference between revisions of "Barnblitz/ko"
Toaster5360 (talk | contribs) |
Toaster5360 (talk | contribs) (→제1 경유지에서 제2 경유지) |
||
| Line 41: | Line 41: | ||
=== 제1 경유지에서 제2 경유지 === | === 제1 경유지에서 제2 경유지 === | ||
| − | * '''레드팀 마당''': 당신은 마당 왼쪽에 있는 계단을 통해 낙하구간으로 갈 수 있습니다. 계단을 오르기 전에 중형 탄약 상자가 놓여져 있습니다. 레드팀 마당 정중앙에 있는 작은 헛간 뒤에는 대형 치료제가 놓여져 있습니다. 맨 오른쪽 금속 지붕에는 제1 경유지에서 온 | + | * '''레드팀 마당''': 당신은 마당 왼쪽에 있는 계단을 통해 낙하구간으로 갈 수 있습니다. 계단을 오르기 전에 중형 탄약 상자가 놓여져 있습니다. 레드팀 마당 정중앙에 있는 작은 헛간 뒤에는 대형 치료제가 놓여져 있습니다. 맨 오른쪽 금속 지붕에는 제1 경유지에서 온 레드팀이 매복하기에 좋습니다. 레드팀 부활 지점 옆의 나무 플랫폼에는 레드 스나이퍼가 저격하기 좋은 공간입니다. 절벽은 눈덮인 플랫폼에서 이어지며 레드팀 공터에 있는 적과 교전할 때 위치에서 이점을 얻을 수 있습니다. |
| − | * ''' | + | * '''입구''': The gate at the bottom provides a flank to the next checkpoint. In the distance, a doorway leading from the room below the dropdown as well as the stairs to the upper level can be seen. |
* '''낙하구간''': You can either drop down into the room below or attack the defenders from the overlook. The room below this level contains a medium ammunition box and health kit. | * '''낙하구간''': You can either drop down into the room below or attack the defenders from the overlook. The room below this level contains a medium ammunition box and health kit. | ||
* '''Approach''': The flank described above can be seen here on the right. The stairway to the left leads upwards. The checkpoint is visible in the distance. Engineers typically build their Sentry Guns to the right infront of the gate or in the back to the left near the large ammunition box. | * '''Approach''': The flank described above can be seen here on the right. The stairway to the left leads upwards. The checkpoint is visible in the distance. Engineers typically build their Sentry Guns to the right infront of the gate or in the back to the left near the large ammunition box. | ||
Revision as of 22:20, 11 February 2020
| 이 번역은 업데이트가 필요합니다. 당신은 Barnblitz (원본 보기) 페이지에 담긴 내용을 참고해서 개선시킬 수 있습니다. Help:Language translation도 참조하세요. |
| Barnblitz | |
|---|---|

| |
| 기본 정보 | |
| 제작: | 알 수 없음 |
| 맵 사진 | |
| 맵 전경 | |
| “ | 이 Valve가 제작한 수레 밀기 맵으로 당신이 곳간에서 태어났다는 것(마피아 조직에서 비밀스럽게 태어났다는 것)을 증명하십시오! 바로 하나의 밖에 있는 점령지점과 건물 안에 있는 점령지점 3개 (마지막 점령 지점 포함)에서 당신의 적들이 농장을 사도록 만들 때 (당신의 적들이 마피아를 그만두고 농사꾼이 될 때) 당신의 적들에게 당신이 "곳간의 넓은 곳을 칠 수 있다는 것"(마피아 활동을 잘 한다는 것)을 보여 주십시오!
|
” |
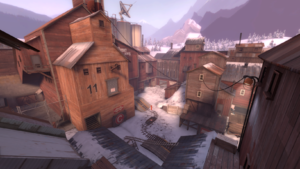
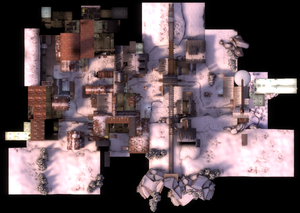
Barnblitz는 Valve가 제작한 수레 밀기 맵이고, 우버 업데이트 1일에 발표되었습니다. 이 맵의 특징은 건물 밖에 점령지점 1개와 건물 안에 점령지점 3개가 있는 구성입니다. 수레가 이동하는 트랙의 대부분은 물론이고, 블루팀과 레드팀의 부활 지점까지 헛간과 헛간 스타일의 건물로 지어져있습니다.
목차
목적
- 블루 팀: 블루팀의 최우선 목표는 수레를 최종 목적지까지 운반하는 겁니다. 계속해서 수레를 운반하면서 레드팀의 수비 전선을 돌파한다면, 수레는 폭발하면서 블루팀은 승리합니다. 팀원들이 수레에 아무도 가까이 가지 못해 수레를 미는데 실패한다면 수레는 뒤로 천천히 밀려날 것이고 어느 정도 시간이 흐르면, 당신의 팀이 가장 최근에 점령한 지점까지 수레는 뒤로 갈 것입니다.
- 레드 팀: 블루팀의 목표와 반대로, 레드팀의 목표는 단체로 모여 블루팀을 저지하고, 수레가 최종 목적지에 도달하는 것을 막는 것입니다. 블루팀의 공격을 제한시간 동안 성공적으로 저지한다면, 레드팀은 승리합니다. 블루 팀을 저지하는 가장 효과적인 방법은, 수레 가까이서 수비를 해서 블루팀 인원들이 아예 접근도 못하게 만드는 것입니다.
장소들
부활 지점에서 제1 경유지
- 부활 지점과 블루팀 마당: 블루팀 부활 지점 왼쪽 출구는 수레 뒤로 갈 수 있습니다. 정면에 있는 2개의 출구는 준비 시간이 끝남과 동시에 수레를 운반할 수 있습니다. 오른쪽의 출구는 공터로 바로 나갈 수 있으며 커다란 바위에 가려져 있는데, 바위 반대편은 주로 센트리 건을 짓는 위치입니다. 블루팀 마당 한 가운데에는 작은 헛간이 있는데 그곳엔 중형 치료제가 놓여져 있습니다.
- 왼쪽 헛간: 왼쪽에 있는 헛간을 통해 눈덮인 플랫폼 위의 적을 기습할 수 있습니다. 헛간을 들어가려면 선반과 함께 있는 상자를 밟고 올라가야합니다. 헛간 안에는 여러 프롭과 함께 소형 탄약 상자가 있습니다. 그리고 헛간 뒤에는 대형 탄약 상자와 소형 치료제가 놓여져 있습니다.
- 플랫폼: 레드 엔지니어들이 주로 수레가 제1 경유지에 진입하는 걸 막기 위해 콘크리트 플랫폼에 구조물을 짓습니다. 만약 눈 덮인 경사로에서 위를 공략하지 못할 경우 측면을 치기 위해 위에서 언급한 헛간을 사용하십시오. 여기서부턴, 당신은 제1 경유지 쪽이나 뒷쪽 경사로를 따라 레드팀 마당으로 갈 수 있습니다.
- 진입로: 진입로의 오른쪽 작은 공간에 대형 탄약 상자와 소형 치료제가 배치되어 있습니다. 그 바로 옆의 콘크리트 바닥에는 엔지니어가 구조물을 짓기 좋은 공간입니다.
- 제1 경유지: 이 곳은 중형 치료제와 대형 탄약 상자가 배치되어 있습니다. 방 전체를 둘러싸고 있는 나무로 된 경사로가 있어 여길 점거하는 팀은 자유롭게 눈덮인 플랫폼으로 이동할 수 있습니다. 여기에 엔지니어가 구조물을 짓는다면 경사로 옆에 있는 작은 방에 텔레포터를 숨겨 지을 수 있습니다.
제1 경유지에서 제2 경유지
- 레드팀 마당: 당신은 마당 왼쪽에 있는 계단을 통해 낙하구간으로 갈 수 있습니다. 계단을 오르기 전에 중형 탄약 상자가 놓여져 있습니다. 레드팀 마당 정중앙에 있는 작은 헛간 뒤에는 대형 치료제가 놓여져 있습니다. 맨 오른쪽 금속 지붕에는 제1 경유지에서 온 레드팀이 매복하기에 좋습니다. 레드팀 부활 지점 옆의 나무 플랫폼에는 레드 스나이퍼가 저격하기 좋은 공간입니다. 절벽은 눈덮인 플랫폼에서 이어지며 레드팀 공터에 있는 적과 교전할 때 위치에서 이점을 얻을 수 있습니다.
- 입구: The gate at the bottom provides a flank to the next checkpoint. In the distance, a doorway leading from the room below the dropdown as well as the stairs to the upper level can be seen.
- 낙하구간: You can either drop down into the room below or attack the defenders from the overlook. The room below this level contains a medium ammunition box and health kit.
- Approach: The flank described above can be seen here on the right. The stairway to the left leads upwards. The checkpoint is visible in the distance. Engineers typically build their Sentry Guns to the right infront of the gate or in the back to the left near the large ammunition box.
- Upper Level: To the left is a set of stairs leading outside and around back of the checkpoint. To the right is the platform overlooking the track. To the rear right is a small corridor with window for surprising the enemy as well as a hole to drop down onto a medium health kit behind the checkpoint. Before this window, there is a medium ammunition box and health kit at the rear of the upper platform.
Checkpoint 2 to Checkpoint 3
- Entrance: The doorway into the house leads to a flight of stairs and a medium health kit.
- Second Story: The defender spawn is here when checkpoint 2 is being contested. Turning the corner and entering the doorway marked "capture point" overlooks the tracks. Heading up the ramp leads to the next story. The door underneath the ramp leads to the second story roof.
- Roof: You can immediately access this roof using the overlook underneath the ramp in the second story. There is a wooden ramp leading to and from the ledge or ground near the checkpoint.
- Third Story: You can either drop down out of the doorway onto the roof below or use the dropdown to the left to land on the platform outside. There is a small health kit and large ammunition box here. Attacking Engineers often place their Teleporters here when the Blu Team is capturing the final point.
- Platform: You can access the roof here. There is a large ammunition box on this platform. Below, there is a small health kit along the edge.
Checkpoint 3 to Final Checkpoint
There are three entrances to the enclosed area that houses the final checkpoint.
- Left Entrance: The left entrance is quickly accessible from the house roof or platform.
- Main Entrance: This is the entrance the cart takes into the next area.
- Right Entrance: A large opening furthest from checkpoint 3; The hill before it has a large ammunition box and medium health kit.
- Platform: This platform is accessed from the left entrance stairs. There's a small ammunition box and health kit here. The stacks of wood provide cover from enemies on the ground. This platform can be accessed from the ground by its respective ramp.
- Right Entrance Lower: The grate protects players moving through this area from enemy fire. This is a good spot to consider enemy placements before moving into the next area. Defending players should use the grate to anticipate flanking enemies. There is a small health kit here.
- Right Entrance Upper: You can either attack the defenders from the small overlooking platform or return to the outside via the open window. There's a small ammunition box and health kit here.
- Final Checkpoint Left: In the rear left of the last checkpoint is a small ramp and platform. Beneath the enclosed area is a large health kit. There is also a large ammunition box near the support column. The floor declines to a chute which defending players can slide down as well as an doorway to a flight of stairs leading to the platform above. Defenders spawn in the room on this platform.
- Final Checkpoint Right: The defenders arrive out of the rear corridor from another spawn. The cart is dropped and detonated at this point. There is a small health kit beside the boxes along the grate overlooking the right entrance's lower level.
- RED Spawn: Located on the right in the image "Final Checkpoint Left", the RED Spawn has two forms of exit. You can either turn left to the main exit which has a drop near the final checkpoint or take a slide exit (by walking straight), where there is a staircase near their left leading back to the spawn. You cannot go back up the slide.
- Other RED Spawn: Located in the middle of the image "Final Checkpoint Right", this RED spawn consists of a simple room with one exit in front of the players. The final checkpoint is to their left.
Strategy
Update history
2011년 6월 23일 패치 (Über Update)
- Added Barnblitz to the game.
- Reduced Blue respawn time at cap 1.
- Fixed cart not allowing Overtime when it has to stop at the turn table.
- Fixed players getting stuck in spawn doors when blue captures a point.
- Fixed spawn doors staying open when points are captured.
- Various clipping and exploit fixes.
- [언급되지 않음] Added a "Grocket" to this map.
2011년 10월 13일 패치 (Manniversary Update & Sale)
- Made Barnblitz available in Offline Practice mode.
- Fixed a bug that allowed players to get into the opposing team's respawn room.
2011년 12월 15일 패치 (Australian Christmas 2011)
- [언급되지 않음] Removed the crashed rocket from this map.
2012년 12월 20일 패치 (Mecha Update)
- Updated pl_barnblitz
- Fixed various map exploits.
- Fixed building in the skybox above Red's final spawn
- Teleporters will no longer self destruct when used on the battlements near Blu's first spawn
- Fixed an exploit related to the final control point and dropped weapons on Badwater Basin, Barnblitz, Borneo, and Gold Rush.
- [언급되지 않음] Added saucers and posters to Barnblitz.
- [언급되지 않음] Removed Saucers and Posters from all maps.
Trivia
- Official, password-protected Valve servers were running development versions of Barnblitz months before its official announcement.
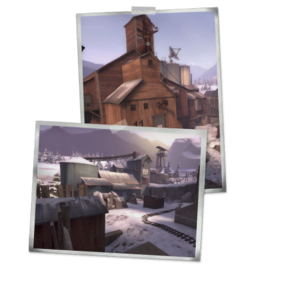
- Barnblitz was later leaked in a promotional image for Steam's screenshot feature.[1]
References
| |||||||||||||||||||||||||||||||||||||||||||||||||


