Difference between revisions of "Zombie Survival"

From Team Fortress Wiki
Jump to: navigation, search
(Added a table with Lazyneer's Zombie Server weapon balances)
m (Auto: EnforceCapitalization(Shotgun), EnforceCapitalization(Teleporters), EnforceCapitalization(Dispensers) (Review RC#2426962))
Line 44: Line 44:
 
==== Telefragging and stair-trapping ====
 
==== Telefragging and stair-trapping ====
  
[[Telefrag|Telefragging]] is a method of quickly eliminating Zombies, and is most effective in narrow areas where Medics must step on a Teleporter exit in order to reach a Dispenser barricade. In order for a proper telefrag to be set up, a Teleporter exit is placed directly in front of a Dispenser, and the associated Teleporter entrance is placed within a non-intrusive and close-by area (but not directly behind the Dispenser, this prevents Engineers from using it as cover). In less narrow areas, Medics can easily destroy telefrags by crouching some distance away from the Teleporter exit and attacking it directly. Engineers using the telefrag also open themselves to being killed by the [[Spinal Tap]] taunt or suffering a regular death (most prominently for the Engineer that built the Dispenser, since they cannot walk through it).
+
[[Telefrag]]ging is a method of quickly eliminating Zombies, and is most effective in narrow areas where Medics must step on a Teleporter exit in order to reach a Dispenser barricade. In order for a proper telefrag to be set up, a Teleporter exit is placed directly in front of a Dispenser, and the associated Teleporter entrance is placed within a non-intrusive and close-by area (but not directly behind the Dispenser, this prevents Engineers from using it as cover). In less narrow areas, Medics can easily destroy telefrags by crouching some distance away from the Teleporter exit and attacking it directly. Engineers using the telefrag also open themselves to being killed by the [[Spinal Tap]] taunt or suffering a regular death (most prominently for the Engineer that built the Dispenser, since they cannot walk through it).
  
 
[[Image:Stair-trapping_example.png|thumb|An example of stair-trapping.]]
 
[[Image:Stair-trapping_example.png|thumb|An example of stair-trapping.]]
Line 262: Line 262:
 
{{buff|On Hit: 100% chance to slow target}}
 
{{buff|On Hit: 100% chance to slow target}}
 
|
 
|
The Pomson 6000 is the only shotgun that does not require ammo. This makes it useful in spots where building a Dispenser is not possible. With the last survivor crit, it can instantly kill any Zombie, with the exception of Zombies using the Amputator.
+
The Pomson 6000 is the only Shotgun that does not require ammo. This makes it useful in spots where building a Dispenser is not possible. With the last survivor crit, it can instantly kill any Zombie, with the exception of Zombies using the Amputator.
 
|-
 
|-
 
| align="center" | [[File:Item_icon_Rescue_Ranger.png|100px]]<br>
 
| align="center" | [[File:Item_icon_Rescue_Ranger.png|100px]]<br>
Line 344: Line 344:
 
{{nerf|50% more expensive building costs}}
 
{{nerf|50% more expensive building costs}}
 
|
 
|
Dispensers cost 150 metal and teleporters 75 metal. To use metal efficiently, you should focus on keeping your Dispenser alive, rather than build a new one when it gets destroyed.
+
Dispensers cost 150 metal and Teleporters 75 metal. To use metal efficiently, you should focus on keeping your Dispenser alive, rather than build a new one when it gets destroyed.
 
|-
 
|-
 
| align="center" rowspan="5" | {{Icon class|class=Medic|link=Medic}}<br>[[Medic]]
 
| align="center" rowspan="5" | {{Icon class|class=Medic|link=Medic}}<br>[[Medic]]
Line 364: Line 364:
 
{{buff|Allows you to see enemy health}}
 
{{buff|Allows you to see enemy health}}
 
|
 
|
The main use of the Ubersaw is to kill Engineers behind dispensers that are hard to break through with its ability to tauntkill.
+
The main use of the Ubersaw is to kill Engineers behind Dispensers that are hard to break through with its ability to tauntkill.
 
|-
 
|-
 
| align="center" | [[File:Item_icon_Vita-Saw.png|100px]]<br>
 
| align="center" | [[File:Item_icon_Vita-Saw.png|100px]]<br>

Revision as of 23:30, 27 August 2019

This article is about the custom game mode. For other uses, please see Zombie (Disambiguation).
A Zombie Survival logo, used in ZS maps between 2017 and early 2018.

Zombie Survival is an unofficial game mode for Team Fortress 2 (not to be confused with any variant of Zombie Fortress) that is also sometimes called "Medic VS Engineer". The game mode has no officially recognized SourceMod plugin, requiring server owners to create and balance the game mode to their own liking. There are two opposing teams: the Survivors (RED Engineers) and the Zombies (BLU Medics). BLU's goal is to kill all the Survivors. RED's objective is for at least one Survivor to be alive after (usually) 7 minutes of gameplay. If all Survivors die before the end of the round, the Zombies win; otherwise, the Survivors win. When a Survivor is killed, they are immediately switched to the Zombie team, while killed Zombies simply respawn. Zombie Survival was popularised by Muselk, a previous TF2 YouTuber, but remained a basic and unchanged game mode until early 2017.

In Zombie Survival, Survivors lack the ability to build Sentry Guns, and Zombies are restricted to melee only; however, both teams have access to global perks to help balance the classes. Zombies gain the most perks, including longer melee attack range, an increased jump height or double jump, and a potential speed boost during the last 2 minutes. Survivors remain mostly vanilla, unless there are very few alive, upon which these Engineers gain a permanent Buff Banner effect. Random critical hits are disabled in Zombie Survival.

During setup time, the Survivors are given the opportunity to safely build Dispensers and Teleporters as barricades, methods of escape or tools for killing (in the case of Teleporters) in an area they wish to fortify without the presence of the Zombies. The Zombies are frozen within their spawn (within which they are ÜberCharged) until setup time is over. Survivors can continue to build outside of setup time, though the horde of Zombies can make building difficult and dangerous.

Gameplay demonstration

Special additions

Bonus rounds

Bonus rounds may happen on the last round of a map. Each bonus can have varying effects on Survivors, Zombies or both. Some common bonus rounds include:

  • Zombies are unfrozen immediately, and are given a speed boost for the first 10 seconds after they have been released.
  • Survivors are stripped down to their melee weapons, but are given guaranteed critical hits so long as they are not being healed by a Dispenser.
  • Survivors can only build Teleporters, but get passive health and metal regeneration as compensation.
  • Zombies can jump four times in a row instead of only twice.
  • One Engineer is designated to be the King (tinted yellow) and is given passive health and metal regeneration, as well as permanent mini-crits. However, if the King dies the Survivors automatically lose.
  • Survivors are now able to build Sentry Guns, but they cannot fire and cannot be upgraded. Essentially, the Sentry Guns become extra barricades or distractions, and should not be regarded as having a higher priority over Dispensers.
  • The waists of the Zombies' models are stretched, in order to mimic the visual style of Muselk's later Zombie Survival videos.
  • Player deaths and building destructions emit various sound clips.

Juggernauts

Juggernauts are an optional feature for Zombie Survival much like bonus rounds. They are Zombies that are tinted green, and only two Medics are selected to have this power. If one disconnects, another will replace them. Juggernauts can't do much on their own, merely having a small speed boost and health regeneration increase. However, while these green Zombies are close to other Medics, non-Juggernauts can inherit the health regeneration increase so long as they are within the Juggernaut's range. This makes Juggernauts the perfect tool for leading Zombie rushes.

ZS maps

A picture of randomised spawning logic exclusive to Zombie Survival Steel.

Maps with the prefix "zs_" are built specifically for use on certain Zombie Survival servers (not to be confused with other similar prefixes). These maps need the help of server game mode logic in order to run properly. ZS maps range from optimisations of existing Valve or community maps (buffing or nerfing of defensible spots, moving of health and ammo packs, etc.) to completely new experiences. Many of these maps are subject to heavy rebalancing to ensure they remain suitable for the game mode.

On the maps that stay close to standard gameplay, a secret area or function is usually placed within them to peak player interest, and in the case of optimisations, unreachable areas may be opened up. Some ZS maps, on the other hand, are radically different from the base game, serving as either a concept testing ground or an isolated experience incompatible with the base game mode.

Strategies

Telefragging and stair-trapping

Telefragging is a method of quickly eliminating Zombies, and is most effective in narrow areas where Medics must step on a Teleporter exit in order to reach a Dispenser barricade. In order for a proper telefrag to be set up, a Teleporter exit is placed directly in front of a Dispenser, and the associated Teleporter entrance is placed within a non-intrusive and close-by area (but not directly behind the Dispenser, this prevents Engineers from using it as cover). In less narrow areas, Medics can easily destroy telefrags by crouching some distance away from the Teleporter exit and attacking it directly. Engineers using the telefrag also open themselves to being killed by the Spinal Tap taunt or suffering a regular death (most prominently for the Engineer that built the Dispenser, since they cannot walk through it).

An example of stair-trapping.

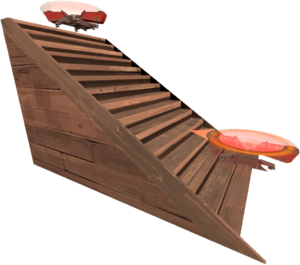
"Stair-trapping" is a usage of Teleporters prominently used in Zombie Survival and can be performed on most sloped surfaces. By placing a teleporter at the bottom or top of a slope, as close to the middle of the slope as allowed, the increment from the floor up to the teleporter may be so great that a jump is required. Stair-trapping is useful for temporarily denying Zombies access to a defense at the top of a slope. A stair-trap can also be part of a telefrag.

Rushing

"Rushing" is a term used to describe the grouping up and simultaneous attacking of Zombies, in order to completely overthrow an otherwise impenetrable Survivor defense. The leader of a rush is usually the person that requests one, unless Engineers get too close to the group and participating Medics are forced to intervene on their own. It is important to have a microphone for voice chat or know how to effectively use team chat in order to command a rush, since players of Zombie Survival often do not listen to calls for Medic.

Amping

"Amping" is an abbreviation for performing the Medicating Melody taunt with the Amputator during a Zombie rush, thereby increasing the health regeneration rate of surrounding Zombies and decreasing an Engineer's chance of survival. Medics using the taunt are referred to as "Amps" by Survivors, and are considered a high priority to kill due to their immense power. In order to avoid being singled out, these Medics often shield themselves behind walls, other obstacles and sometimes their own teammates. Additionally, the Amputator's healing power stacks with other Amputators, so a couple of Amps assisting a rush spells disaster for any Engineers in their path.

Weapon balances

This section of the article documents the weapon balances on the Rushy Servers version of Zombie Survival. Other server groups may be added in future if possible.

[expand]Rushy Servers weapon balances
Class Weapon Balances (on top of stock stats) Notes
Leaderboard class engineer.png
Engineer
Item icon Shotgun.png

Shotgun

Pictogram info.png No balances apply to this weapon

The Shotgun, while part of the meta, is considered second to the Widowmaker due to its need to reload after firing. It is typically used by Survivors that prefer to roam the map rather than camp in a defensible area.

Item icon Frontier Justice.png

Frontier Justice

Pictogram plus.png 100% faster reload speed
Pictogram plus.png 3 extra reserve ammo

The Frontier Justice was originally a straight downgrade from the Shotgun, sporting half the clip size, 3 less total ammo and an inability to gain revenge criticals due to the lack of Sentry Guns within the game mode. This has been rectified with the Frontier Justice's increased reload speed and reserve ammo. While the stock primary benefits from its 6-shot burst fire, the Frontier Justice is able to produce more sustained fire. It is now just as useful and as used as the Shotgun.

Item icon Widowmaker.png

Widowmaker

Pictogram minus.png 10% slower firing speed

The Widowmaker is hailed as the penultimate primary weapon, since its use of metal instead of ammo means that it will not need to reload while near a Dispenser and hitting targets. It is commonly used by Survivors that wish to defend a single area with their buildings. Because of its incredible versatility, its fire rate has been nerfed.

Item icon Pomson 6000.png

Pomson 6000

Pictogram plus.png 10% damage increase
Pictogram plus.png 10% faster reload speed
Pictogram plus.png 80% faster firing speed

The Pomson 6000 was the most underused primary weapon due to the large delay between shots and slow-travelling projectiles, making aiming very difficult. Post-balance, the Pomson can be fired more quickly and deals more damage allowing Survivors to easily overwhelm Zombies with a stream of high-knockback shots, but the Pomson's projectiles are blocked by teammates, making it an unfavorable weapon in cramped spots.

Item icon Rescue Ranger.png

Rescue Ranger

Pictogram plus.png 50% larger clip size

The Rescue Ranger used to be underused as a result of Survivors preferring more leeway in ammunition when shooting. The changes bring it on par with other weapons, although it still requires more guesswork to aim. As a projectile weapon, it suffers very little damage falloff. Its ability to fire bolts through teammates makes it a useful tool to fight and heal buildings in situations where body blocking is common.

Item icon Panic Attack.png

Panic Attack

Pictogram info.png No balances apply to this weapon

Before the Jungle Inferno Update, the Panic Attack was a balanced alternative to the Shotgun and Widowmaker, thereby also being part of the meta. However, the update removed the weapon's unique shooting mechanic, and replaced it with sub-par non-unique attributes that caused the weapon to be discredited. A major balance is planned for this weapon.

Item icon Pistol.png

Pistol
and its reskins

Pictogram info.png No balances apply to this weapon

The Pistol was the original meta secondary in the Engineer's arsenal, due to there being no good alternatives before the first major weapon balances. By default, it continues to be the most used secondary.

Item icon Wrangler.png

Wrangler
and its reskins

Pictogram info.png Protection: Active while deployed
Pictogram plus.png 10% faster move speed while deployed
Pictogram plus.png 35% damage resistance while deployed
Pictogram minus.png 50% slower deploy time

Originally, the Wrangler was useless in nearly all rounds of Zombie Survival, its only ability arising during the bonus round where Sentry Guns are allowed, in which it could shield them from a small amount of incoming damage. The balances it has received have catapulted it into the meta playstyle, offering an easy escape for Engineers in serious danger.

Item icon Short Circuit.png

Short Circuit

Pictogram plus.png 50% damage increase
Pictogram minus.png Secondary fire disabled

The Short Circuit was nerfed initially due to its secondary fire, which gave Survivors an unfair advantage due to the alt-fire passing through Dispensers. Even after the Jungle Inferno Update, this function is still overpowered. The weapon has since been updated in Zombie Survival to make it viable without relying on the secondary fire, bringing its primary fire damage output closer to that of the stock Pistol.

Item icon Wrench.png

Wrench
and its reskins

Pictogram plus.png 10% faster swing speed
Pictogram plus.png 25 more health on wearer

The stock Wrench's swing speed buff was made to give the weapon a reason to be used, for it had no upsides at all and generally performed poorly in matches at the time. In January 2019, all Engineer melee weapons except the Gunslinger were buffed with 25 extra health to reduce the divide between the Gunslinger users.

Item icon Gunslinger.png

Gunslinger

Pictogram plus.png One Punch: One guaranteed crit per two killing non-crit punches
Pictogram minus.png No third-hit-guaranteed-crit

The Gunslinger was the most used melee in the Engineer's arsenal, and overshadowed every other melee with its impressive bonus 25 health and third-hit-guaranteed-crit, making it the one and only meta melee for Survivors. This mechanic was changed in the January 2019 balance update to benefit players of a lower skill level. Instead of needing to hit three punches in a row to get a critical, a single critical hit is stored if an Engineer first kills two Medics with regular punches.

Item icon Southern Hospitality.png

Southern Hospitality

Pictogram plus.png 25 more health on wearer

The Southern Hospitality denies any Medic it hits from healing back lost health for a short time. This weapon should be used sparingly.

Item icon Jag.png

Jag

Pictogram plus.png 25 more health on wearer

The Jag is the least used Survivor melee weapon. Engineers that equip it use its fast construction time to their advantage, but the weapon suffers in the heat of battle, unable to repair buildings effectively and having low damage per second. A major balance is planned for this weapon.

Item icon Eureka Effect.png

Eureka Effect

Pictogram plus.png 25 more health on wearer
Pictogram minus.png Teleport has 0.5 second delay
Pictogram minus.png Marked for death and cannot teleport for 10 seconds after teleport

The Eureka Effect is most commonly used to build Teleporters without much metal and teleport away from danger instantaneously, however the melee has had a troubled history. It has been and is regularly abused by griefers in order to kill teammates by teleporting them into danger, and also to escape damage themselves. This has resulted in the teleport ability being nerfed heavily.

Leaderboard class medic.png
Medic
Item icon Bonesaw.png

Bonesaw
and its reskins

Pictogram info.png No balances apply to this weapon

The Bonesaw is the most well-rounded Zombie weapon, as well as the most accessible. It deals the standard amount of damage per second, has no downsides, and thus is part of the Zombie meta.

Item icon Ubersaw.png

Ubersaw

Pictogram plus.png 10 health gained on hit

The Ubersaw does not deal as much damage per second as the stock melee, but is useful because of its Spinal Tap taunt, which can stun and kill Engineers instantly if positioned correctly. Additionally, it now provides health to a Zombie attacking a Survivor directly.

Item icon Vita-Saw.png

Vita-Saw

Pictogram plus.png 15% damage increase vs. buildings
Pictogram minus.png 10 less health on wearer

The Vita-Saw used to be an undesirable melee because it gave Zombies 10 less health with no upsides. Post-balance, the Vita-Saw brings a Medic's health down to 130 in exchange for dealing more damage to buildings, so it is a practical choice in situations where Survivors may struggle to see over their own buildings.

Item icon Amputator.png

Amputator

Pictogram info.png No balances apply to this weapon

The Amputator is a special case in that it is able to heal fellow Medics within a radius. This melee is extremely useful when accompanied by a horde of Zombies, as the horde can shelter those using the Amputator whilst attacking Survivors, thus continually regenerating the horde's health, making for a partially damage-resistant rush.

Item icon Solemn Vow.png

Solemn Vow

Pictogram plus.png 50% knockback resistance on wearer
Pictogram minus.png 10% slower swing speed

The Solemn Vow was the least used Zombie melee overall during the first few weapon balances updates, used exclusively by Medics that had become too used to the weapon's upside of seeing enemy health to use anything else. The melee now has a secondary purpose, to dampen knockback and thereby make attacking roaming Engineers easier.

[expand]Lazyneer's Zombie Servers weapon balances
Class Weapon Balances (on top of stock stats) Notes
Leaderboard class engineer.png
Engineer
Item icon Shotgun.png

Shotgun

Pictogram plus.png On Hit: 100% chance to slow target

The Shotgun is the default primary weapon for Engineers.

Item icon Frontier Justice.png

Frontier Justice

Pictogram plus.png On Hit: 100% chance to slow target
Pictogram plus.png On Kill: Gain Crits for 4 seconds

Because Sentry Guns are disabled, the Frontier Justice cannot get the revenge crits. The Frontier Justice excels at clearing hordes of Zombies. Using the tauntkill is a great way to get crits.

Item icon Widowmaker.png

Widowmaker

Pictogram plus.png On Hit: 100% chance to slow target
Pictogram minus.png 15% slower firing speed
Pictogram minus.png Cannot be crit boosted

Unlike the other shotguns, the Widowmaker does not get the crits when an Engineer gets the last survivors boost. Because of this, the crit sound is also not played. This can be used to remain hidden.

Item icon Pomson 6000.png

Pomson 6000

Pictogram plus.png On Hit: 100% chance to slow target

The Pomson 6000 is the only Shotgun that does not require ammo. This makes it useful in spots where building a Dispenser is not possible. With the last survivor crit, it can instantly kill any Zombie, with the exception of Zombies using the Amputator.

Item icon Rescue Ranger.png

Rescue Ranger

Pictogram plus.png  On Hit: Slow target movement by 40% for 1.5s

The Rescue Ranger's buff allow Engineers to stop Zombies in midair whenever they are jumping. This is useful for spots that require a jump to get to.

Item icon Panic Attack.png

Panic Attack

Pictogram plus.png 20% faster firing speed

Template:Explain

Item icon Pistol.png

Pistol
and its reskins

Pictogram plus.png 25% damage bonus

With the high fire rate and damage bonus, the Pistol is basically the Engineer's primary weapon.

Item icon Wrangler.png

Wrangler
and its reskins

Pictogram info.png This weapon has been removed

Template:Explain

Item icon Short Circuit.png

Short Circuit

Pictogram info.png This weapon has been removed

Template:Explain

Item icon Wrench.png

Wrench
and its reskins

Pictogram info.png No balances apply to this weapon

The Wrench is the default melee for Engineer.

Item icon Gunslinger.png

Gunslinger

Pictogram minus.png 10% slower swing speed
Pictogram minus.png 25 less health on wearer

The health nerf puts the Engineer back on 125 HP. With the extra health, an Engineer could survive 2 hits instead of one with no downsides.

Item icon Southern Hospitality.png

Southern Hospitality

Pictogram minus.png 10% slower swing speed
Pictogram minus.png On Miss: Hit yourself. Idiot.

Template:Explain

Item icon Jag.png

Jag

Pictogram info.png No balances apply to this weapon

Template:Explain

Item icon Eureka Effect.png

Eureka Effect

Pictogram info.png This weapon has been stripped of all its normal attributes

With its attributes removed, the Eureka Effect acts the same as the stock Wrench.

Backpack PDA builder.png

PDA

Pictogram minus.png 50% more expensive building costs

Dispensers cost 150 metal and Teleporters 75 metal. To use metal efficiently, you should focus on keeping your Dispenser alive, rather than build a new one when it gets destroyed.

Leaderboard class medic.png
Medic
Item icon Bonesaw.png

Bonesaw
and its reskins

Pictogram plus.png 25% faster move speed on wearer
Pictogram plus.png 40% greater jump height on wearer
Pictogram plus.png Allows you to see enemy health

The Bonesaw is the default weapon for Zombies.

Item icon Ubersaw.png

Ubersaw

Pictogram plus.png 25% faster move speed on wearer
Pictogram plus.png 40% greater jump height on wearer
Pictogram plus.png Allows you to see enemy health

The main use of the Ubersaw is to kill Engineers behind Dispensers that are hard to break through with its ability to tauntkill.

Item icon Vita-Saw.png

Vita-Saw

Pictogram plus.png 25% faster move speed on wearer
Pictogram plus.png 40% greater jump height on wearer
Pictogram plus.png Allows you to see enemy health
Pictogram plus.png 10 more health on wearer

The 4th buff is used to cancel out its normal downside. The Vita-Saw acts the same as the stock Bonesaw.

Item icon Amputator.png

Amputator

Pictogram plus.png 25% faster move speed on wearer
Pictogram plus.png 40% greater jump height on wearer
Pictogram plus.png Allows you to see enemy health
Pictogram plus.png 50 more health on wearer

The extra health allows the Zombie to survive a critical Pomson shot, which instantly kills a Zombie using any other weapon. The major downside is that it takes 3 hits to kill an Engineer, instead of 2. The main use of the Amputator is to passively help their teammates by healing them.

Item icon Solemn Vow.png

Solemn Vow

Pictogram plus.png 25% faster move speed on wearer
Pictogram plus.png 40% greater jump height on wearer
Pictogram plus.png 10% faster swing speed

The 3rd buff is used to cancel out its normal downside. The Solemn Vow acts the same as the stock Bonesaw.

External links

References