Difference between revisions of "Scream Fortress 2016/ja"
(→マップ) |
BrazilianNut (talk | contribs) m |
||
| Line 13: | Line 13: | ||
{{main|Cosmetic items/ja|l1=装飾アイテム}} | {{main|Cosmetic items/ja|l1=装飾アイテム}} | ||
{| class="wikitable collapsible" cellpadding="3" style="text-align:center;" | {| class="wikitable collapsible" cellpadding="3" style="text-align:center;" | ||
| − | | width="60px" style="background: #6A5587;" rowspan="1" | {{icon class|Scout}}<br/>'''[[Scout | + | | width="60px" style="background: #6A5587;" rowspan="1" | {{icon class|Scout}}<br/>'''[[Scout{{if lang}}|<span style="color: #FFF;">{{class name|Scout}}</span>]]''' |
| − | | align="center" style="background: # | + | | align="center" style="background: #4B69FF;" | {{item icon|Wing Mann|75px}} |
| style="background: #F1ECF7;"| '''{{item link|Wing Mann}}''' | | style="background: #F1ECF7;"| '''{{item link|Wing Mann}}''' | ||
|- | |- | ||
| − | | width="60px" style="background: #6A5587;" rowspan="3" | {{icon class|Pyro}}<br/>'''[[Pyro | + | | width="60px" style="background: #6A5587;" rowspan="3" | {{icon class|Pyro}}<br/>'''[[Pyro{{if lang}}|<span style="color: #FFF;">{{class name|Pyro}}</span>]]''' |
| − | | align="center" style="background: # | + | | align="center" style="background: #EB4B4B;" | {{item icon|Combustible Cutie|75px}} |
| style="background: #F1ECF7;"| '''{{item link|Combustible Cutie}}''' | | style="background: #F1ECF7;"| '''{{item link|Combustible Cutie}}''' | ||
|- | |- | ||
| − | | align="center" style="background: # | + | | align="center" style="background: #4B69FF;" | {{item icon|Cranial Carcharodon|75px}} |
| style="background: #F1ECF7;"| '''{{item link|Cranial Carcharodon}}''' | | style="background: #F1ECF7;"| '''{{item link|Cranial Carcharodon}}''' | ||
|- | |- | ||
| − | | align="center" style="background: # | + | | align="center" style="background: #FFD700;" | {{item icon|Hovering Hotshot|75px}} |
| style="background: #F1ECF7;"| '''{{item link|Hovering Hotshot}}''' | | style="background: #F1ECF7;"| '''{{item link|Hovering Hotshot}}''' | ||
|- | |- | ||
| − | | width="60px" style="background: #6A5587;" rowspan="2" | {{icon class|Demoman}}<br/>'''[[Demoman | + | | width="60px" style="background: #6A5587;" rowspan="2" | {{icon class|Demoman}}<br/>'''[[Demoman{{if lang}}|<span style="color: #FFF;">{{class name|Demoman}}</span>]]''' |
| − | | align="center" style="background: # | + | | align="center" style="background: #FFD700;" | {{item icon|Aerobatics Demonstrator|75px}} |
| style="background: #F1ECF7;"| '''{{item link|Aerobatics Demonstrator}}''' | | style="background: #F1ECF7;"| '''{{item link|Aerobatics Demonstrator}}''' | ||
|- | |- | ||
| − | | align="center" style="background: # | + | | align="center" style="background: #8847FF;" | {{item icon|Spirit of the Bombing Past|75px}} |
| style="background: #F1ECF7;"| '''{{item link|Spirit of the Bombing Past}}''' | | style="background: #F1ECF7;"| '''{{item link|Spirit of the Bombing Past}}''' | ||
|- | |- | ||
| − | | width="60px" style="background: #6A5587;" rowspan="3" | {{icon class|Heavy}}<br/>'''[[Heavy | + | | width="60px" style="background: #6A5587;" rowspan="3" | {{icon class|Heavy}}<br/>'''[[Heavy{{if lang}}|<span style="color: #FFF;">{{class name|Heavy}}</span>]]''' |
| − | | align="center" style="background: # | + | | align="center" style="background: #8847FF;" | {{item icon|Heavy Tourism|75px}} |
| style="background: #F1ECF7;"| '''{{item link|Heavy Tourism}}''' | | style="background: #F1ECF7;"| '''{{item link|Heavy Tourism}}''' | ||
|- | |- | ||
| − | | align="center" style="background: # | + | | align="center" style="background: #4B69FF;" | {{item icon|Mad Mask|75px}} |
| style="background: #F1ECF7;"| '''{{item link|Mad Mask}}''' | | style="background: #F1ECF7;"| '''{{item link|Mad Mask}}''' | ||
|- | |- | ||
| − | | align="center" style="background: # | + | | align="center" style="background: #D32CE6;" | {{item icon|Mo'Horn|75px}} |
| style="background: #F1ECF7;"| '''{{item link|Mo'Horn}}''' | | style="background: #F1ECF7;"| '''{{item link|Mo'Horn}}''' | ||
|- | |- | ||
| − | | width="60px" style="background: #6A5587;" rowspan="4" | {{icon class|Engineer}}<br/>'''[[Engineer | + | | width="60px" style="background: #6A5587;" rowspan="4" | {{icon class|Engineer}}<br/>'''[[Engineer{{if lang}}|<span style="color: #FFF;">{{class name|Engineer}}</span>]]''' |
| − | | align="center" style="background: # | + | | align="center" style="background: #8847FF;" | {{item icon|Corpus Christi Cranium|75px}} |
| style="background: #F1ECF7;"| '''{{item link|Corpus Christi Cranium}}''' | | style="background: #F1ECF7;"| '''{{item link|Corpus Christi Cranium}}''' | ||
|- | |- | ||
| − | | align="center" style="background: # | + | | align="center" style="background: #4B69FF;" | {{item icon|El Paso Poncho|75px}} |
| style="background: #F1ECF7;"| '''{{item link|El Paso Poncho}}''' | | style="background: #F1ECF7;"| '''{{item link|El Paso Poncho}}''' | ||
|- | |- | ||
| − | | align="center" style="background: # | + | | align="center" style="background: #FFD700;" | {{item icon|Final Frontier Freighter|75px}} |
| style="background: #F1ECF7;"| '''{{item link|Final Frontier Freighter}}''' | | style="background: #F1ECF7;"| '''{{item link|Final Frontier Freighter}}''' | ||
|- | |- | ||
| − | | align="center" style="background: # | + | | align="center" style="background: #4B69FF;" | {{item icon|Wide-Brimmed Bandito|75px}} |
| style="background: #F1ECF7;"| '''{{item link|Wide-Brimmed Bandito}}''' | | style="background: #F1ECF7;"| '''{{item link|Wide-Brimmed Bandito}}''' | ||
|- | |- | ||
| − | | width="60px" style="background: #6A5587;" rowspan="3" | {{icon class|Medic}}<br/>'''[[Medic | + | | width="60px" style="background: #6A5587;" rowspan="3" | {{icon class|Medic}}<br/>'''[[Medic{{if lang}}|<span style="color: #FFF;">{{class name|Medic}}</span>]]''' |
| − | | align="center" style="background: # | + | | align="center" style="background: #D32CE6;" | {{item icon|Burly Beast|75px}} |
| style="background: #F1ECF7;"| '''{{item link|Burly Beast}}''' | | style="background: #F1ECF7;"| '''{{item link|Burly Beast}}''' | ||
|- | |- | ||
| − | | align="center" style="background: # | + | | align="center" style="background: #4B69FF;" | {{item icon|Colossal Cranium|75px}} |
| style="background: #F1ECF7;"| '''{{item link|Colossal Cranium}}''' | | style="background: #F1ECF7;"| '''{{item link|Colossal Cranium}}''' | ||
|- | |- | ||
| − | | align="center" style="background: # | + | | align="center" style="background: #4B69FF;" | {{item icon|Surgeon's Sidearms|75px}} |
| style="background: #F1ECF7;"| '''{{item link|Surgeon's Sidearms}}''' | | style="background: #F1ECF7;"| '''{{item link|Surgeon's Sidearms}}''' | ||
|- | |- | ||
| − | | width="60px" style="background: #6A5587;" rowspan="2" | {{icon class|Spy}}<br/>'''[[Spy | + | | width="60px" style="background: #6A5587;" rowspan="2" | {{icon class|Spy}}<br/>'''[[Spy{{if lang}}|<span style="color: #FFF;">{{class name|Spy}}</span>]]''' |
| − | | align="center" style="background: # | + | | align="center" style="background: #8847FF;" | {{item icon|Big Topper|75px}} |
| style="background: #F1ECF7;"| '''{{item link|Big Topper}}''' | | style="background: #F1ECF7;"| '''{{item link|Big Topper}}''' | ||
|- | |- | ||
| − | | align="center" style="background: # | + | | align="center" style="background: #4B69FF;" | {{item icon|Showstopper|75px}} |
| style="background: #F1ECF7;"| '''{{item link|Showstopper}}''' | | style="background: #F1ECF7;"| '''{{item link|Showstopper}}''' | ||
|- | |- | ||
| − | | width="60px" style="background: #6A5587;" rowspan="1" | {{icon class|Scout}}<br/>'''[[Scout | + | | width="60px" style="background: #6A5587;" rowspan="1" | {{icon class|Scout}}<br/>'''[[Scout{{if lang}}|<span style="color: #FFF;">{{class name|Scout}}</span>]]'''<br>{{icon class|Soldier}}<br/>'''[[Soldier{{if lang}}|<span style="color: #FFF;">{{class name|Soldier}}</span>]]'''<br>{{icon class|Pyro}}<br/>'''[[Pyro{{if lang}}|<span style="color: #FFF;">{{class name|Pyro}}</span>]]'''<br>{{icon class|Heavy}}<br/>'''[[Heavy{{if lang}}|<span style="color: #FFF;">{{class name|Heavy}}</span>]]''' |
| − | | align="center" style="background: # | + | | align="center" style="background: #D32CE6;" | {{item icon|Pestering Jester|75px}} |
| style="background: #F1ECF7;"| '''{{item link|Pestering Jester}}''' | | style="background: #F1ECF7;"| '''{{item link|Pestering Jester}}''' | ||
|- | |- | ||
| − | | width="60px" style="background: #6A5587;" rowspan="5" | {{icon class|All Classes}}<br/>'''[[Classes | + | | width="60px" style="background: #6A5587;" rowspan="5" | {{icon class|All Classes}}<br/>'''[[Classes{{if lang}}|<span style="color: #FFF;">{{class name|All Classes}}</span>]]''' |
| − | | align="center" style="background: # | + | | align="center" style="background: #EB4B4B;" | {{item icon|Class Crown|75px}} |
| style="background: #F1ECF7;"| '''{{item link|Class Crown}}''' | | style="background: #F1ECF7;"| '''{{item link|Class Crown}}''' | ||
|- | |- | ||
| − | | align="center" style="background: # | + | | align="center" style="background: #8847FF;" | {{item icon|Lil' Bitey|75px}} |
| style="background: #F1ECF7;"| '''{{item link|Lil' Bitey}}''' | | style="background: #F1ECF7;"| '''{{item link|Lil' Bitey}}''' | ||
|- | |- | ||
| − | | align="center" style="background: # | + | | align="center" style="background: #4B69FF;" | {{item icon|Nasty Norsemann|75px}} |
| style="background: #F1ECF7;"| '''{{item link|Nasty Norsemann}}''' | | style="background: #F1ECF7;"| '''{{item link|Nasty Norsemann}}''' | ||
|- | |- | ||
| − | | align="center" style="background: # | + | | align="center" style="background: #4B69FF;" | {{item icon|Spooktacles|75px}} |
| style="background: #F1ECF7;"| '''{{item link|Spooktacles}}''' | | style="background: #F1ECF7;"| '''{{item link|Spooktacles}}''' | ||
|- | |- | ||
| − | | align="center" style="background: # | + | | align="center" style="background: #8847FF;" | {{item icon|Toadstool Topper|75px}} |
| style="background: #F1ECF7;"| '''{{item link|Toadstool Topper}}''' | | style="background: #F1ECF7;"| '''{{item link|Toadstool Topper}}''' | ||
| − | |||
|} | |} | ||
| Line 105: | Line 104: | ||
| align="center" style="background-color:#AD9DC3;" | {{Icon item|Victory Lap|75px}} | | align="center" style="background-color:#AD9DC3;" | {{Icon item|Victory Lap|75px}} | ||
| style="background-color:#F1ECF7;"| '''{{item link|Victory Lap}}''' | | style="background-color:#F1ECF7;"| '''{{item link|Victory Lap}}''' | ||
| − | |||
|} | |} | ||
| Line 119: | Line 117: | ||
| align="center" style="background: #AD9DC3;" | {{item icon|Unusualifier|75px}} | | align="center" style="background: #AD9DC3;" | {{item icon|Unusualifier|75px}} | ||
| style="background: #F1ECF7;"| '''{{item link|Unusualifier}}''' | | style="background: #F1ECF7;"| '''{{item link|Unusualifier}}''' | ||
| − | |||
|} | |} | ||
| Line 165: | Line 162: | ||
File:News item 2016-10-25 Scream Fortress Extended!.png|期間延長に関する告知 | File:News item 2016-10-25 Scream Fortress Extended!.png|期間延長に関する告知 | ||
</gallery> | </gallery> | ||
| − | + | <!-- | |
| + | File:User Twolfe Halloween2016.png|Pre-event teaser picture. | ||
| + | --> | ||
{{Scream Fortress 2016 Nav}} | {{Scream Fortress 2016 Nav}} | ||
| + | {{Scream Fortress Events Nav}} | ||
{{Major updates nav}} | {{Major updates nav}} | ||
Revision as of 05:26, 3 November 2019

この記事ではアップデートで登場したアイテム、新要素などについて記載しています。アップデートの詳細については2016年10月21日 パッチをご覧ください。
Scream Fortress 2016は2016年10月21日に配信された大型アップデートです。このアップデートでは新たに2つの挑発と3つのマップ、24個の装飾アイテム、そして新たな工具アイテムのUnusualifierが追加されました。また、過去のイベントにおけるメラスミッションが再び受けられるようになりました。
日程
本イベントは当初2016年の10月21日から11月9日までの予定でしたが、11月16日までに延長されました。
追加要素
装飾アイテム
もっと詳しく: 装飾アイテム
挑発(Taunts)
もっと詳しく: 挑発
全クラス |
Second Rate Sorcery | |
| Victory Lap |
工具
もっと詳しく: 工具
| Creepy Crawly Case | |
| Creepy Crawly Key | |
| Unusualifier |
マップ(Maps)
もっと詳しく: マップ一覧
| マップ名 | 画像 | ゲームモード | ファイル名 |
|---|---|---|---|
| Brimstone | 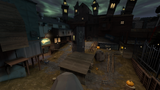
|
ペイロード
|
pl_fifthcurve_event
|
| Maple Ridge Event | 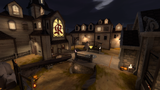
|
キング・オブ・ザ・ヒル |
koth_maple_ridge_event
|
| Pit of Death | 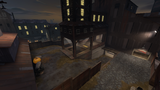
|
Player Destruction
|
pd_pit_of_death_event
|
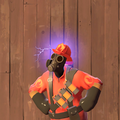
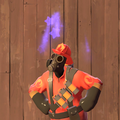
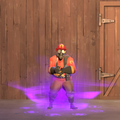
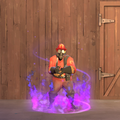
アンユージュアルエフェクト
もっと詳しく: アンユージュアルエフェクト
Neutron Star
Tesla Coil

Starstorm Insomnia
Starstorm Slumber

Hellish Inferno
Spectral Swirl
Infernal Flames

Infernal Smoke


ギャラリー
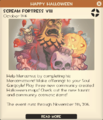
イベント開始時のゲーム内の告知
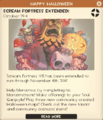
期間延長に関する告知


| |||||
| ||||||||||||||||||||||||||||||||||||||||||||||||||||||||||||||||||||||||||||||||||||||||||||||||||