Difference between revisions of "Hybrid"
Jack5wikia (talk | contribs) (Location updates) |
Jack5wikia (talk | contribs) (Fixed grammar) |
||
| Line 28: | Line 28: | ||
===Warehouse=== | ===Warehouse=== | ||
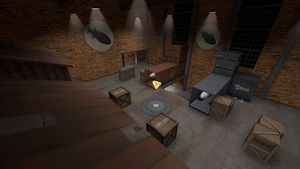
[[Image:Cp_hybrid_warehouse.jpg|thumb|right|Screenshot of the Warehouse.]] | [[Image:Cp_hybrid_warehouse.jpg|thumb|right|Screenshot of the Warehouse.]] | ||
| − | The Warehouse is the second slowest Control Point to capture. It can be reached by taking the far-right path from BLU spawn or the far-left path from RED spawn. It also connects to the Courtyard through two large arched doorways. Unlike the Courtyard, the Warehouse sees less interaction from either team | + | The Warehouse is the second slowest Control Point to capture. It can be reached by taking the far-right path from BLU spawn or the far-left path from RED spawn. It also connects to the Courtyard through two large arched doorways. Unlike the Courtyard, the Warehouse sees less interaction from either team and as a result, it is prone to captures from flanking classes (such as a Scout claiming it for the defending team after a push). |
===Intelligence (B and R)=== | ===Intelligence (B and R)=== | ||
[[Image:Cp_hybrid_intelligence.jpg|thumb|right|Screenshot of Intelligence Control Point B.]] | [[Image:Cp_hybrid_intelligence.jpg|thumb|right|Screenshot of Intelligence Control Point B.]] | ||
| − | The area in which Control Point B is contained is | + | The area in which Control Point B is contained is to the far-left of BLU spawn, and Control Point R is to the far-right of RED spawn. Each Intelligence Control Point is also connected to the Courtyard through small rectangular doorways, and connect to each other via the Sewers. These Control Points share the fastest capture speed out of all the Control Points on the map. |
===Sewers=== | ===Sewers=== | ||
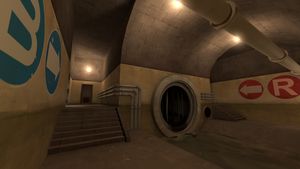
[[Image:Cp_hybrid_sewers.jpg|thumb|right|Screenshot of the Sewers.]] | [[Image:Cp_hybrid_sewers.jpg|thumb|right|Screenshot of the Sewers.]] | ||
| − | The Sewers is a passage between Control Points B and R that is inaccessible for most of the game. The area only becomes useable when one team activates a push. Said team will be able to use the Sewers as a one-way secondary entrance into the enemy's Intelligence Control Point. Any players within the Sewers that are not authorised (such as those from the attacking team outside of a push or the defending team) are teleported a small distance from the entrance on their team's side of the map. | + | The Sewers is a passage between Control Points B and R that is inaccessible for most of the game. The area only becomes useable when one team activates a push. Said team will be able to use the Sewers as a one-way secondary entrance into the enemy's Intelligence Control Point. Any players within the Sewers that are not authorised (such as those from the attacking team outside of a push or the defending team) are teleported to an area a small distance from the entrance on their team's side of the map. |
== Control point timings == | == Control point timings == | ||
{{Control Point Timing | {{Control Point Timing | ||
Revision as of 07:21, 13 June 2020
 | “I built that.” This page contains information about a custom map that is not an officially released Team Fortress 2 map. All released Valve and Community-made TF2 maps can be found on the list of maps. |
| Hybrid | |
|---|---|

| |
| Basic Information | |
| Developer(s): | Unknown |
| Map Info | |
| Environment: | Industrial, spytech, warehouse |
| Setting: | Nighttime |
| “ | Control Points Hybrid is an unusual but surprisingly versatile map built with both competitive and community server players in mind, with a complexity comparable to CP Steel.
— Hybrid promotional text
|
” |
Hybrid is a custom Control Points map which has gameplay that combines motifs of symmetric Control Points and Attack/Defend. In order for a team to progress, they must own both the Courtyard and Warehouse Control Points in order to attack the enemy's Intelligence Control Point. After both the Courtyard and Warehouse are captured by the same team, a push begins, in which the team has one minute of decreased respawn time and Sewers access, and the enemy cannot capture the Courtyard or Warehouse until the push is over. A game is won when a team captures the enemy's Intelligence Control Pont, thus owning all four Control Points.
Contents
Gameplay demonstration
Locations
Courtyard
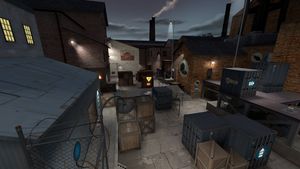
The Courtyard is the quickest Control Point to reach but takes the longest to capture. It is accessible directly out of each spawn by taking one of the two passages in front of each spawn. Due to the Courtyard's proximity to the Intelligence Control Points, it is a heavily contested area.
Warehouse
The Warehouse is the second slowest Control Point to capture. It can be reached by taking the far-right path from BLU spawn or the far-left path from RED spawn. It also connects to the Courtyard through two large arched doorways. Unlike the Courtyard, the Warehouse sees less interaction from either team and as a result, it is prone to captures from flanking classes (such as a Scout claiming it for the defending team after a push).
Intelligence (B and R)
The area in which Control Point B is contained is to the far-left of BLU spawn, and Control Point R is to the far-right of RED spawn. Each Intelligence Control Point is also connected to the Courtyard through small rectangular doorways, and connect to each other via the Sewers. These Control Points share the fastest capture speed out of all the Control Points on the map.
Sewers
The Sewers is a passage between Control Points B and R that is inaccessible for most of the game. The area only becomes useable when one team activates a push. Said team will be able to use the Sewers as a one-way secondary entrance into the enemy's Intelligence Control Point. Any players within the Sewers that are not authorised (such as those from the attacking team outside of a push or the defending team) are teleported to an area a small distance from the entrance on their team's side of the map.
Control point timings
| Hybrid | ||||
|---|---|---|---|---|
| Control Point | Multiplier | Seconds | ||
| Courtyard | ×1 |
| ||
| ×2 |
| |||
| ×3 |
| |||
| ×4 |
| |||
| ×5 |
| |||
| Warehouse | ×1 |
| ||
| ×2 |
| |||
| ×3 |
| |||
| ×4 |
| |||
| ×5 |
| |||
| Intelligence (B & R) | ×1 |
| ||
| ×2 |
| |||
| ×3 |
| |||
| ×4 |
| |||
| ×5 |
| |||
Trivia
- Development of Hybrid started in an attempt to fully develop the game mode in the custom map ato_mission_rc1 by Soldier_engie-demo.
- Hybrid's game mode changed multiple times during development, as well as numerous control point and respawn wave timing changes.
- Certain areas of the map are intentionally enclosed so it is compatible with the server game mode Zombie Survival. To date, this map continues to be used on such servers.
- A Domination and Pre-Fortress 2 version of Hybrid were made independently by Jack5, but are not maintained similarly.
| ||||||||||||||||||||||||||||||||||||||||||||||||


