Difference between revisions of "Fifthcurve"
ShadowMan44 (talk | contribs) m |
ShadowMan44 (talk | contribs) m (→Gallery) |
||
| Line 105: | Line 105: | ||
== Gallery == | == Gallery == | ||
<gallery> | <gallery> | ||
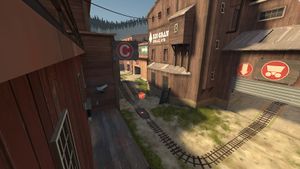
| − | + | Pl fifthcurve firstspwn blu1.png|First BLU's spawn. | |
| − | + | Pl fifthcurve firstspwn blu2.png|Ditto, other point of view. | |
| − | + | Pl fifthcurve blu start.png|BLU's courtyard. | |
| − | + | Pl_fifthcurve_a_point.png|Point A. | |
| − | + | Pl fifthcurve after a.png|Area between Points A and B. | |
| − | + | Pl fifthcurve b point.png|Point B. | |
| − | + | Pl fifthcurve after b.png|Area between Points B and C. Point C can be seen. | |
| − | + | Pl fifthcurve enter d.png|Entrance of Warehouse. | |
| − | + | Pl fifthcurve before d.png|Warehouse. Point D can be seen. | |
| − | + | Pl fifthcurve d point.png|Point D. | |
| − | + | Pl fifthcurve after d.png|Area between Points D and E. Point E can be seen. | |
| − | + | Pl fifthcurve e point.png|Point E. | |
| − | + | Pl fifthcurve firstspwn red.png|First RED's spawn. | |
| − | + | Pl fifthcurve secspwn red window.png|View from the window on second RED's spawn. | |
| − | + | Pl fifthcurve secspwn red1.png|Second RED's spawn. | |
| − | + | Pl fifthcurve secspwn red2.png|Ditto, other point of view. | |
| − | + | Pl fifthcurve lastspwn red.png|Last RED's spawn. | |
| − | + | Pl fifthcurve secspwn blu.png|Second BLU's spawn. | |
| − | + | Pl fifthcurve nextspwndoor blu.png|Door, leading to next BLU's spawn. | |
| + | Fifthcurve Workshop image.jpg|Steam Workshop thumbnail for Fifthcurve. | ||
</gallery> | </gallery> | ||
Revision as of 08:42, 22 October 2022
 | “I built that.” This page contains information about a custom map that is not an officially released Team Fortress 2 map. All released Valve and Community-made TF2 maps can be found on the list of maps. |
| Fifthcurve | |
|---|---|

| |
| Basic Information | |
| Developer(s): | Unknown |
| Map Info | |
| Environment: | Alpine |
| Setting: | Daytime, sunny |
| Hazards: | Pitfall/Payload cart explosion |
Fifthcurve is a community-created Payload map. During the development, it has also been known with names "Curve" and "5curve".
A Halloween version of the map was released with the Scream Fortress 2016 update under the name Brimstone.
Locations
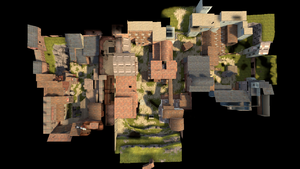
The map has 5 control points. They are named by their locations within the map. Garage(A), Satellite Dish(B), Entrance(C), Warehouse(D) and E as The Pit. BLU team needs to push cart through all these control points to the pit to win the game. RED team needs to prevent them from doing so.
Map features
The first capture point is a 2-way one, first you must push the cart upwards to the point middle of the hill and then from the CP itself to the top of the hill, without cart rolling down.
Spawning RED players can actually see their next forward spawn out from the 1st spawn window. They end up there if they fail to defend the A and B control points. BLU players on the other hand in their first forward spawn, can see a spawn door opening to their next spawn area, if they manage to push the cart up to C area.
In the last area, RED team spawns both sides of the pit and they have multiple ways in and out from the spawn areas. One route actually brings them behind BLU team, that might be trying to make the last pushes up to the pit area. This is a intentional twist that is not used in many maps. Keep an eye out on those exits as BLU!
Changelog
- Fixed missing texture.
- Removed one way door and stairs, added drop down area.
- Improved clipping.
- Added initial bot navigation.
- More small fixes and improvements.
August 6, 2016 Patch
- Changed BLU 1st forward spawn a bit. Now you won't get stuck to the landing door, because there isn't one. After the spawns change when 3rd CP is capped, you will simply get a door open and the back, long leading ways will be locked. You will have arrows to point you into correct way, as well as the spawnpoints will change to point that direction.
- Removed plank path up towards the balcony near last from RED due to it adding cluttered gameplay.
- Lots of small fixes and texture alignements.
March 28, 2016 Patch
- Added new door out from BLU 1st forward spawn.
- Remodeled the BLU 1st forward spawn and BLU 2nd forward spawn, connected 2 spawns into one. Spawns dynamically change depending if B, C or D has been capped.
- Closed off doorway to C from near B area.
- Adjusted respawn times on last CP area (E).
- Adjusted respawn times on C cap area.
- Added additional models few places within the map.
- Fixed texture errors.
March 21, 2016 Patch
- Moved BLU third spawn to change only after D has been capped instead of C, liked it used to be.
- Added new flank route for BLU to the cap C area, which opens after cap C has been capped.
- Added some height to some rooms.
- Added few props to high areas to tell players that they are not accessible even with rocket/sticky jump.
- Removed some props from the map to make it less busy looking.
- Changed respawn times after C has been capped.
- Fixed few overlays being out of place.
- Fixed few hovering models.
- Fixed some soudscapes not playing correctly in some areas.
- Continued optimizing pass.
- Several miscellaneous changes all over the map.
March 27, 2016 Patch
- Added new door out from BLU 1st forward spawn.
- Remodeled the BLU 1st forward spawn and BLU 2nd forward spawn, connected 2 spawns into one. Spawns dynamically change depending if B, C or D has been capped.
- Closed off doorway to C from near B area.
- Adjusted respawn times on last CP area (E).
- Adjusted respawn times on C cap area.
- Added additional models few places within the map.
- Fixed texture errors.
August 6, 2016 Patch
- Changed BLU 1st forward spawn a bit. Now you won't get stuck to the landing door, because there isn't one. After the spawns change when 3rd CP is capped, you will simply get a door open and the back, long leading ways will be locked. You will have arrows to point you into correct way, as well as the spawn points will change to point that direction.
- Removed plank path up towards the balcony near last from RED due to it adding cluttered gameplay.
- Lots of small fixes and texture alignments.
September 6, 2016 Patch
- Fixed missing texture.
- Removed one way door and stairs, added drop down area.
- Improved clipping.
- Added initial bot navigation.
- More small fixes and improvements.
March 6, 2020 Patch
- Brought in most of the good changes from official Halloween version, Brimstone.
- Fixed a crack in displacement between A and B path.
- Fixed door in blu 2nd spawn being able to be opened by RED, but not enter in.
- Fixed being able to stand on a blu 2nd spawn door to ambush people.
- Fixed some props fading out too soon.
- Changed some railins from white to dark.
- Improved clipping all over the map.
Gallery
See also
External links
| ||||||||||||||||||||||||||||||||||||||||||||||||


