Interfaccia Grafica
| La traduzione di questa pagina in italiano è ancora in corso. Se parlate italiano, postate nella pagina di discussione o parlate con coloro che hanno contribuito a questa pagina (vedendo la cronologia della pagina). |

L'Interfaccia, o HUD in inglese, è un sistema per riportare velocemente le informazioni necessarie al giocatore. Appare come varie sezioni che circondano la vista del giocatore durante il gioco. Può essere abilitata una versione minima dell'interfaccia di default nelle opzioni multigiocatore avanzate. Il gioco permette anche di aggiungere file per modificare l'interfaccia (detti "HUD personalizzati") per adattarla ai gusti del giocatore (vedi la sezione sottostante).
Indice
Interfaccia Generale
Angolo basso sinistro
In basso al centro
- Cattura la Bandiera – La posizione e lo stato dei Segreti di entrambe le squadre (il primo indicato da delle frecce, e il secondo indicato da una immagine descrittiva: al sicuro, presi dal nemico o lasciati cadere) e il punteggio corrente
- Punti di controllo, Arena, Controllo Territoriale, Dominatore della Collina – Lo stato dei Punti di controllo della mappa (conquistato, neutrale, in cattura o bloccato)
- Carico e Corsa dei Carrelli – Il progresso del Carrello, il tempo in cui il carrello non si è mosso, l'indicatore di marcia indietro, lo stato dei checkpoint e le salite (solo Corsa dei Carrelli)
Angolo basso destro
- Le Munizioni (nel caricatore / trasportate in totale)
- Chat vocale (visualizzato assieme al nome dei giocatori parlanti per capire chi sta utilizzando la chat vocale in quel momento)
Altri elementi
- Il mirino – centro dello schermo
- Tempo rimasto prima della fine della partita (accompagnato da un grafico a torta) – in alto al centro
- Rapporto sulle uccisioni (con nomi e icone mostranti il tipo di morte e completamento di obiettivi) – in alto a destra
- Menu di selezione armi (visualizzato premendo il tasto di selezione armi) – sul bordo destro
- Nome del giocatore alleato e la sua salute – visualizzato guardando direttamente un giocatore alleato
Elementi specifici per le classi
Esploratore
- Tempo di ricarica per la palla da baseball del Sandman (si ricarica lentamente dopo ogni palla da baseball lanciata) – angolo basso destro
- Tempo di ricarica delle bibite Bonk! Pugno Atomico o Crit-a-Cola (ricarica lenta) – angolo basso destro
- Tempo di ricarica del Latte Pazzo (si ricarica lentamente dopo ogni lancio) – angolo basso destro
Soldier
- Rage meter for Buff Banner (progresses with the damage inflicted by the player) – bottom right corner
- Rage meter for Battalion's Backup (progresses with the damage inflicted to the player) – bottom right corner
Demoman

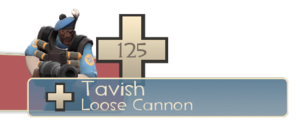
Bottom: Number of heads and charge meter for Chargin' Targe
- Sticky bomb charge for Stickybomb Launcher and Scottish Resistance (fills up the longer you hold the fire button to determine the its launch distance. When full charge is reached it will fire automatically) – bottom right corner beneath your ammo display
- Currently placed Sticky bombs for Stickybomb Launcher (max 8) and Scottish Resistance (max 14) – bottom right corner
- Charge meter for Chargin' Targe (slowly regenerates after every charge) – bottom right corner
- Heads counter for Eyelander (more heads contribute to more health and increased speed) – bottom right corner
Heavy
- Recharge timer for Sandvich, Dalokohs Bar or Buffalo Steak Sandvich lunchboxes (slowly recharges) – bottom right corner
Engineer
- Metal count – bottom right corner
- Number of Revenge Criticals for the Frontier Justice – bottom right corner
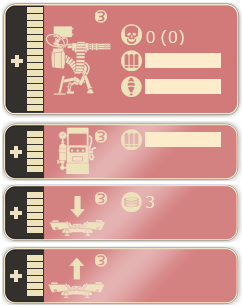
- Engineer panel (displays information about your various buildings) – top left corner
- Sentry Gun status (displays health, number of kills, number of assists in parenthesis, bullet ammo, rocket ammo, upgrade meter, and whether or not your turret is being sapped or is in need of repair)
- Dispenser status (displays health, metal stock, upgrade meter and whether or not your Dispenser is being sapped or is in need of repair)
- Teleporter Entrance and Exit status (displays health, number of times used, upgrade meter and whether or not your Teleporter/s are being sapped or are in need of repair. There are individual panels for your entrance and exit)
Medic
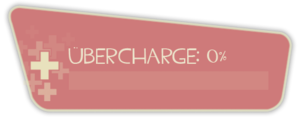
- ÜberCharge progress/drain meter for Medi Gun, Kritzkrieg or Übersaw (shows the progress of your charge when healing friendly (or enemy Spy) players and flashes when it's 100% ready. When the ÜberCharge is activated, it shows you the charge you have left before your meter resets) – bottom right corner
- Medic! calls – shown above any nearby friendly (or enemy Spy) players that call for medical assistance.
Sniper
- Shot charge (charges when scoped, amount of charge determines the damage output of your shot) – right of your crosshair when scoped with Sniper Rifle or underneath ammo count with Huntsman
- Jarate respawn timer (slowly recharges after every toss) – bottom right corner
Spy
- Your current Disguise – bottom left corner appearing over your own class picture
- Your Cloak drain/regen charge for Invisibility Watch, Cloak and Dagger or Dead Ringer – bottom right corner
- Your cloaking visibility (the translucency of your class/disguise picture changes to reflect this)
- The health of currently sapped buildings. – top left corner
HUD modification
Team Fortress 2 allows players to modify their HUD from the default layout. Many community members have made modifications that are shared with the public. Reasons for using custom HUDs vary widely, but most agree that they are primarily to improve visibility of important information (e.g. health, ammo or ÜberCharge meters) and move non-vital HUD panels aside. Which custom HUD you choose or choose not to use is all up to personal preference; there is no one HUD that is "better" than another, though many would disagree. Custom HUDs can also be used on servers with an sv_pure setting.
- Note: Custom HUD modifications will often break after game updates. If your current HUD is not displaying properly, check the website of your custom HUD for an update, or delete the custom HUD files and restart your game to use the default HUD.
Installation
Each custom HUD contains different files and their correct destination may vary (see their individual documentation for exact locations). However, custom HUD modifications generally only modify files in two folders:
/tf/resource/tf/scripts
After placing all files in their correct destinations, restart the game and play with your new HUD.
External links
- Flame's HUD Guide (PDF) – a starter's guide to modifying the HUD.
- Popular custom HUDs
- Flame's Community HUD: Official site – Screenshots – Download
- BroeselHUD (updated m0reHUD): Official site – Screenshots – Download
- G-Mang HUD: Official site – Screenshots – Download
- Revan XP HUD: Official site – Screenshots – Download
- Oxide HUD: Official site – Screenshots – Download
- A Toasty HUD: Official site – Screenshots – Download
- FrankenHUD: Official site – Screenshots – Download


