Help:Unusual and Killstreak renders
| ||||||||||||||||||||||||||||
This Unusual & Killstreak renders tutorial will show you how to render images of Unusual effects, Killstreak Sheens, and Killstreaker effects in Source Filmmaker, for use in Unusual, Killstreak, and/or update related pages. Average Source Filmmaker and particle system knowledge is required.
Contents
Getting Started
The following process will provide you with all of the tools you need to open the original project file used to make renders consistent with all current Unusual and Killstreak image renders. Standard installs of SFM lack a lot of files required for the project file to work, and also use incorrect versions of other files. Following these instructions should fix all of that.
- First off, download and install SFM if you haven't already.
- Download this .zip file, containing the project file and other required materials. (Version 26; last updated November 27, 2024)
- Open and extract the .zip file. You should have a folder called
game. - Drag this folder into the
SourceFilmmakerfolder, your main SFM folder, and replace any duplicate files. - Launch SFM. Open the
unusualdemo.dmxproject file and wait for it to load. - Once loaded, right click on your viewport window. Select Render Settings, and turn off Motion Blur and Ambient Occlusion.
Congratulations! You're now ready for rendering rendering Unusual effects, Killstreak Sheens, and Killstreaker effects.
Rendering Unusual effects
Below is the tutorial for rendering Unusual effects.
Adding the particle
- If you are rendering a brand new set of Unusual effects, you will need to grab their files from TF2. To do this:
- Download GCFScape if you do not have it.
- Open
Team Fortress 2\tf\tf2_misc_dir.vpk. Grab your .pcf from theparticlesfolder, and your materials from thematerials\effectsfolder. - Open
Team Fortress 2\tf\tf2_textures_dir.vpk. Grab your textures from thematerials\effectsfolder. - You should now have a
particlesandmaterialsfolder. Drag these intoSourceFilmmaker\game\tfand replace any duplicate files.
- Set your camera to
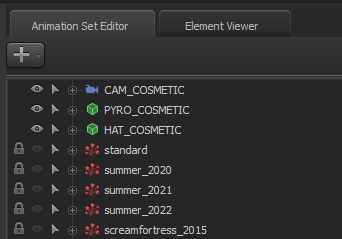
cam_cosmetic,cam_taunt, orcam_weapon, depending on the type of effect you want to render. - Click the + icon in the Animation Set Editor window. Create an Animation Set for a new particle system.
- There will be a few fields for you to fill out:
- Set Particle System Definition File to the .pcf your Unusual effect is contained in.
- We'll ignore Particle System Definition for now.
- Set Start Time to
0. - Set the Emission Duration and Particle System Lifetime fields to something big, like
999.
You should now have your particle file added into the session.
Positioning the particle
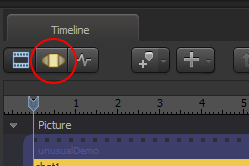
- Switch to the Motion Editor in the timeline window.
- Next, this will branch off depending on what you're trying to render:
- For COSMETIC Unusual Effects:
- Find your particle's Animation Set. Expand it, then expand the all field.
- Find the PYRO_COSMETIC model near the top of the Animation Set list. Expand it, expand the Body field, and select bip_head.
- Drag PYRO_COSMETIC's bip_head field into the particle's transform field.
- Select the main particle, and find the Zero slider near the top of your slider list. Drag it all the way to the right.
- For TAUNT Unusual Effects:
- Find your particle's Animation Set. Expand it, then expand the all field.
- Find the PYRO_TAUNT model near the top of the Animation Set list. Expand it, expand the Body field, and select rootTransform.
- Drag PYRO_TAUNT's rootTransform field into the particle's transform field.
- Select the main particle, and find the Zero slider near the top of your slider list. Drag it all the way to the right.
- Right click PYRO_TAUNT. Go to Show in Element Viewer, and click Model.
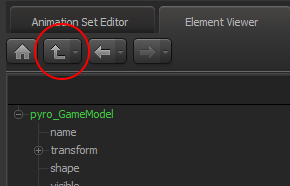
- Click the ⮤ icon at the top left, and then select the children field. Right click pyro_GameModel, and copy it.
- Go back to your Animation Set editor and right click your particle. Go to Show in Element Viewer, and click Particle System.
- At the bottom of the list, right click on controlModels, click Paste Special, then Paste as Reference.
- For WEAPON Unusual Effects with 2 control points:
- Find the transform - pos field of your particle system. In respective order, change each 0 to
5020-23. - Find the transform - rot field. In respective order, change each value to
00-125. - If the effect is still not positioned properly, adjust manually as needed.
- For WEAPON Unusual Effects with more than 2 control points:
- Find the transform - pos field of your particle system. In respective order, change each 0 to
5020-23. - Find the controlPoint4 - pos field. In respective order, change each value to
15200. - If the effect is still not positioned properly, adjust manually as needed.
- Now that you've done all that, in the timeline window, move your current frame position to something negative and then back out to positive to refresh the particle.
Finalizing the particle
- Right click your particle in the Animation Set Editor. Go to Show in Element Viewer, and then Particle System.
- Replace what's in the particleSystemType field with your desired particle's filename.
- Your particle should now show up properly and be ready to export. Click on File at the top left, and export as a poster. The image size should be 1920x1080.
- When your render exports, it can be found in
SourceFilmmaker\game\usermod\elements\renders. Use your favorite image editing software to crop the width to 1080. The image will now be 1080x1080 and is ready for use on the wiki!
Repeat these finalization steps for each effect you plan to render. Congratulations! You have now rendered out wiki-ready Unusual effects. Please note that SFM and TF2 do not share the same codebase, and effects may differ in appearance or just plain not work in SFM. Adjust them as necessary by right clicking the particle, clicking Instance Particle System, and then editing the particle through Edit Particle System Definition.
Rendering Killstreak Sheens
Below is the tutorial for rendering Killstreak Sheens.
Preparing the Sheen
- Set your camera to
cam_weapon. - Hide the SHOTGUN model and show the SHOTGUN_SHEEN model.
- Right click SHOTGUN_SHEEN in the Animation Set Editor. Go to Show in Element Viewer, and click Model.
- Scroll down to materials, and expand it.
- Change $envmaptint to the color of the Sheen you're rendering.
Finalizing the particle
- Your Sheen should now be ready to export. Click on File at the top left, and export as a poster. The image size should be 1920x1080.
- When your render exports, it can be found in
SourceFilmmaker\game\usermod\elements\renders. Use your favorite image editing software to crop the width to 1080. The image will now be 1080x1080 and is ready for use on the wiki! - Due to the nature of Killstreak Sheens, it may take multiple attempts to get a good render. You'll want to use existing images as reference.
Repeat these finalization steps for each effect you plan to render. Congratulations! You have now rendered out wiki-ready Killstreak Sheens.
Rendering Killstreaker effects
Below is the tutorial for rendering a Killstreaker effect.
Adding the particles
- Set your camera to
cam_cosmetic. - Click the + icon in the Animation Set Editor window. Create an Animation Set for a new particle system.
- There will be a few fields for you to fill out:
- Set Particle System Definition File to the .pcf your Unusual effect is contained in.
- We'll ignore Particle System Definition for now.
- Set Start Time to
0. - Set the Emission Duration and Particle System Lifetime fields to something big, like
999.
You should now have your 2 particle files added into the session one for each eye.
Positioning the particles
- Switch to the Motion Editor in the timeline window.
- Next, this will branch off depending on what eye you're adjusting:
- For the LEFT eye:
- Find the transform - pos field of your particle system. In respective order, change each value to
-6.5822888.45833.20387. - Find the transform - rot field. In respective order, change each value to
00-139.361. - If the effect is still not positioned properly, adjust manually as needed.
- For the RIGHT eye:
- Find the transform - pos field of your particle system. In respective order, change each value to
-3.3862386.25211.85855. - Find the transform - rot field. In respective order, change each value to
00-75.4402. - If the effect is still not positioned properly, adjust manually as needed.
- Now that you've done all that, in the timeline window, move your current frame position to something negative and then back out to positive to refresh the particles.
Finalizing the particles
- Right click your particles in the Animation Set Editor. Go to Show in Element Viewer, and then Particle System.
- Replace what's in the particleSystemType field with your desired particles' filenames.
- Your particles should now show up properly and be ready to export. Click on File at the top left, and export as a poster. The image size should be 1920x1080.
- When your render exports, it can be found in
SourceFilmmaker\game\usermod\elements\renders. Use your favorite image editing software to crop the width to 1080. The image will now be 1080x1080 and is ready for use on the wiki!
Repeat these finalization steps for each effect you plan to render. Congratulations! You have now rendered out wiki-ready Killstreak effects.


