Difference between revisions of "Scream Fortress 2016/ko"
m |
BrazilianNut (talk | contribs) m |
||
| Line 13: | Line 13: | ||
{{main|Cosmetic items/ko|l1=장식 아이템}} | {{main|Cosmetic items/ko|l1=장식 아이템}} | ||
{| class="wikitable collapsible" cellpadding="3" style="text-align:center;" | {| class="wikitable collapsible" cellpadding="3" style="text-align:center;" | ||
| − | | width="60px" style="background: #6A5587;" rowspan="1" | {{icon class|Scout}}<br/>'''[[Scout | + | | width="60px" style="background: #6A5587;" rowspan="1" | {{icon class|Scout}}<br/>'''[[Scout{{if lang}}|<span style="color: #FFF;">{{class name|Scout}}</span>]]''' |
| − | | align="center" style="background: # | + | | align="center" style="background: #4B69FF;" | {{item icon|Wing Mann|75px}} |
| style="background: #F1ECF7;"| '''{{item link|Wing Mann}}''' | | style="background: #F1ECF7;"| '''{{item link|Wing Mann}}''' | ||
|- | |- | ||
| − | | width="60px" style="background: #6A5587;" rowspan="3" | {{icon class|Pyro}}<br/>'''[[Pyro | + | | width="60px" style="background: #6A5587;" rowspan="3" | {{icon class|Pyro}}<br/>'''[[Pyro{{if lang}}|<span style="color: #FFF;">{{class name|Pyro}}</span>]]''' |
| − | | align="center" style="background: # | + | | align="center" style="background: #EB4B4B;" | {{item icon|Combustible Cutie|75px}} |
| style="background: #F1ECF7;"| '''{{item link|Combustible Cutie}}''' | | style="background: #F1ECF7;"| '''{{item link|Combustible Cutie}}''' | ||
|- | |- | ||
| − | | align="center" style="background: # | + | | align="center" style="background: #4B69FF;" | {{item icon|Cranial Carcharodon|75px}} |
| style="background: #F1ECF7;"| '''{{item link|Cranial Carcharodon}}''' | | style="background: #F1ECF7;"| '''{{item link|Cranial Carcharodon}}''' | ||
|- | |- | ||
| − | | align="center" style="background: # | + | | align="center" style="background: #FFD700;" | {{item icon|Hovering Hotshot|75px}} |
| style="background: #F1ECF7;"| '''{{item link|Hovering Hotshot}}''' | | style="background: #F1ECF7;"| '''{{item link|Hovering Hotshot}}''' | ||
|- | |- | ||
| − | | width="60px" style="background: #6A5587;" rowspan="2" | {{icon class|Demoman}}<br/>'''[[Demoman | + | | width="60px" style="background: #6A5587;" rowspan="2" | {{icon class|Demoman}}<br/>'''[[Demoman{{if lang}}|<span style="color: #FFF;">{{class name|Demoman}}</span>]]''' |
| − | | align="center" style="background: # | + | | align="center" style="background: #FFD700;" | {{item icon|Aerobatics Demonstrator|75px}} |
| style="background: #F1ECF7;"| '''{{item link|Aerobatics Demonstrator}}''' | | style="background: #F1ECF7;"| '''{{item link|Aerobatics Demonstrator}}''' | ||
|- | |- | ||
| − | | align="center" style="background: # | + | | align="center" style="background: #8847FF;" | {{item icon|Spirit of the Bombing Past|75px}} |
| style="background: #F1ECF7;"| '''{{item link|Spirit of the Bombing Past}}''' | | style="background: #F1ECF7;"| '''{{item link|Spirit of the Bombing Past}}''' | ||
|- | |- | ||
| − | | width="60px" style="background: #6A5587;" rowspan="3" | {{icon class|Heavy}}<br/>'''[[Heavy | + | | width="60px" style="background: #6A5587;" rowspan="3" | {{icon class|Heavy}}<br/>'''[[Heavy{{if lang}}|<span style="color: #FFF;">{{class name|Heavy}}</span>]]''' |
| − | | align="center" style="background: # | + | | align="center" style="background: #8847FF;" | {{item icon|Heavy Tourism|75px}} |
| style="background: #F1ECF7;"| '''{{item link|Heavy Tourism}}''' | | style="background: #F1ECF7;"| '''{{item link|Heavy Tourism}}''' | ||
|- | |- | ||
| − | | align="center" style="background: # | + | | align="center" style="background: #4B69FF;" | {{item icon|Mad Mask|75px}} |
| style="background: #F1ECF7;"| '''{{item link|Mad Mask}}''' | | style="background: #F1ECF7;"| '''{{item link|Mad Mask}}''' | ||
|- | |- | ||
| − | | align="center" style="background: # | + | | align="center" style="background: #D32CE6;" | {{item icon|Mo'Horn|75px}} |
| style="background: #F1ECF7;"| '''{{item link|Mo'Horn}}''' | | style="background: #F1ECF7;"| '''{{item link|Mo'Horn}}''' | ||
|- | |- | ||
| − | | width="60px" style="background: #6A5587;" rowspan="4" | {{icon class|Engineer}}<br/>'''[[Engineer | + | | width="60px" style="background: #6A5587;" rowspan="4" | {{icon class|Engineer}}<br/>'''[[Engineer{{if lang}}|<span style="color: #FFF;">{{class name|Engineer}}</span>]]''' |
| − | | align="center" style="background: # | + | | align="center" style="background: #8847FF;" | {{item icon|Corpus Christi Cranium|75px}} |
| style="background: #F1ECF7;"| '''{{item link|Corpus Christi Cranium}}''' | | style="background: #F1ECF7;"| '''{{item link|Corpus Christi Cranium}}''' | ||
|- | |- | ||
| − | | align="center" style="background: # | + | | align="center" style="background: #4B69FF;" | {{item icon|El Paso Poncho|75px}} |
| style="background: #F1ECF7;"| '''{{item link|El Paso Poncho}}''' | | style="background: #F1ECF7;"| '''{{item link|El Paso Poncho}}''' | ||
|- | |- | ||
| − | | align="center" style="background: # | + | | align="center" style="background: #FFD700;" | {{item icon|Final Frontier Freighter|75px}} |
| style="background: #F1ECF7;"| '''{{item link|Final Frontier Freighter}}''' | | style="background: #F1ECF7;"| '''{{item link|Final Frontier Freighter}}''' | ||
|- | |- | ||
| − | | align="center" style="background: # | + | | align="center" style="background: #4B69FF;" | {{item icon|Wide-Brimmed Bandito|75px}} |
| style="background: #F1ECF7;"| '''{{item link|Wide-Brimmed Bandito}}''' | | style="background: #F1ECF7;"| '''{{item link|Wide-Brimmed Bandito}}''' | ||
|- | |- | ||
| − | | width="60px" style="background: #6A5587;" rowspan="3" | {{icon class|Medic}}<br/>'''[[Medic | + | | width="60px" style="background: #6A5587;" rowspan="3" | {{icon class|Medic}}<br/>'''[[Medic{{if lang}}|<span style="color: #FFF;">{{class name|Medic}}</span>]]''' |
| − | | align="center" style="background: # | + | | align="center" style="background: #D32CE6;" | {{item icon|Burly Beast|75px}} |
| style="background: #F1ECF7;"| '''{{item link|Burly Beast}}''' | | style="background: #F1ECF7;"| '''{{item link|Burly Beast}}''' | ||
|- | |- | ||
| − | | align="center" style="background: # | + | | align="center" style="background: #4B69FF;" | {{item icon|Colossal Cranium|75px}} |
| style="background: #F1ECF7;"| '''{{item link|Colossal Cranium}}''' | | style="background: #F1ECF7;"| '''{{item link|Colossal Cranium}}''' | ||
|- | |- | ||
| − | | align="center" style="background: # | + | | align="center" style="background: #4B69FF;" | {{item icon|Surgeon's Sidearms|75px}} |
| style="background: #F1ECF7;"| '''{{item link|Surgeon's Sidearms}}''' | | style="background: #F1ECF7;"| '''{{item link|Surgeon's Sidearms}}''' | ||
|- | |- | ||
| − | | width="60px" style="background: #6A5587;" rowspan="2" | {{icon class|Spy}}<br/>'''[[Spy | + | | width="60px" style="background: #6A5587;" rowspan="2" | {{icon class|Spy}}<br/>'''[[Spy{{if lang}}|<span style="color: #FFF;">{{class name|Spy}}</span>]]''' |
| − | | align="center" style="background: # | + | | align="center" style="background: #8847FF;" | {{item icon|Big Topper|75px}} |
| style="background: #F1ECF7;"| '''{{item link|Big Topper}}''' | | style="background: #F1ECF7;"| '''{{item link|Big Topper}}''' | ||
|- | |- | ||
| − | | align="center" style="background: # | + | | align="center" style="background: #4B69FF;" | {{item icon|Showstopper|75px}} |
| style="background: #F1ECF7;"| '''{{item link|Showstopper}}''' | | style="background: #F1ECF7;"| '''{{item link|Showstopper}}''' | ||
|- | |- | ||
| − | | width="60px" style="background: #6A5587;" rowspan="1" | {{icon class|Scout}}<br/>'''[[Scout | + | | width="60px" style="background: #6A5587;" rowspan="1" | {{icon class|Scout}}<br/>'''[[Scout{{if lang}}|<span style="color: #FFF;">{{class name|Scout}}</span>]]'''<br>{{icon class|Soldier}}<br/>'''[[Soldier{{if lang}}|<span style="color: #FFF;">{{class name|Soldier}}</span>]]'''<br>{{icon class|Pyro}}<br/>'''[[Pyro{{if lang}}|<span style="color: #FFF;">{{class name|Pyro}}</span>]]'''<br>{{icon class|Heavy}}<br/>'''[[Heavy{{if lang}}|<span style="color: #FFF;">{{class name|Heavy}}</span>]]''' |
| − | | align="center" style="background: # | + | | align="center" style="background: #D32CE6;" | {{item icon|Pestering Jester|75px}} |
| style="background: #F1ECF7;"| '''{{item link|Pestering Jester}}''' | | style="background: #F1ECF7;"| '''{{item link|Pestering Jester}}''' | ||
|- | |- | ||
| − | | width="60px" style="background: #6A5587;" rowspan="5" | {{icon class|All Classes}}<br/>'''[[Classes | + | | width="60px" style="background: #6A5587;" rowspan="5" | {{icon class|All Classes}}<br/>'''[[Classes{{if lang}}|<span style="color: #FFF;">{{class name|All Classes}}</span>]]''' |
| − | | align="center" style="background: # | + | | align="center" style="background: #EB4B4B;" | {{item icon|Class Crown|75px}} |
| style="background: #F1ECF7;"| '''{{item link|Class Crown}}''' | | style="background: #F1ECF7;"| '''{{item link|Class Crown}}''' | ||
|- | |- | ||
| − | | align="center" style="background: # | + | | align="center" style="background: #8847FF;" | {{item icon|Lil' Bitey|75px}} |
| style="background: #F1ECF7;"| '''{{item link|Lil' Bitey}}''' | | style="background: #F1ECF7;"| '''{{item link|Lil' Bitey}}''' | ||
|- | |- | ||
| − | | align="center" style="background: # | + | | align="center" style="background: #4B69FF;" | {{item icon|Nasty Norsemann|75px}} |
| style="background: #F1ECF7;"| '''{{item link|Nasty Norsemann}}''' | | style="background: #F1ECF7;"| '''{{item link|Nasty Norsemann}}''' | ||
|- | |- | ||
| − | | align="center" style="background: # | + | | align="center" style="background: #4B69FF;" | {{item icon|Spooktacles|75px}} |
| style="background: #F1ECF7;"| '''{{item link|Spooktacles}}''' | | style="background: #F1ECF7;"| '''{{item link|Spooktacles}}''' | ||
|- | |- | ||
| − | | align="center" style="background: # | + | | align="center" style="background: #8847FF;" | {{item icon|Toadstool Topper|75px}} |
| style="background: #F1ECF7;"| '''{{item link|Toadstool Topper}}''' | | style="background: #F1ECF7;"| '''{{item link|Toadstool Topper}}''' | ||
| − | |||
|} | |} | ||
| Line 105: | Line 104: | ||
| align="center" style="background-color:#AD9DC3;" | {{Icon item|Victory Lap|75px}} | | align="center" style="background-color:#AD9DC3;" | {{Icon item|Victory Lap|75px}} | ||
| style="background-color:#F1ECF7;"| '''{{item link|Victory Lap}}''' | | style="background-color:#F1ECF7;"| '''{{item link|Victory Lap}}''' | ||
| − | |||
|} | |} | ||
| Line 119: | Line 117: | ||
| align="center" style="background: #AD9DC3;" | {{item icon|Unusualifier|75px}} | | align="center" style="background: #AD9DC3;" | {{item icon|Unusualifier|75px}} | ||
| style="background: #F1ECF7;"| '''{{item link|Unusualifier}}''' | | style="background: #F1ECF7;"| '''{{item link|Unusualifier}}''' | ||
| − | |||
|} | |} | ||
| Line 150: | Line 147: | ||
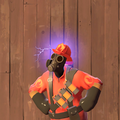
{{main|Unusual effects/ko|l1=범상찮은 효과}} | {{main|Unusual effects/ko|l1=범상찮은 효과}} | ||
<gallery perrow="4"> | <gallery perrow="4"> | ||
| − | File:Unusual Neutron Star.png| Neutron Star | + | File:Unusual Neutron Star.png|{{item name|Neutron Star}} |
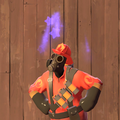
| − | File:Unusual Tesla Coil.png| Tesla Coil | + | File:Unusual Tesla Coil.png|{{item name|Tesla Coil}} |
| − | File:Unusual Starstorm Insomnia.png| Starstorm Insomnia | + | File:Unusual Starstorm Insomnia.png|{{item name|Starstorm Insomnia}} |
| − | File:Unusual Starstorm Slumber.png| Starstorm Slumber | + | File:Unusual Starstorm Slumber.png|{{item name|Starstorm Slumber}} |
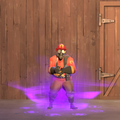
| − | File:Unusual Hellish Inferno.png| Hellish Inferno | + | File:Unusual Hellish Inferno.png|{{item name|Hellish Inferno}} |
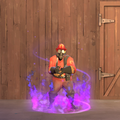
| − | File:Unusual Spectral Swirl.png| Spectral Swirl | + | File:Unusual Spectral Swirl.png|{{item name|Spectral Swirl}} |
| − | File:Unusual Infernal Flames.png| Infernal Flames | + | File:Unusual Infernal Flames.png|{{item name|Infernal Flames}} |
| − | File:Unusual Infernal Smoke.png| Infernal Smoke | + | File:Unusual Infernal Smoke.png|{{item name|Infernal Smoke}} |
</gallery> | </gallery> | ||
| Line 165: | Line 162: | ||
File:News item 2016-10-25 Scream Fortress Extended!.png|행사 기간 연장에 대한 게임 내 알림. | File:News item 2016-10-25 Scream Fortress Extended!.png|행사 기간 연장에 대한 게임 내 알림. | ||
</gallery> | </gallery> | ||
| − | + | <!-- | |
| + | File:User Twolfe Halloween2016.png|Pre-event teaser picture. | ||
| + | --> | ||
{{Scream Fortress 2016 Nav}} | {{Scream Fortress 2016 Nav}} | ||
| + | {{Scream Fortress Events Nav}} | ||
{{Major updates nav}} | {{Major updates nav}} | ||
Revision as of 05:29, 3 November 2019

해당 문서는 콘텐츠 업데이트를 다루고 있습니다. 패치에 대한 내용은 2016년 10월 21일 패치를 참고하세요.
2016년 스크림 포트리스는 2016년 10월 21일에 공개된 주요 업데이트입니다. 이 업데이트로 2개의 새로운 도발, 3개의 새로운 맵, 24개의 새로운 장식 아이템, 새로운 도구 아이템인 범상찮은 마술가 추가되었고, 작년 행사 때 개최했던 메라'임무'스가 돌아왔습니다.
시간표
이 행사는 원래 2016년 10월 21일부터 2016년 11월 9일까지 개최하기로 되어 있었지만 2016년 11월 16일까지로 연장했습니다.
추가 사항
장식 아이템
본문: 장식 아이템
도발
본문: 도발
모든 병과 |
이류 저주술 | |
| 승리의 한 바퀴 |
도구
본문: 도구
| 기이하게 기어다니는 벌레 상자 | |
| 기이하게 기어다니는 벌레 열쇠 | |
| 범상찮은 마술 |
맵
본문: 맵 목록
| 이름 | 사진 | 게임 모드 | 파일명 |
|---|---|---|---|
| Brimstone | 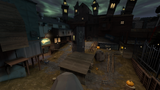
|
수레 밀기
|
pl_fifthcurve_event
|
| Maple Ridge Event | 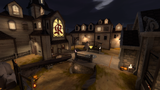
|
언덕의 왕 |
koth_maple_ridge_event
|
| Pit of Death | 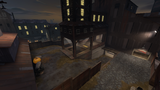
|
플레이어 말살
|
pd_pit_of_death_event
|
범상찮은 효과
본문: 범상찮은 효과
중성자별
테슬라 코일

별빛이 내리는 불면증
별빛이 내리는 잠

지옥 같은 불지옥
소름끼치는 소용돌이
지옥 같은 불꽃

지옥 같은 연기


갤러리
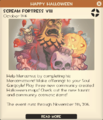
행사가 시작되었음을 알리는 게임 내 알림.
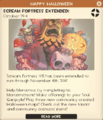
행사 기간 연장에 대한 게임 내 알림.


| ||||||||||||||
| ||||||||||||||||||||||||||||||||||||||||||||||||||||||||||||||||||||||||||||||||||||||||||||||||||