Difference between revisions of "Community Wutville strategy"
m |
m (Sync map infobox) |
||
| Line 9: | Line 9: | ||
| file-name = pl_wutville_event | | file-name = pl_wutville_event | ||
| map-image = Pl_wutville_event.png | | map-image = Pl_wutville_event.png | ||
| + | | release-date = December 3, 2020 | ||
| + | | last-updated = December 16, 2020 | ||
| + | | map-hazards = [[Pitfall]]s,<br>[[Environmental death#Cart explosion|Payload Cart explosion]] | ||
| + | | map-environment = Smissmas | ||
| + | | map-setting = Night, Town | ||
| map-health-pickups-small = 10 | | map-health-pickups-small = 10 | ||
| map-health-pickups-medium = 6 | | map-health-pickups-medium = 6 | ||
| Line 15: | Line 20: | ||
| map-ammo-pickups-medium = 13 | | map-ammo-pickups-medium = 13 | ||
| map-ammo-pickups-large = 2 | | map-ammo-pickups-large = 2 | ||
| + | | developer = {{Steamid|76561197960465342|Andrew "Thirteen" Risch}} | ||
| + | | map-bots = yes | ||
}} | }} | ||
Revision as of 14:11, 18 April 2021
| “Sun Tzu's got nothing on us!” This article is a Community strategy stub. As such, it is not complete. You can help the Team Fortress Wiki Community Strategy Project by expanding it. Notes: I've seen some problems with this community strategy page
|
| Community Wutville strategy | |
|---|---|

| |
| Basic Information | |
| Developer(s): | Unknown |
| Map Info | |
| Environment: | Smissmas |
| Setting: | Night, Town |
| Hazards: | Pitfalls, Payload Cart explosion |
| Map Photos | |
This article is about Community Wutville strategy.
Contents
General Strategy
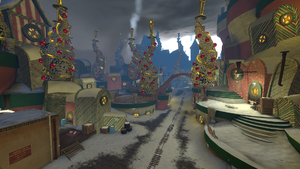
Wutville's layout is a long narrow corridor with a lot of choke points, and a few tunnels which go to different places, away from the Payload track. Due to this design, Sentry Guns and Sticky Traps are all great tools for the defending team due to the narrowness of the map. Because much of the map is a long path, Sniper's long-range damage is both easily utilized and very helpful. The many tunnels allow for Spies to infiltrate the enemy team.
The final point provides high ground and plentiful health and ammo packs to the attacking team should they push up the left flank, securing this route can easily turn the tide.
Class specific strategy
 Scout
Scout
 Soldier
 Pyro
Pyro
 Demoman
- The many long, straight angles available between chokes can be exploited by Demoknights.
 Heavy
Heavy
- Genuinely Heavy on this map is very hard to play, since the Sniper sightlines are so long, and you can only hide, and even then, cover is rare on this map.
 Engineer
 Medic
Medic
 Sniper
- The map has such long sight lines that a Sniper can kill a TON of people from far away.
 Spy
Spy
- Cloak and Dagger your way to the Sniper sight lines, and kill them since they think they are far enough away from Spies and the rest of the enemy team
