Difference between revisions of "Scream Fortress 2021/es"
BrazilianNut (talk | contribs) m (→Cronología) |
BrazilianNut (talk | contribs) m (Applied new color scheme; put War Paints before Taunts.) |
||
| Line 18: | Line 18: | ||
{|class="wikitable" cellpadding=2 style="text-align:center;" | {|class="wikitable" cellpadding=2 style="text-align:center;" | ||
|-style="height:20px;" | |-style="height:20px;" | ||
| − | ! class="header" style="background:# | + | ! class="header" style="background:#BD190B;color:#FFFFFF;" | Nombre |
| − | ! class="header" style="background:# | + | ! class="header" style="background:#BD190B;color:#FFFFFF;" | Imagen |
| − | ! class="header" style="background:# | + | ! class="header" style="background:#BD190B;color:#FFFFFF;" | Modo de juego |
| − | ! class="header" style="background:# | + | ! class="header" style="background:#BD190B;color:#FFFFFF;" | Nombre de archivo |
|- | |- | ||
| − | | width="90px" style="background:# | + | | width="90px" style="background:#FF5252;" | '''[[Erebus{{if lang}}|<font color="white">Erebus</font>]]''' |
| − | | style="background:# | + | | style="background:#E1CCC9;" | [[File:Cp ambush event.png|160px|link=Erebus{{if lang}}]] |
| − | | style="background:# | + | | style="background:#E1CCC9;" | '''[[Control Point (game mode){{if lang}}|{{common string|Attack/Defend}}]]'''<br>[[File:Controlpoint.png|50px|link=Control Point (game mode){{if lang}}]] |
| {{code|cp_ambush_event}} | | {{code|cp_ambush_event}} | ||
|- | |- | ||
| − | | style="background:# | + | | style="background:#FF5252;" | '''[[Farmageddon{{if lang}}|<font color="white">Farmageddon</font>]]''' |
| − | | style="background:# | + | | style="background:#E1CCC9;" | [[File:Pd farmageddon.png|160px|link=Farmageddon{{if lang}}]] |
| − | | style="background:# | + | | style="background:#E1CCC9;" | '''[[Player Destruction{{if lang}}|{{common string|Player Destruction}}]]'''<br>[[File:Weedkillersmall.png|50px|link=Player Destruction{{if lang}}]] |
| {{code|pd_farmageddon}} | | {{code|pd_farmageddon}} | ||
|- | |- | ||
| − | | style="background:# | + | | style="background:#FF5252;" | '''[[Graveyard{{if lang}}|<font color="white">Graveyard</font>]]''' |
| − | | style="background:# | + | | style="background:#E1CCC9;" | [[File:Arena lumberyard event.png|160px|link=Graveyard{{if lang}}]] |
| − | | style="background:# | + | | style="background:#E1CCC9;" | '''[[Arena{{if lang}}|{{common string|Arena}}]]'''<br>[[File:Controlpoint.png|50px|link=Arena{{if lang}}]] |
| {{code|arena_lumberyard_event}} | | {{code|arena_lumberyard_event}} | ||
|- | |- | ||
| − | | style="background:# | + | | style="background:#FF5252;" | '''[[Los Muertos{{if lang}}|<font color="white">Los Muertos</font>]]''' |
| − | | style="background:# | + | | style="background:#E1CCC9;" | [[File:Koth los muertos.png|160px|link=Los Muertos{{if lang}}]] |
| − | | style="background:# | + | | style="background:#E1CCC9;" | '''[[King of the Hill{{if lang}}|{{common string|King of the Hill}}]]'''<br>[[File:Controlpoint.png|50px|link=King of the Hill{{if lang}}]] |
| {{code|koth_los_muertos}} | | {{code|koth_los_muertos}} | ||
|- | |- | ||
| − | | style="background:# | + | | style="background:#FF5252;" | '''[[Sinthetic{{if lang}}|<font color="white">Sinthetic</font>]]''' |
| − | | style="background:# | + | | style="background:#E1CCC9;" | [[File:Koth synthetic event.png|160px|link=Sinthetic{{if lang}}]] |
| − | | style="background:# | + | | style="background:#E1CCC9;" | '''[[King of the Hill{{if lang}}|{{common string|King of the Hill}}]]'''<br>[[File:Controlpoint.png|50px|link=King of the Hill{{if lang}}]] |
| {{code|koth_synthetic_event}} | | {{code|koth_synthetic_event}} | ||
|- | |- | ||
| − | | style="background:# | + | | style="background:#FF5252;" | '''[[Terror{{if lang}}|<font color="white">Terror</font>]]''' |
| − | | style="background:# | + | | style="background:#E1CCC9;" | [[File:Pl terror event.png|160px|link=Terror{{if lang}}]] |
| − | | style="background:# | + | | style="background:#E1CCC9;" | '''[[Payload{{if lang}}|{{common string|Payload}}]]'''<br>[[File:BLU_Bombcart.png|50px|link=Payload{{if lang}}]] |
| {{code|pl_terror_event}} | | {{code|pl_terror_event}} | ||
|} | |} | ||
| Line 57: | Line 57: | ||
{{main|Cosmetic items/es|l1=Objetos cosméticos}} | {{main|Cosmetic items/es|l1=Objetos cosméticos}} | ||
{| class="wikitable collapsible" cellpadding="3" style="text-align:center;" | {| class="wikitable collapsible" cellpadding="3" style="text-align:center;" | ||
| − | | width="90px" style="background:# | + | | width="90px" style="background:#BD190B;" rowspan="2" | '''{{class link|Scout|br=yes|color=white}}''' |
| style="background:#FFD700;" | {{item icon|Batter's Beak|75px}} | | style="background:#FFD700;" | {{item icon|Batter's Beak|75px}} | ||
| − | | style="background:# | + | | style="background:#E1CCC9;" | '''{{item link|Batter's Beak}}''' |
|- | |- | ||
| style="background:#FFD700;" | {{item icon|Corpse Carrier|75px}} | | style="background:#FFD700;" | {{item icon|Corpse Carrier|75px}} | ||
| − | | style="background:# | + | | style="background:#E1CCC9;" | '''{{item link|Corpse Carrier}}''' |
|- | |- | ||
| − | | style="background:# | + | | style="background:#BD190B;" rowspan="2" | '''{{class link|Soldier|br=yes|color=white}}''' |
| style="background:#FFD700;" | {{item icon|Poopy Doe|75px}} | | style="background:#FFD700;" | {{item icon|Poopy Doe|75px}} | ||
| − | | style="background:# | + | | style="background:#E1CCC9;" | '''{{item link|Poopy Doe}}''' |
|- | |- | ||
| style="background:#FFD700;" | {{item icon|War Dog|75px}} | | style="background:#FFD700;" | {{item icon|War Dog|75px}} | ||
| − | | style="background:# | + | | style="background:#E1CCC9;" | '''{{item link|War Dog}}''' |
|- | |- | ||
| − | | style="background:# | + | | style="background:#BD190B;" rowspan="3" | '''{{class link|Pyro|br=yes|color=white}}''' |
| style="background:#D32CE6;" | {{item icon|Wandering Wraith|75px}} | | style="background:#D32CE6;" | {{item icon|Wandering Wraith|75px}} | ||
| − | | style="background:# | + | | style="background:#E1CCC9;" | '''{{item link|Wandering Wraith}}''' |
|- | |- | ||
| style="background:#4B69FF;" | {{item icon|Smiling Somen|75px}} | | style="background:#4B69FF;" | {{item icon|Smiling Somen|75px}} | ||
| − | | style="background:# | + | | style="background:#E1CCC9;" | '''{{item link|Smiling Somen}}''' |
|- | |- | ||
| style="background:#FFD700;" | {{item icon|Miami Rooster|75px}} | | style="background:#FFD700;" | {{item icon|Miami Rooster|75px}} | ||
| − | | style="background:# | + | | style="background:#E1CCC9;" | '''{{item link|Miami Rooster}}''' |
|- | |- | ||
| − | | style="background:# | + | | style="background:#BD190B;" rowspan="1" | '''{{class link|Demoman|br=yes|color=white}}''' |
| style="background:#4B69FF;" | {{item icon|Death Stare|75px}} | | style="background:#4B69FF;" | {{item icon|Death Stare|75px}} | ||
| − | | style="background:# | + | | style="background:#E1CCC9;" | '''{{item link|Death Stare}}''' |
|- | |- | ||
| − | | style="background:# | + | | style="background:#BD190B;" rowspan="1" | '''{{class link|Engineer|br=yes|color=white}}''' |
| style="background:#8847FF;" | {{item icon|Hook, Line, and Thinker|75px}} | | style="background:#8847FF;" | {{item icon|Hook, Line, and Thinker|75px}} | ||
| − | | style="background:# | + | | style="background:#E1CCC9;" | '''{{item link|Hook, Line, and Thinker}}''' |
|- | |- | ||
| − | | style="background:# | + | | style="background:#BD190B;" rowspan="1" | '''{{class link|Medic|br=yes|color=white}}''' |
| style="background:#8847FF;" | {{item icon|Optic Nerve|75px}} | | style="background:#8847FF;" | {{item icon|Optic Nerve|75px}} | ||
| − | | style="background:# | + | | style="background:#E1CCC9;" | '''{{item link|Optic Nerve}}''' |
|- | |- | ||
| − | | style="background:# | + | | style="background:#BD190B;" rowspan="1" | '''{{class link|Spy|br=yes|color=white}}''' |
| style="background:#D32CE6;" | {{item icon|Gruesome Gourd|75px}} | | style="background:#D32CE6;" | {{item icon|Gruesome Gourd|75px}} | ||
| − | | style="background:# | + | | style="background:#E1CCC9;" | '''{{item link|Gruesome Gourd}}''' |
|- | |- | ||
| − | | align="left" style="background:# | + | | align="left" style="background:#BD190B;" | '''{{class link|Scout|color=white}}'''<br>'''{{class link|Heavy|color=white}}'''<br>'''{{class link|Engineer|color=white}}'''<br>'''{{class link|Medic|color=white}}'''<br>'''{{class link|Spy|color=white}}''' |
| style="background:#FFD700;" | {{item icon|Computron 5000|75px}} | | style="background:#FFD700;" | {{item icon|Computron 5000|75px}} | ||
| − | | style="background:# | + | | style="background:#E1CCC9;" | '''{{item link|Computron 5000}}''' |
|- | |- | ||
| − | | align="left" style="background:# | + | | align="left" style="background:#BD190B;" | '''{{class link|Soldier|color=white}}'''<br>'''{{class link|Pyro|color=white}}'''<br>'''{{class link|Demoman|color=white}}''' |
| style="background:#4B69FF;" | {{item icon|Trickster's Treats|75px}} | | style="background:#4B69FF;" | {{item icon|Trickster's Treats|75px}} | ||
| − | | style="background:# | + | | style="background:#E1CCC9;" | '''{{item link|Trickster's Treats}}''' |
|- | |- | ||
| − | | style="background:# | + | | style="background:#BD190B;" rowspan="12" | '''{{class link|All Classes|br=yes|color=white}}''' |
| style="background:#8847FF;" | {{item icon|Alakablamicon|75px}} | | style="background:#8847FF;" | {{item icon|Alakablamicon|75px}} | ||
| − | | style="background:# | + | | style="background:#E1CCC9;" | '''{{item link|Alakablamicon}}''' |
|- | |- | ||
| style="background:#4B69FF;" | {{item icon|Beanie The All-Gnawing|75px}} | | style="background:#4B69FF;" | {{item icon|Beanie The All-Gnawing|75px}} | ||
| − | | style="background:# | + | | style="background:#E1CCC9;" | '''{{item link|Beanie The All-Gnawing}}''' |
|- | |- | ||
| style="background:#D32CE6;" | {{item icon|Bone Cone|75px}} | | style="background:#D32CE6;" | {{item icon|Bone Cone|75px}} | ||
| − | | style="background:# | + | | style="background:#E1CCC9;" | '''{{item link|Bone Cone}}''' |
|- | |- | ||
| style="background:#4B69FF;" | {{item icon|Creepy Crawlers|75px}} | | style="background:#4B69FF;" | {{item icon|Creepy Crawlers|75px}} | ||
| − | | style="background:# | + | | style="background:#E1CCC9;" | '''{{item link|Creepy Crawlers}}''' |
|- | |- | ||
| style="background:#8847FF;" | {{item icon|Eyequarium|75px}} | | style="background:#8847FF;" | {{item icon|Eyequarium|75px}} | ||
| − | | style="background:# | + | | style="background:#E1CCC9;" | '''{{item link|Eyequarium}}''' |
|- | |- | ||
| style="background:#8847FF;" | {{item icon|Goalkeeper|75px}} | | style="background:#8847FF;" | {{item icon|Goalkeeper|75px}} | ||
| − | | style="background:# | + | | style="background:#E1CCC9;" | '''{{item link|Goalkeeper}}''' |
|- | |- | ||
| style="background:#4B69FF;" | {{item icon|Hat Outta Hell|75px}} | | style="background:#4B69FF;" | {{item icon|Hat Outta Hell|75px}} | ||
| − | | style="background:# | + | | style="background:#E1CCC9;" | '''{{item link|Hat Outta Hell}}''' |
|- | |- | ||
| style="background:#4B69FF;" | {{item icon|Scariest Mask EVER|75px}} | | style="background:#4B69FF;" | {{item icon|Scariest Mask EVER|75px}} | ||
| − | | style="background:# | + | | style="background:#E1CCC9;" | '''{{item link|Scariest Mask EVER}}''' |
|- | |- | ||
| style="background:#8847FF;" | {{item icon|Second-head Headwear|75px}} | | style="background:#8847FF;" | {{item icon|Second-head Headwear|75px}} | ||
| − | | style="background:# | + | | style="background:#E1CCC9;" | '''{{item link|Second-head Headwear}}''' |
|- | |- | ||
| style="background:#4B69FF;" | {{item icon|Spooky Head-Bouncers|75px}} | | style="background:#4B69FF;" | {{item icon|Spooky Head-Bouncers|75px}} | ||
| − | | style="background:# | + | | style="background:#E1CCC9;" | '''{{item link|Spooky Head-Bouncers}}''' |
|- | |- | ||
| style="background:#EB4B4B;" | {{item icon|Towering Patch of Pumpkins|75px}} | | style="background:#EB4B4B;" | {{item icon|Towering Patch of Pumpkins|75px}} | ||
| − | | style="background:# | + | | style="background:#E1CCC9;" | '''{{item link|Towering Patch of Pumpkins}}''' |
|- | |- | ||
| style="background:#4B69FF;" | {{item icon|Twisted Topper|75px}} | | style="background:#4B69FF;" | {{item icon|Twisted Topper|75px}} | ||
| − | | style="background:# | + | | style="background:#E1CCC9;" | '''{{item link|Twisted Topper}}''' |
| − | |||
| − | |||
| − | |||
| − | |||
| − | |||
| − | |||
| − | |||
| − | |||
| − | |||
| − | |||
| − | |||
| − | |||
| − | |||
| − | |||
| − | |||
| − | |||
| − | |||
| − | |||
| − | |||
| − | |||
| − | |||
| − | |||
| − | |||
| − | |||
|} | |} | ||
=== Pinturas de Guerra === | === Pinturas de Guerra === | ||
| − | {{main|War Paint/es|l1= | + | {{main|War Paint/es|l1=Pintura de Guerra}} |
==== {{decorated name|Scream Fortress XIII Collection}} ==== | ==== {{decorated name|Scream Fortress XIII Collection}} ==== | ||
<gallery> | <gallery> | ||
| Line 185: | Line 161: | ||
File:Backpack Skull Cracked War Paint Factory New.png|<div style="display:inline-block; padding:0px 3px; font-weight:bold; border-radius:4px; color:#FAFAFA;background:#4B69FF;">{{Decorated name|Skull Cracked}} | File:Backpack Skull Cracked War Paint Factory New.png|<div style="display:inline-block; padding:0px 3px; font-weight:bold; border-radius:4px; color:#FAFAFA;background:#4B69FF;">{{Decorated name|Skull Cracked}} | ||
</gallery> | </gallery> | ||
| + | |||
| + | === Burlas === | ||
| + | {{main|Taunts/es|l1=Burlas}} | ||
| + | {| class="wikitable collapsible" cellpadding="3" style="text-align:center;" | ||
| + | | width="90px" style="background:#BD190B;" | '''{{class link|Scout|br=yes|color=white}}''' | ||
| + | | style="background:#FF5252;" | {{item icon|Homerunner's Hobby|75px}} | ||
| + | | style="background:#E1CCC9;" | '''{{item link|Homerunner's Hobby}}''' | ||
| + | |- | ||
| + | | style="background:#BD190B;" | '''{{class link|Soldier|br=yes|color=white}}''' | ||
| + | | style="background:#FF5252;" | {{item icon|Profane Puppeteer|75px}} | ||
| + | | style="background:#E1CCC9;" | '''{{item link|Profane Puppeteer}}''' | ||
| + | |- | ||
| + | | style="background:#BD190B;" | '''{{class link|Demoman|br=yes|color=white}}''' | ||
| + | | style="background:#FF5252;" | {{item icon|Drunken Sailor|75px}} | ||
| + | | style="background:#E1CCC9;" | '''{{item link|Drunken Sailor}}''' | ||
| + | |- | ||
| + | | style="background:#BD190B;" | '''{{class link|Heavy|br=yes|color=white}}''' | ||
| + | | style="background:#FF5252;" | {{item icon|Bare Knuckle Beatdown|75px}} | ||
| + | | style="background:#E1CCC9;" | '''{{item link|Bare Knuckle Beatdown}}''' | ||
| + | |- | ||
| + | | style="background:#BD190B;" | '''{{class link|Medic|br=yes|color=white}}''' | ||
| + | | style="background:#FF5252;" | {{item icon|Mannbulance!|75px}} | ||
| + | | style="background:#E1CCC9;" | '''{{item link|Mannbulance!}}''' | ||
| + | |} | ||
=== Herramientas === | === Herramientas === | ||
{{main|Tools/es|l1=Herramientas}} | {{main|Tools/es|l1=Herramientas}} | ||
{| class="wikitable collapsible" cellpadding="3" style="text-align:center;" | {| class="wikitable collapsible" cellpadding="3" style="text-align:center;" | ||
| − | | width="90px" style="background:# | + | | width="90px" style="background:#FF5252;" | {{item icon|Crimson Cache Case|75px}} |
| − | | style="background:# | + | | style="background:#E1CCC9;" | '''{{item link|Crimson Cache Case}}''' |
|- | |- | ||
| − | | style="background:# | + | | style="background:#FF5252;" | {{item icon|Crimson Cache Key|75px}} |
| − | | style="background:# | + | | style="background:#E1CCC9;" | '''{{item link|Crimson Cache Key}}''' |
|- | |- | ||
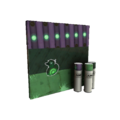
| − | | style="background:# | + | | style="background:#FF5252;" | {{item icon|Scream Fortress XIII War Paint Case|75px}} |
| − | | style="background:# | + | | style="background:#E1CCC9;" | '''{{item link|Scream Fortress XIII War Paint Case}}''' |
|- | |- | ||
| − | | style="background:# | + | | style="background:#FF5252;" | {{item icon|Scream Fortress XIII War Paint Key|75px}} |
| − | | style="background:# | + | | style="background:#E1CCC9;" | '''{{item link|Scream Fortress XIII War Paint Key}}''' |
|} | |} | ||
| Line 216: | Line 216: | ||
== Enlaces externos == | == Enlaces externos == | ||
| − | * "[https://www.teamfortress.com/post.php?id=89193 Scream Fortress XIII has arrived!]" | + | * "[https://www.teamfortress.com/post.php?id=89193 Scream Fortress XIII has arrived!]" {{lang icon|en}}, [[TF2 Official Website/es|Sitio Oficial de TF2]], 5 de octubre de 2021. |
{{Scream Fortress 2021 Nav}} | {{Scream Fortress 2021 Nav}} | ||
Revision as of 10:19, 16 November 2021
Scream Fortress 2021 o Scream Fortress XIII es un evento de Halloween y una actualización mayor iniciada y lanzada el 1 de octubre de 2021, con la activación de los mapas de Halloween, menús y cosmeticos con restricción. El Parche del 5 de octubre de 2021 trajo consigo 6 nuevos mapas de la comunidad con temática de Halloween, 20 nuevos objetos cosméticos creados por la comunidad, 5 nuevos objetos cosméticos con restricción creados por la comunidad, 5 nuevas burlas de la comunidad, 28 nuevos efectos Inusuales, y 13 nuevas Pinturas de Guerra. Los contratos de Halloween gratuitos fueron reactivados en el ConTracker para el evento con dos nuevos contratos añadidos para cubrir los nuevos mapas.
Índice
Cronología
El 1 de octubre de 2021, los cosméticos con restricción de Halloween y Luna Llena fueron activados. El menú de evento especial para seleccionar mapas de Halloween de Scream Fortress anteriores en el menú del Modo Casual fue activado.
El 5 de octubre de 2021, los contratos de Halloween fueron activados, las Gárgolas de Almas empezaron a recolectar almas y el menú de selección de mapas se activó con la selección de los nuevos mapas incluidos en el Scream Fortress de este año. Se han entregado Gárgolas de Almas a los jugadores que iniciaron el juego y no tenían una aún durante este periodo.
El 11 de octubre de 2021, el Portacadáveres recibió retroactivamente una restricción festiva. Siendo anteriormente un objeto de grado Mercenario en la Caja del Alijo Carmesí, el objeto fue eliminado de la lista de objetos posibles de la caja y movida a la lista de objetos de bonificación posibles. Como compensación, los juegos de dicho objeto en ese entonces recibieron un objeto aleatorio gratis de la lista de objetos de la Caja del Alijo Carmesí.
El evento terminó el 7 de noviembre de 2021.
Elementos añadidos
Mapas
| Nombre | Imagen | Modo de juego | Nombre de archivo |
|---|---|---|---|
| Erebus | 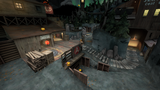
|
Ataque/Defensa |
cp_ambush_event
|
| Farmageddon | 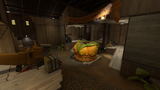
|
Aniquilación
|
pd_farmageddon
|
| Graveyard | 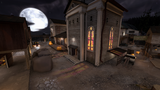
|
Arena |
arena_lumberyard_event
|
| Los Muertos | 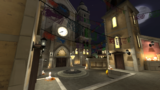
|
Rey de la Colina |
koth_los_muertos
|
| Sinthetic | 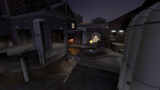
|
Rey de la Colina |
koth_synthetic_event
|
| Terror | 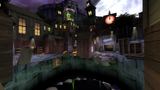
|
Carga Explosiva
|
pl_terror_event
|
Objetos cosméticos
Pinturas de Guerra
Colección Scream Fortress XIII
 Desafortunado
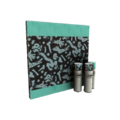 Huesos Rotos
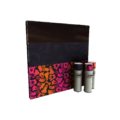 Fantasmas Fiesteros
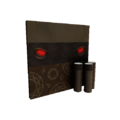 Nigromanteado
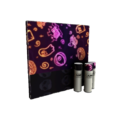 Neón-ween
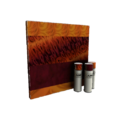 Poltergueistado
 A capa y espada
 Hornear y conquistar
 Veneno Potente
 Zarzaparriellado
 Almas Ardientes
 Espíritus Simples
 Cráneo agrietado


Burlas
| Hobby del Homerunner | ||
| Titiritero Profano | ||
| Marinero Borracho | ||
| Derrota a Manos Desnudas | ||
| ¡La Mannbulancia! |
Herramientas
| Caja del Alijo Carmesí | |
| Llave del Alijo Carmesí | |
| Caja de Pintura de Guerra 'Scream Fortress XIII' | |
| Llave de la Caja de Pintura de Guerra 'Scream Fortress XIII' |
Efectos Inusuales
| Lista de efectos inusuales del Scream Fortress 2021 | ||||||
|---|---|---|---|---|---|---|
| Efectos de cosméticos |  |
 |
 |
 |
 |
 |
| Astas templadas | Diablo diabólico | Salientes serrados | Sombras chillonas | RED | BLU | |
| Espectros inquietos | ||||||
 |
 |
 |
 |
 |
 | |
| Espectro infernal | Corona de fantasmas | Espectro ancestral | Mirón viridiscente | Ojos de fundición | Mirada ominosa | |
 |
 |
 |
 | |||
| Luna de calabaza | Espanto frenético | Poltergeist asustado | Acechador enérgico | |||
| Efectos de burlas |  |
 |
 |
 |
 |
 |
| Cadenas espectrales | Confinamiento maldito | RED | BLU | Florecimiento vacío | Barajadura mágica | |
| Caballero de cartas | ||||||
 |
 |
 |
 |
 |
 | |
| Pulso vigoroso | Espíritu atronador | Desafío galvánico | Halos tenues | Espectros abisales | Aurora borealis | |
 |
 | |||||
| Aurora australis | Aurora polaris | |||||
Galería
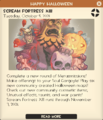
Notificación en el juego sobre el inicio del evento.
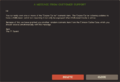
Notificación en el juego por parte del equipo de TF, sobre la restricción festiva que recibió el Portacadáveres.


Véase también
Enlaces externos
- "Scream Fortress XIII has arrived!" (Inglés), Sitio Oficial de TF2, 5 de octubre de 2021.
| ||||||||||||||||||||||
| ||||||||||||||||||||||||||||||||||||||||||||||||||||||||||||||||||||||||||||||||||||||||||||||||||