Difference between revisions of "Community Ravine strategy"
m (cleaning up~) |
m (Auto: Sync Map infobox) |
||
| (9 intermediate revisions by 6 users not shown) | |||
| Line 1: | Line 1: | ||
| − | {{stub}} | + | {{community strategy stub|Expand the "General Strategy" section to cover map locations in more detail. Potentially look at the class-specific strategies as well.}} |
| − | |||
{{Map infobox | {{Map infobox | ||
| − | |game-type=Arena | + | | map-strategy = yes |
| − | |file-name=arena_ravine | + | | map-status = official |
| − | |map-image=arenaravine.jpg | + | | map-name = Ravine |
| − | | map-environment = Desert | + | | map-game-type = Arena |
| − | | map-setting = Daylight, sunny | + | | map-file-name = arena_ravine |
| − | | map-ammo | + | | map-image = arenaravine.jpg |
| − | | map-ammo | + | | map-released = {{Patch name|8|19|2008}} |
| + | | map-released-major = Heavy Update | ||
| + | | map-environment = Desert | ||
| + | | map-setting = Daylight, sunny | ||
| + | | map-pickups-ammo-medium = 4 | ||
| + | | map-pickups-ammo-large = 2 | ||
}} | }} | ||
This article is about '''Community Ravine strategy'''. | This article is about '''Community Ravine strategy'''. | ||
| − | + | '''Note''': It is recommended to read the main [[Ravine]] article first to become familiar with the names of key map locations used in this article. | |
| − | |||
| − | + | {{TOC limit|3}} | |
| + | == General strategy == | ||
| + | * Cover is substantially more common towards the edges of the map. Working your way from outside-in allows for greater protection and a possibly way to set up chokepoints with properly placed teammates. | ||
| + | ==Class-specific strategy == | ||
=== {{class link|Scout}} === | === {{class link|Scout}} === | ||
| − | * Make sure that there is an Engineer or Medic as health will be lost easily. The tight corners of this map make for almost assured surprises from the enemy team. Use the [[Pistol]] to chip away at their health from a safe distance if at all possible. | + | * Make sure that there is an Engineer or Medic in your team as health will be lost easily. The tight corners of this map make for almost assured surprises from the enemy team. Use the [[Pistol]] to chip away at their health from a safe distance if at all possible. |
| + | * As there are no health packs on Ravine, use the [[Mad Milk]] to supply your team with health. | ||
=== {{class link|Soldier}} === | === {{class link|Soldier}} === | ||
| Line 27: | Line 34: | ||
=== {{class link|Pyro}} === | === {{class link|Pyro}} === | ||
* Stick to the edges as there is much more cover. This is also a good level for the [[Backburner]] as [[Ambushing|flanking]] opponents is common. Keep in mind, most flaming enemies will retreat to the water on the edges of the map. Take up a camping position to finish off weakened foes. | * Stick to the edges as there is much more cover. This is also a good level for the [[Backburner]] as [[Ambushing|flanking]] opponents is common. Keep in mind, most flaming enemies will retreat to the water on the edges of the map. Take up a camping position to finish off weakened foes. | ||
| − | * Due to there being no | + | * Due to there being no health packs in this level, make sure to defend the [[Engineer]]'s [[buildings]] so you may continue to replenish your Flamethrower fuel and health, and help teammates. |
=== {{class link|Demoman}} === | === {{class link|Demoman}} === | ||
* Staying away from Ravine's more open yard areas can allow you to guard the map's more cramped passageways easily. The indoors provide plenty of opportunities to lay down stickybomb traps, and giving enemies little room to avoid grenades. | * Staying away from Ravine's more open yard areas can allow you to guard the map's more cramped passageways easily. The indoors provide plenty of opportunities to lay down stickybomb traps, and giving enemies little room to avoid grenades. | ||
| − | + | * As Ravine lacks health pickups, equipping the [[Persian Persuader]] may be a good idea as there are two large ammo pickups on this map. | |
| − | * | ||
=== {{class link|Heavy}} === | === {{class link|Heavy}} === | ||
| Line 39: | Line 45: | ||
=== {{class link|Engineer}} === | === {{class link|Engineer}} === | ||
* Build a Dispenser and Sentry Gun directly outside of your spawn room, so teammates can come back and heal in safety. | * Build a Dispenser and Sentry Gun directly outside of your spawn room, so teammates can come back and heal in safety. | ||
| + | * Use the [[Gunslinger]] to quickly set up safe zones for your team! | ||
=== {{class link|Medic}} === | === {{class link|Medic}} === | ||
* As with all Arena maps, having a Medic on the team is very important, particularly here as there are no health pickups. Stay away from any Pyro rush and dodge fire as you will be the most targeted player. | * As with all Arena maps, having a Medic on the team is very important, particularly here as there are no health pickups. Stay away from any Pyro rush and dodge fire as you will be the most targeted player. | ||
| − | |||
* Since Medics are valuable on Ravine, try to stay with big groups of teammates, rather than just one. | * Since Medics are valuable on Ravine, try to stay with big groups of teammates, rather than just one. | ||
| Line 51: | Line 57: | ||
=== {{class link|Spy}} === | === {{class link|Spy}} === | ||
* The winding paths of Ravine's indoor areas allow Spies to lose pursuers with ease. Dodging around a corner and cloaking to escape is often easier due to the winding nature of the area. | * The winding paths of Ravine's indoor areas allow Spies to lose pursuers with ease. Dodging around a corner and cloaking to escape is often easier due to the winding nature of the area. | ||
| − | ** The [[Revolver]] could also be used to pick off weak pursuers on your trail. | + | ** The [[Revolver]] could also be used to pick off weak pursuers on your trail. |
| + | |||
| + | |||
{{Map strategy}} | {{Map strategy}} | ||
Latest revision as of 20:11, 20 January 2024
| “Sun Tzu's got nothing on us!” This article is a Community strategy stub. As such, it is not complete. You can help the Team Fortress Wiki Community Strategy Project by expanding it. Notes: Expand the "General Strategy" section to cover map locations in more detail. Potentially look at the class-specific strategies as well. |
| Ravine | |
|---|---|

| |
| Basic Information | |
| Map type: | Arena |
| File name: | arena_ravine
|
| Released: | August 19, 2008 Patch (Heavy Update) |
| Developer(s): | Valve |
| Map Info | |
| Environment: | Desert |
| Setting: | Daylight, sunny |
| Map Items | |
| Map Photos | |
| Map Overview | |
This article is about Community Ravine strategy.
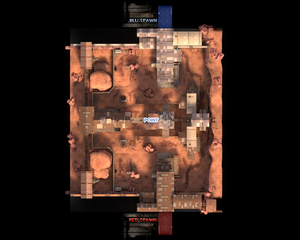
Note: It is recommended to read the main Ravine article first to become familiar with the names of key map locations used in this article.
General strategy
- Cover is substantially more common towards the edges of the map. Working your way from outside-in allows for greater protection and a possibly way to set up chokepoints with properly placed teammates.
Class-specific strategy
 Scout
Scout
- Make sure that there is an Engineer or Medic in your team as health will be lost easily. The tight corners of this map make for almost assured surprises from the enemy team. Use the Pistol to chip away at their health from a safe distance if at all possible.
- As there are no health packs on Ravine, use the Mad Milk to supply your team with health.
 Soldier
- Given the opportunity, you can Rocket Jump onto the roofs of some buildings in Ravine. Use the advantage of the high ground to abuse the classes that cannot reach your position easily.
 Pyro
Pyro
- Stick to the edges as there is much more cover. This is also a good level for the Backburner as flanking opponents is common. Keep in mind, most flaming enemies will retreat to the water on the edges of the map. Take up a camping position to finish off weakened foes.
- Due to there being no health packs in this level, make sure to defend the Engineer's buildings so you may continue to replenish your Flamethrower fuel and health, and help teammates.
 Demoman
- Staying away from Ravine's more open yard areas can allow you to guard the map's more cramped passageways easily. The indoors provide plenty of opportunities to lay down stickybomb traps, and giving enemies little room to avoid grenades.
- As Ravine lacks health pickups, equipping the Persian Persuader may be a good idea as there are two large ammo pickups on this map.
 Heavy
Heavy
- For the first half of the round, staying near the open area near your team's spawn room can be advantageous, as the absence of cover in the region could prevent a serious push by enemies into your team's side. Pursuing enemies indoors will allow them to use Ravine's many corners against you.
 Engineer
- Build a Dispenser and Sentry Gun directly outside of your spawn room, so teammates can come back and heal in safety.
- Use the Gunslinger to quickly set up safe zones for your team!
 Medic
Medic
- As with all Arena maps, having a Medic on the team is very important, particularly here as there are no health pickups. Stay away from any Pyro rush and dodge fire as you will be the most targeted player.
- Since Medics are valuable on Ravine, try to stay with big groups of teammates, rather than just one.
 Sniper
- While standing on the control point itself is often dangerous, looking through Ravine's central building can afford you a clear shot from one side of the map to the other.
- Spies could easily get to your position. As a Sniper, you should check your back often to prevent any Spies from having the opportunity to Backstab.
 Spy
Spy
- The winding paths of Ravine's indoor areas allow Spies to lose pursuers with ease. Dodging around a corner and cloaking to escape is often easier due to the winding nature of the area.
- The Revolver could also be used to pick off weak pursuers on your trail.

