Difference between revisions of "Smissmas 2014/de"
m (Corrected few mistakes.) |
BrazilianNut (talk | contribs) m |
||
| (2 intermediate revisions by 2 users not shown) | |||
| Line 1: | Line 1: | ||
| + | {{update trans}} | ||
| + | |||
{{DISPLAYTITLE:Smissmas 2014}} | {{DISPLAYTITLE:Smissmas 2014}} | ||
| − | |||
| − | |||
| − | |||
| − | |||
{{patch info|12|22|2014}} | {{patch info|12|22|2014}} | ||
| + | {{Infobox | ||
| + | | title = Smissmas 2014 | ||
| + | | image = Smissmas14 Cup.png | ||
| + | | imagewidth = 380px | ||
| + | }} | ||
{{Quotation | {{Quotation | ||
| '''TF2 Blog''' | | '''TF2 Blog''' | ||
| Line 10: | Line 13: | ||
}} | }} | ||
| − | [[ | + | Das '''Smissmas 2014'''-Update war ein [[Patches/de#Große Updates|großes Update]] für ''[[Team Fortress 2/de|Team Fortress 2]]'' und wurde mit dem {{Patch name|12|22|2014}} veröffentlicht. Es ist der Nachfolger der früheren, [[Steam Workshop/de|von der Community erstellten]] Updates, der in Zusammenhang mit den Weihnachtseinsendungen im Steam Workshop entstand. |
| − | Das | + | Das Update fügte 28 neue, winterliche [[Cosmetic items/de|kosmetische Gegenstände]] und 7 neue [[Festive weapons/de|festliche Waffen]] hinzu. Die Highlights dieses Updates waren hingegen ein neuer [[Mann Co. Beta Maps/de|Beta]]-[[List of game modes/de|Spielmodus]], ''[[Mannpower/de|Mannpower]]'', sowie zwei neue Betakarten, [[Foundry (Capture the Flag)/de|Foundry (Flagge Erobern)]] und [[Gorge (Capture the Flag)/de|Gorge (Flagge Erobern)]]. Viele bereits existierende [[Demoman/de|Demoman]]-Waffen wurden in ihrer Funktion abgeändert. Außerdem hinzugefügt wurden drei komplett neue Waffen, der ''{{item link|Quickiebomb Launcher}}'', der ''{{item link|Iron Bomber}}'' und die ''{{item link|Panic Attack}}''. |
| − | + | == Neuerungen == | |
| + | === Karten === | ||
| + | {{main|List of maps/de|l1=Liste der Karten}} | ||
| + | {| class="wikitable" cellpadding=2 style="text-align:center;" | ||
| + | |- style="height: 20px;" | ||
| + | ! class="header" style="background:#6B0000; color:#FFFFFF" | {{common string|Name}} | ||
| + | ! class="header" style="background:#6B0000; color:#FFFFFF" | {{common string|Picture}} | ||
| + | ! class="header" style="background:#6B0000; color:#FFFFFF" | {{common string|Game mode}} | ||
| + | ! class="header" style="background:#6B0000; color:#FFFFFF" | {{common string|File name}} | ||
| + | |- | ||
| + | | style="background:#990000;" | '''[[Foundry (Capture the Flag){{if lang}}|<span style="color:#FFF;">Foundry<br/>{{parenthesis|{{gamemode name|Capture the Flag}}}}</span>]]''' | ||
| + | | style="background:#FAE5E5;" | [[File:Ctf_foundry.jpg|160px|link=Foundry (Capture the Flag){{if lang}}]] | ||
| + | | style="background:#FAE5E5;" | '''{{gamemode link|Mannpower}}'''<br>[[File:Backpack Grappling Hook.png|50px|link=Mannpower{{if lang}}]] | ||
| + | | style="background:#FAE5E5;" | {{code|ctf_foundry}} | ||
| + | |- | ||
| + | | style="background:#990000;" | '''[[Gorge (Capture the Flag){{if lang}}|<span style="color:#FFF;">Gorge<br/>{{parenthesis|{{gamemode name|Capture the Flag}}}}</span>]]''' | ||
| + | | style="background:#FAE5E5;" | [[File:Ctf gorge.jpg|160px|link=Gorge (Capture the Flag){{if lang}}]] | ||
| + | | style="background:#FAE5E5;" | '''{{gamemode link|Mannpower}}'''<br>[[File:Backpack Grappling Hook.png|50px|link=Mannpower{{if lang}}]] | ||
| + | | style="background:#FAE5E5;" | {{code|ctf_gorge}} | ||
| + | |} | ||
| − | |||
=== Waffen === | === Waffen === | ||
{{main|Weapons/de|l1=Waffen}} | {{main|Weapons/de|l1=Waffen}} | ||
{| class="wikitable" cellpadding=2 style="text-align:center;" | {| class="wikitable" cellpadding=2 style="text-align:center;" | ||
| − | | width=" | + | | width="85px" style="background:#6B0000;" rowspan="2" | '''{{class link|Demoman|br=yes|color=white}}''' |
| − | | | + | | style="background:#990000;" | {{item icon|Iron Bomber|75px}} |
| − | | style="background: #FAE5E5;" | '''{{item link|Iron Bomber}}''' | + | | style="background:#FAE5E5;" | '''{{item link|Iron Bomber}}''' |
|- | |- | ||
| − | | | + | | style="background:#990000;" | {{item icon|Quickiebomb Launcher|75px}} |
| − | | style="background: #FAE5E5;" | '''{{item link|Quickiebomb Launcher | + | | style="background:#FAE5E5;" | '''{{item link|Quickiebomb Launcher}}''' |
| − | |||
| − | |||
| − | |||
| − | |||
|- | |- | ||
| + | | align="left" style="background:#6B0000;" | '''{{class link|Soldier|color=white}}'''<br/>'''{{class link|Pyro|color=white}}'''<br/>'''{{class link|Heavy|color=white}}'''<br/>'''{{class link|Engineer|color=white}}''' | ||
| + | | style="background:#990000;" | {{item icon|Panic Attack|75px}} | ||
| + | | style="background:#FAE5E5;" | '''{{item link|Panic Attack}}''' | ||
|} | |} | ||
| − | === | + | === Festliche Waffen === |
| − | {{main| | + | {{main|Festive weapons/de|l1=Festliche Waffen}} |
{| class="wikitable collapsible" cellpadding="3" style="text-align:center;" | {| class="wikitable collapsible" cellpadding="3" style="text-align:center;" | ||
| − | | width=" | + | | width="85px" style="background:#6B0000;" | '''{{class link|Scout|br=yes|color=white}}''' |
| − | | | + | | style="background:#990000;" | {{item icon|Festive Bonk! Atomic Punch|75px}} |
| − | | style="background: #FAE5E5;"| '''{{item link| | + | | style="background:#FAE5E5;" | '''{{item link|Festive Bonk! Atomic Punch}}''' |
|- | |- | ||
| − | | | + | | style="background:#6B0000;" | '''{{class link|Pyro|br=yes|color=white}}''' |
| − | | style="background: #FAE5E5;"| '''{{item link| | + | | style="background:#990000;" | {{item icon|Festive Backburner|75px}} |
| + | | style="background:#FAE5E5;" | '''{{item link|Festive Backburner}}''' | ||
|- | |- | ||
| − | | | + | | style="background:#6B0000;" | '''{{class link|Demoman|br=yes|color=white}}''' |
| − | | style="background: #FAE5E5;"| '''{{item link| | + | | style="background:#990000;" | {{item icon|Festive Chargin' Targe|75px}} |
| + | | style="background:#FAE5E5;" | '''{{item link|Festive Chargin' Targe}}''' | ||
|- | |- | ||
| − | | | + | | style="background:#6B0000;" | '''{{class link|Medic|br=yes|color=white}}''' |
| − | | style="background: #FAE5E5;"| '''{{item link| | + | | style="background:#990000;" | {{item icon|Festive Bonesaw|75px}} |
| + | | style="background:#FAE5E5;" | '''{{item link|Festive Bonesaw}}''' | ||
|- | |- | ||
| − | | | + | | style="background:#6B0000;" | '''{{class link|Sniper|br=yes|color=white}}''' |
| − | | | + | | style="background:#990000;" | {{item icon|Festive SMG|75px}} |
| − | | style="background: #FAE5E5;"| '''{{item link| | + | | style="background:#FAE5E5;" | '''{{item link|Festive SMG}}''' |
|- | |- | ||
| − | | | + | | style="background:#6B0000;" | '''{{class link|Spy|br=yes|color=white}}''' |
| − | | | + | | style="background:#990000;" | {{item icon|Festive Revolver|75px}} |
| − | | style="background: #FAE5E5;"| '''{{item link| | + | | style="background:#FAE5E5;" | '''{{item link|Festive Revolver}}''' |
|- | |- | ||
| − | | align="center" style="background: #990000;" | {{item icon| | + | | align="left" style="background:#6B0000;" | '''{{class link|Soldier|color=white}}'''<br/>'''{{class link|Pyro|color=white}}'''<br/>'''{{class link|Heavy|color=white}}'''<br/>'''{{class link|Engineer|color=white}}''' |
| − | | style="background: #FAE5E5;"| '''{{item link| | + | | style="background:#990000;" | {{item icon|Festive Shotgun|75px}} |
| + | | style="background:#FAE5E5;" | '''{{item link|Festive Shotgun}}''' | ||
| + | |} | ||
| + | |||
| + | === Kosmetische Gegenstände === | ||
| + | {{main|Cosmetic items/de|l1=Kosmetische Gegenstände}} | ||
| + | {| class="wikitable collapsible" cellpadding="3" style="text-align:center;" | ||
| + | | width="85px" style="background:#6B0000;" rowspan="3" | '''{{class link|Scout|br=yes|color=white}}''' | ||
| + | | style="background:#990000;" | {{item icon|Courtier's Collar|75px}} | ||
| + | | style="background:#FAE5E5;" | '''{{item link|Courtier's Collar}}''' | ||
|- | |- | ||
| − | | | + | | style="background:#990000;" | {{item icon|Harlequin's Hooves|75px}} |
| − | | style="background: #FAE5E5;"| '''{{item link| | + | | style="background:#FAE5E5;" | '''{{item link|Harlequin's Hooves}}''' |
|- | |- | ||
| − | | | + | | style="background:#990000;" | {{item icon|Mountebank's Masque|75px}} |
| − | | style="background: #FAE5E5;"| '''{{item link| | + | | style="background:#FAE5E5;" | '''{{item link|Mountebank's Masque}}''' |
|- | |- | ||
| − | | | + | | style="background:#6B0000;" | '''{{class link|Soldier|br=yes|color=white}}''' |
| − | | style="background: #FAE5E5;"| '''{{item link| | + | | style="background:#990000;" | {{item icon|Skullcap|75px}} |
| + | | style="background:#FAE5E5;" | '''{{item link|Skullcap}}''' | ||
|- | |- | ||
| − | | | + | | style="background:#6B0000;" rowspan="5" | '''{{class link|Pyro|br=yes|color=white}}''' |
| − | | | + | | style="background:#990000;" | {{item icon|Black Knight's Bascinet|75px}} |
| − | | style="background: #FAE5E5;"| '''{{item link| | + | | style="background:#FAE5E5;" | '''{{item link|Black Knight's Bascinet}}''' |
|- | |- | ||
| − | | | + | | style="background:#990000;" | {{item icon|Charred Chainmail|75px}} |
| − | | style="background: #FAE5E5;"| '''{{item link| | + | | style="background:#FAE5E5;" | '''{{item link|Charred Chainmail}}''' |
|- | |- | ||
| − | | | + | | style="background:#990000;" | {{item icon|Pyromancer's Hood|75px}} |
| − | | style="background: #FAE5E5;"| '''{{item link| | + | | style="background:#FAE5E5;" | '''{{item link|Pyromancer's Hood}}''' |
|- | |- | ||
| − | | | + | | style="background:#990000;" | {{item icon|Pyromancer's Raiments|75px}} |
| − | + | | style="background:#FAE5E5;" | '''{{item link|Pyromancer's Raiments}}''' | |
| − | | style="background: #FAE5E5;"| '''{{item link| | ||
|- | |- | ||
| − | | | + | | style="background:#990000;" | {{item icon|Torcher's Tabard|75px}} |
| − | | style="background: #FAE5E5;"| '''{{item link| | + | | style="background:#FAE5E5;" | '''{{item link|Torcher's Tabard}}''' |
|- | |- | ||
| − | | | + | | style="background:#6B0000;" rowspan="3" | '''{{class link|Demoman|br=yes|color=white}}''' |
| − | | | + | | style="background:#990000;" | {{item icon|Scot Bonnet|75px}} |
| − | | style="background: #FAE5E5;"| '''{{item link| | + | | style="background:#FAE5E5;" | '''{{item link|Scot Bonnet}}''' |
|- | |- | ||
| − | | | + | | style="background:#990000;" | {{item icon|Storm Stompers|75px}} |
| − | | style="background: #FAE5E5;"| '''{{item link| | + | | style="background:#FAE5E5;" | '''{{item link|Storm Stompers}}''' |
|- | |- | ||
| − | | | + | | style="background:#990000;" | {{item icon|Valhalla Helm|75px}} |
| − | | style="background: #FAE5E5;"| '''{{item link| | + | | style="background:#FAE5E5;" | '''{{item link|Valhalla Helm}}''' |
|- | |- | ||
| − | | | + | | style="background:#6B0000;" rowspan="2" | '''{{class link|Heavy|br=yes|color=white}}''' |
| − | | style="background: #FAE5E5;"| '''{{item link| | + | | style="background:#990000;" | {{item icon|Old Man Frost|75px}} |
| + | | style="background:#FAE5E5;" | '''{{item link|Old Man Frost}}''' | ||
|- | |- | ||
| − | | | + | | style="background:#990000;" | {{item icon|Siberian Facehugger|75px}} |
| − | | style="background: #FAE5E5;"| '''{{item link| | + | | style="background:#FAE5E5;" | '''{{item link|Siberian Facehugger}}''' |
|- | |- | ||
| − | | | + | | style="background:#6B0000;" rowspan="5" | '''{{class link|Engineer|br=yes|color=white}}''' |
| − | | | + | | style="background:#990000;" | {{item icon|Clubsy The Seal|75px}} |
| − | | style="background: #FAE5E5;"| '''{{item link| | + | | style="background:#FAE5E5;" | '''{{item link|Clubsy The Seal}}''' |
|- | |- | ||
| − | | | + | | style="background:#990000;" | {{item icon|Conagher's Combover|75px}} |
| − | | style="background: #FAE5E5;"| '''{{item link| | + | | style="background:#FAE5E5;" | '''{{item link|Conagher's Combover}}''' |
|- | |- | ||
| − | | | + | | style="background:#990000;" | {{item icon|Cop Caller|75px}} |
| − | + | | style="background:#FAE5E5;" | '''{{item link|Cop Caller}}''' | |
| − | | style="background: #FAE5E5;"| '''{{item link| | ||
|- | |- | ||
| − | | | + | | style="background:#990000;" | {{item icon|Holstered Heaters|75px}} |
| − | | style="background: #FAE5E5;"| '''{{item link| | + | | style="background:#FAE5E5;" | '''{{item link|Holstered Heaters}}''' |
|- | |- | ||
| − | | | + | | style="background:#990000;" | {{item icon|Thermal Insulation Layer|75px}} |
| − | | style="background: #FAE5E5;"| '''{{item link| | + | | style="background:#FAE5E5;" | '''{{item link|Thermal Insulation Layer}}''' |
|- | |- | ||
| − | | | + | | style="background:#6B0000;" rowspan="2" | '''{{class link|Medic|br=yes|color=white}}''' |
| − | | style="background: #FAE5E5;"| '''{{item link| | + | | style="background:#990000;" | {{item icon|Surgeon's Shako|75px}} |
| + | | style="background:#FAE5E5;" | '''{{item link|Surgeon's Shako}}''' | ||
|- | |- | ||
| − | | | + | | style="background:#990000;" | {{item icon|Unknown Mann|75px}} |
| − | + | | style="background:#FAE5E5;" | '''{{item link|Unknown Mann}}''' | |
| − | | style="background: #FAE5E5;"| '''{{item link| | ||
|- | |- | ||
| − | | | + | | style="background:#6B0000;" rowspan="4" | '''{{class link|Sniper|br=yes|color=white}}''' |
| − | | style="background: #FAE5E5;"| '''{{item link| | + | | style="background:#990000;" | {{item icon|Bushman's Bristles|75px}} |
| + | | style="background:#FAE5E5;" | '''{{item link|Bushman's Bristles}}''' | ||
|- | |- | ||
| − | | | + | | style="background:#990000;" | {{item icon|Marksman's Mohair|75px}} |
| − | | style="background: #FAE5E5;"| '''{{item link| | + | | style="background:#FAE5E5;" | '''{{item link|Marksman's Mohair}}''' |
|- | |- | ||
| − | | | + | | style="background:#990000;" | {{item icon|Professional's Ushanka|75px}} |
| − | + | | style="background:#FAE5E5;" | '''{{item link|Professional's Ushanka}}''' | |
| − | |||
| − | |||
| − | |||
| − | |||
| − | |||
| − | | style="background: #FAE5E5;"| '''{{item link| | ||
| − | |||
| − | |||
| − | |||
| − | |||
|- | |- | ||
| − | | | + | | style="background:#990000;" | {{item icon|Wally Pocket|75px}} |
| − | + | | style="background:#FAE5E5;" | '''{{item link|Wally Pocket}}''' | |
| − | | style="background: #FAE5E5;"| '''{{item link| | ||
|- | |- | ||
| − | | | + | | style="background:#6B0000;" rowspan="3" | '''{{class link|Spy|br=yes|color=white}}''' |
| − | | | + | | style="background:#990000;" | {{item icon|Pocket Momma|75px}} |
| − | | style="background: #FAE5E5;"| '''{{item link| | + | | style="background:#FAE5E5;" | '''{{item link|Pocket Momma}}''' |
|- | |- | ||
| − | | | + | | style="background:#990000;" | {{item icon|Puffy Provocateur|75px}} |
| − | + | | style="background:#FAE5E5;" | '''{{item link|Puffy Provocateur}}''' | |
| − | | style="background: #FAE5E5;"| '''{{item link| | ||
|- | |- | ||
| − | | | + | | style="background:#990000;" | {{item icon|Stealthy Scarf|75px}} |
| − | + | | style="background:#FAE5E5;" | '''{{item link|Stealthy Scarf}}''' | |
| − | |||
| − | |||
| − | |||
| − | |||
| − | | style="background: #FAE5E5;"| '''{{item link| | ||
|- | |- | ||
| + | | style="background:#6B0000;" | '''{{class link|All Classes|br=yes|color=white}}''' | ||
| + | | style="background:#990000;" | {{item icon|Co-Pilot|75px}} | ||
| + | | style="background:#FAE5E5;" | '''{{item link|Co-Pilot}}''' | ||
|} | |} | ||
| Line 170: | Line 189: | ||
{{main|Tools/de|l1=Werkzeuge}} | {{main|Tools/de|l1=Werkzeuge}} | ||
{| class="wikitable collapsible" cellpadding="3" style="text-align:center;" | {| class="wikitable collapsible" cellpadding="3" style="text-align:center;" | ||
| − | | | + | | style="background:#6B0000;" | {{Icon item|Naughty Winter Crate Key 2014|75px}} |
| − | | | + | | style="background:#990000;" | '''[[Naughty Winter Crate Key 2014{{if lang}}|<font color="white">{{item name|Naughty Winter Crate Key 2014}}]]''' |
| − | | style="background: #FAE5E5;"| Wird benutzt, um die {{item link|Naughty Winter Crate 2014}} zu öffnen. Dieser Schlüssel öffnet keine Artigen Kisten. Nach dem 16.2.2015 wird er zu einem normalen Schlüssel. | + | | style="background:#FAE5E5;" align="left" | Wird benutzt, um die {{item link|Naughty Winter Crate 2014}} zu öffnen. Dieser Schlüssel öffnet keine Artigen Kisten. Nach dem 16.2.2015 wird er zu einem normalen Schlüssel. |
|- | |- | ||
| − | | | + | | style="background:#6B0000;" | {{Icon item|Nice Winter Crate Key 2014|75px}} |
| − | | | + | | style="background:#990000;" | '''[[Nice Winter Crate Key 2014{{if lang}}|<font color="white">{{item name|Nice Winter Crate Key 2014}}]]''' |
| − | | style="background: #FAE5E5;"| Wird benutzt, um die {{item link|Nice Winter Crate 2014}} zu öffnen. Dieser Schlüssel öffnet keine Unartigen Kisten. Nach dem 16.2.2015 wird er zu einem normalen Schlüssel. | + | | style="background:#FAE5E5;" align="left" | Wird benutzt, um die {{item link|Nice Winter Crate 2014}} zu öffnen. Dieser Schlüssel öffnet keine Unartigen Kisten. Nach dem 16.2.2015 wird er zu einem normalen Schlüssel. |
|- | |- | ||
|} | |} | ||
=== Aktionsgegenstände === | === Aktionsgegenstände === | ||
| + | {{main|Action items/de|l1=Aktionsgegenstände}} | ||
{| class="wikitable collapsible" cellpadding=2 style="text-align:center;" | {| class="wikitable collapsible" cellpadding=2 style="text-align:center;" | ||
| − | | | + | | width="85px" style="background: #990000;" | {{Icon item|Grappling Hook|75px}} |
| − | | style="background: #FAE5E5;" | '''{{item link|Grappling Hook}}''' | + | | style="background:#FAE5E5;" | '''{{item link|Grappling Hook}}''' |
| − | |||
| − | |||
| − | |||
| − | |||
| − | |||
| − | |||
| − | |||
| − | |||
| − | |||
| − | |||
| − | |||
| − | |||
| − | |||
| − | |||
| − | |||
| − | |||
| − | |||
| − | |||
| − | |||
|} | |} | ||
| Line 211: | Line 212: | ||
! style="background: #6B0000;" class="header" | <span style="color: white;"> Änderungen | ! style="background: #6B0000;" class="header" | <span style="color: white;"> Änderungen | ||
|- | |- | ||
| − | ! style="background: #990000;" rowspan=20 | {{ | + | ! width="85px" style="background:#990000;" rowspan=20 | {{class link|Demoman|br=yes|color=white}} |
! style="background: #FAE5E5;" rowspan=2 | Alle explosiven Primär-<br>und Sekundärwaffen | ! style="background: #FAE5E5;" rowspan=2 | Alle explosiven Primär-<br>und Sekundärwaffen | ||
|- | |- | ||
| Line 271: | Line 272: | ||
== Externe Links == | == Externe Links == | ||
| − | * [ | + | * [https://www.teamfortress.com/post.php?id=15304 Merry Smissmas, Everyone!] {{lang icon|en}} |
{{Smissmas 2014 Nav}} | {{Smissmas 2014 Nav}} | ||
| − | {{ | + | {{Smissmas Events Nav}} |
| − | + | {{Major Updates Nav}} | |
| − | |||
| − | |||
Latest revision as of 23:27, 21 January 2025
| Diese Übersetzung müsste erneuert werden. Du kannst helfen, indem du sie mit Inhalten von Smissmas 2014 (Quelltext) bearbeitest. Siehe Auch Help:Language translation. |
|

| “ | Bald ist Smissmas, und jeder im TF2-Team hat schon eifrig Geschenke zusammengestellt und stand in einer Gruppe unter dem Valve-Mistelzweig. Die verteilten Küsschen halten sich in Grenzen, aber wir glauben, dass da noch etwas Großes kommt. Richtig gehört, wir werden hier auch die ganze verdammte Woche lang stehen und warten, wenn's auch was für uns gibt. Versucht ihr das mal, Dota 2-Team! Ihr auch, CS:GO!
— TF2 Blog
|
” |
Das Smissmas 2014-Update war ein großes Update für Team Fortress 2 und wurde mit dem 22. Dezember 2014 Patch veröffentlicht. Es ist der Nachfolger der früheren, von der Community erstellten Updates, der in Zusammenhang mit den Weihnachtseinsendungen im Steam Workshop entstand.
Das Update fügte 28 neue, winterliche kosmetische Gegenstände und 7 neue festliche Waffen hinzu. Die Highlights dieses Updates waren hingegen ein neuer Beta-Spielmodus, Mannpower, sowie zwei neue Betakarten, Foundry (Flagge Erobern) und Gorge (Flagge Erobern). Viele bereits existierende Demoman-Waffen wurden in ihrer Funktion abgeändert. Außerdem hinzugefügt wurden drei komplett neue Waffen, der Hastbombenwerfer, der Eisenbomber und die Panikattacke.
Inhaltsverzeichnis
Neuerungen
Karten
| Name | Bild | Spielmodus | Dateiname |
|---|---|---|---|
| Foundry (Flagge erobern) |
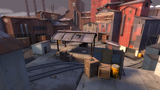
|
Mannpower
|
ctf_foundry
|
| Gorge (Flagge erobern) |
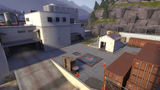
|
Mannpower
|
ctf_gorge
|
Waffen
| Eisenbomber | ||
| Hastbombenwerfer | ||
| Panikattacke |
Festliche Waffen
| Festlicher Bonk! Atomenergie-Drink | ||
| Festlicher Rückenschmorer | ||
| Festlicher Sturmschild | ||
| Festliche Knochensäge | ||
| Festliches SMG | ||
| Festlicher Revolver | ||
| Festliche Schrotflinte |
Kosmetische Gegenstände
Werkzeuge
| Unartiger Winterkistenschlüssel 2014 | Wird benutzt, um die Unartige Winterkiste 2014 zu öffnen. Dieser Schlüssel öffnet keine Artigen Kisten. Nach dem 16.2.2015 wird er zu einem normalen Schlüssel. | |
| Artiger Winterkistenschlüssel 2014 | Wird benutzt, um die Artige Winterkiste 2014 zu öffnen. Dieser Schlüssel öffnet keine Unartigen Kisten. Nach dem 16.2.2015 wird er zu einem normalen Schlüssel. |
Aktionsgegenstände
| Enterhaken |
Veränderte Waffen
| Klasse | Waffe | Änderungen |
|---|---|---|
| Alle explosiven Primär- und Sekundärwaffen | ||
| ||
Granatwerfer | ||
Haftbombenwerfer | ||
| ||
Stimmungskanone | ||
| ||
Lochnesser | ||
| ||
Ali Babas Stiefel Schwarzzhändler | ||
Steuerrad | ||
| ||
Schottischer Widerstand | ||
Schottischer Schädelspalter | ||
Claidheamh Mòr | ||
Galerie
Die neue Waffe Panikattacke auf dem TF2-Blog.
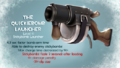
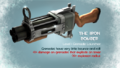
Die neue Waffe Hastbombenwerfer auf dem TF2-Blog.
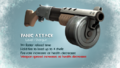
Die neue Waffe Eisenbomber auf dem TF2-Blog.


Externe Links
- Merry Smissmas, Everyone! (Englisch)
| |||||
| ||||||||||||||||||||||||||||||||||||||||||||||||||||||||||||||||||||||||||||||||||||||||||||||||||