Difference between revisions of "Community Harvest Event strategy"
m (Auto: Sync Map infobox) |
|||
| (21 intermediate revisions by 16 users not shown) | |||
| Line 1: | Line 1: | ||
| − | {{stub}} | + | {{community strategy stub|Page is almost empty.}} |
| − | |||
{{Map infobox | {{Map infobox | ||
| − | | game-type = King of the Hill | + | | map-strategy = yes |
| − | | file-name = koth_harvest_event | + | | map-status = community |
| − | | | + | | map-name = Harvest Event |
| − | | map-image = koth_harvest_event_mid. | + | | map-game-type = King of the Hill |
| − | | map-environment = Farmland | + | | map-file-name = koth_harvest_event |
| − | | map-setting = Nighttime | + | | map-released = {{Patch name|10|29|2009}} |
| − | | map-hazards = [[Pumpkin bomb]]s, [[Ghost]] | + | | map-released-major = Haunted Halloween Special |
| − | | map-health | + | | map-image = koth_harvest_event_mid.png |
| − | | map-health | + | | map-environment = Farmland |
| − | | map | + | | map-setting = Nighttime |
| − | + | | map-hazards = [[Pumpkin bomb]]s, [[Ghost]] | |
| − | | map- | + | | map-pickups-health-small = 4 |
| − | | map | + | | map-pickups-health-medium = 4 |
| − | + | | map-pickups-ammo-medium = 8 | |
| + | | map-pickups-special-sgg = yes | ||
| + | | map-pickups-special-pumpkin = yes | ||
}} | }} | ||
| + | |||
| + | {{Other uses|this=strategy specific to the [[Halloween map|Halloween]] variant of [[Harvest]]|for=strategy specific to the standard variant|Community Harvest strategy}} | ||
This article is about '''Community Harvest Event strategy'''. | This article is about '''Community Harvest Event strategy'''. | ||
| − | + | '''Note''': It is recommended to read the main [[Harvest Event]] article first to become familiar with the names of key map locations used in this article. | |
| − | |||
| − | |||
| − | |||
| − | |||
| − | |||
| − | |||
| − | |||
| − | |||
| − | |||
| − | |||
| − | |||
| − | |||
| − | |||
| − | |||
| − | |||
| − | |||
| − | |||
| − | |||
| − | |||
| − | |||
| − | |||
| − | |||
| − | |||
| − | |||
| − | |||
| − | |||
| − | |||
| − | |||
| − | |||
| − | |||
| − | |||
| − | |||
| − | |||
| − | |||
| − | |||
| − | |||
| − | |||
| − | |||
| − | |||
| − | |||
| − | |||
| − | |||
| − | |||
| − | |||
| − | |||
| − | |||
| − | |||
| − | |||
| − | |||
| − | |||
| + | {{TOC limit|3}} | ||
| − | =={{ | + | ==General strategy== |
| − | + | {{see also|Community Harvest strategy}} | |
| + | ''This Halloween map features [[pumpkin bomb]]s, [[Halloween pumpkin]]s, Zepheniah's [[Ghost]], and the [[Soul Gargoyle]]; see [[Community Halloween maps strategy]].'' | ||
| − | + | This map is near-identical to [[Harvest]], so you can use any [[Community Harvest strategy|strategies]] it has. For the Halloween items littered around the map make sure you watch what corners you go into this is because you can run into Zepheniah's [[Ghost]] or run in front of a pumpkin bomb which might be harder or easier depending on what class you play. If you don’t watch you can become an easy target for other players. | |
| − | |||
| + | ==Class-specific strategy vs. Zepheniah's [[Ghost]]== | ||
| + | === {{class link|Scout}}=== | ||
| + | Scout is the most likely to accidentally run into him due to his speed. It might help to strife in entrance of hallways before running in. | ||
| + | === {{class link|Soldier}}=== | ||
| + | Soldier’s long range damage can help with killing any enemies who are stunned by Zepheniah while keeping your distance Zepheniah himself. | ||
| + | === {{class link|Pyro}}=== | ||
| + | The [[Powerjack]] is helpful for getting you around the map but it might put you in front of Zepheniah. Airblast can be used to push players back into Zepheniah to restart how long they are stunned for. | ||
| + | === {{class link|Demoman}} === | ||
| + | Be careful what hallways you place in because Zepheniah can make them useless by detouring them away. Pipes can be used to punish stunned players while keeping you distance. | ||
| + | === {{class link|Heavy}} === | ||
| + | While you have a better chance of not running into Zepheniah as heavy, you will have a harder time getting away from Zepheniah. This can be avoided by being careful what corners you jump. | ||
| + | === {{class link|Engineer}} === | ||
| + | Sentry Guns can be placed in hallway exit to catch stunned players who are running way from Zepheniah or players trying to get ammo or health but it might be more helpful for your team to place the sentry by the control point. | ||
| + | === {{class link|Medic}} === | ||
| + | Medics have to be carful around such corner because it will make them easy targets for Snipers. Leading casing enemies into Zepheniah can help you live long enough to escape. | ||
| + | === {{class link|Sniper}} === | ||
| + | The only time you will need to worry about Zepheniah is when picking up ammo. Use your long distance to pick off stunned players | ||
| + | === {{class link|Spy}} === | ||
| + | Make sure you scan the area before going for a target because being stunned can ruin your attempt to backstab your enemy. | ||
{{Map strategy}} | {{Map strategy}} | ||
Latest revision as of 19:45, 20 January 2024
| “Sun Tzu's got nothing on us!” This article is a Community strategy stub. As such, it is not complete. You can help the Team Fortress Wiki Community Strategy Project by expanding it. Notes: Page is almost empty. |
| Harvest Event | |
|---|---|

| |
| Basic Information | |
| Map type: | King of the Hill |
| File name: | koth_harvest_event
|
| Released: | October 29, 2009 Patch (Haunted Hallowe'en Special) |
| Variants: | Harvest |
| Developer(s): | Valve Sean "Heyo" Cutino |
| Map Info | |
| Environment: | Farmland |
| Setting: | Nighttime |
| Hazards: | Pumpkin bombs, Ghost |
| Map Items | |
| Map Photos | |
| Map Overview | |
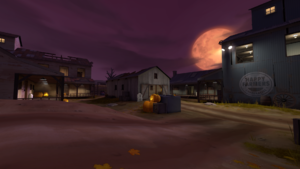
This article is about Community Harvest Event strategy.
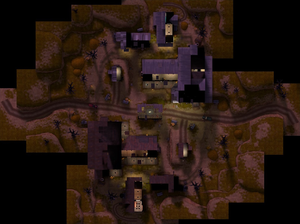
Note: It is recommended to read the main Harvest Event article first to become familiar with the names of key map locations used in this article.
General strategy
This Halloween map features pumpkin bombs, Halloween pumpkins, Zepheniah's Ghost, and the Soul Gargoyle; see Community Halloween maps strategy.
This map is near-identical to Harvest, so you can use any strategies it has. For the Halloween items littered around the map make sure you watch what corners you go into this is because you can run into Zepheniah's Ghost or run in front of a pumpkin bomb which might be harder or easier depending on what class you play. If you don’t watch you can become an easy target for other players.
Class-specific strategy vs. Zepheniah's Ghost
 Scout
Scout
Scout is the most likely to accidentally run into him due to his speed. It might help to strife in entrance of hallways before running in.
 Soldier
Soldier’s long range damage can help with killing any enemies who are stunned by Zepheniah while keeping your distance Zepheniah himself.
 Pyro
Pyro
The Powerjack is helpful for getting you around the map but it might put you in front of Zepheniah. Airblast can be used to push players back into Zepheniah to restart how long they are stunned for.
 Demoman
Be careful what hallways you place in because Zepheniah can make them useless by detouring them away. Pipes can be used to punish stunned players while keeping you distance.
 Heavy
Heavy
While you have a better chance of not running into Zepheniah as heavy, you will have a harder time getting away from Zepheniah. This can be avoided by being careful what corners you jump.
 Engineer
Sentry Guns can be placed in hallway exit to catch stunned players who are running way from Zepheniah or players trying to get ammo or health but it might be more helpful for your team to place the sentry by the control point.
 Medic
Medic
Medics have to be carful around such corner because it will make them easy targets for Snipers. Leading casing enemies into Zepheniah can help you live long enough to escape.
 Sniper
The only time you will need to worry about Zepheniah is when picking up ammo. Use your long distance to pick off stunned players
 Spy
Spy
Make sure you scan the area before going for a target because being stunned can ruin your attempt to backstab your enemy.

