Difference between revisions of "Community Badlands (King of the Hill) strategy"
m |
Marioman2020 (talk | contribs) (Added some strategies) |
||
| Line 17: | Line 17: | ||
== General (All Classes) == | == General (All Classes) == | ||
| + | Starting off in badlands, all player should focus on capturing the Point. Later on in the game when defending, players should focus on destroying Engineer bases that are defending the point. Some of the players should also focus on killing snipers and spies. | ||
| + | |||
== Class-specific strategy == | == Class-specific strategy == | ||
| Line 33: | Line 35: | ||
**Since this map only has two water pits that are usually far away from the fighting, it is very useful to employ a hit-and-run tactic, as you may get overwhelmed by Heavies lurking around with their Medics. | **Since this map only has two water pits that are usually far away from the fighting, it is very useful to employ a hit-and-run tactic, as you may get overwhelmed by Heavies lurking around with their Medics. | ||
| + | |||
| + | *Be sure to spy check around your team's Engineer bases that are defending the point. This will be come useful for better defense of the point. | ||
*Make use of the valley underneath the capture point to ambush unaware players inside the buildings. The [[Backburner]] is a great choice for this type of gameplay style, as you can quickly kill enemies with crits from behind and the +10% damage bonus. | *Make use of the valley underneath the capture point to ambush unaware players inside the buildings. The [[Backburner]] is a great choice for this type of gameplay style, as you can quickly kill enemies with crits from behind and the +10% damage bonus. | ||
Revision as of 20:31, 13 August 2013
| “You are so small! Is funny to me!” This article is a stub. As such, it is not complete. You can help Team Fortress Wiki by expanding it. |
| Community Badlands (King of the Hill) strategy | |
|---|---|

| |
| Basic Information | |
| Developer(s): | Unknown |
| Map Info | |
| Environment: | Desert |
| Setting: | Dusk, cloudy |
| Map Photos | |
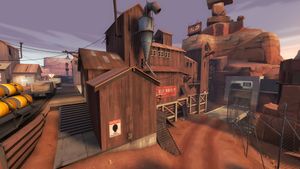
Badlands (KotH) strategy.
Contents
General (All Classes)
Starting off in badlands, all player should focus on capturing the Point. Later on in the game when defending, players should focus on destroying Engineer bases that are defending the point. Some of the players should also focus on killing snipers and spies.
Class-specific strategy
 Scout
Scout
- As a Scout, your strategy should be to hit the enemy hard and fast. Use your speed advantage to flank enemies and try to kill ÜberCharging Medics and Engineers making a nest as soon as possible.
- As this is a King of the Hill mode, it usually starts off like an Arena match before the control point is unlocked. In this time, keep the pressure on the enemy's spawn point to give your team enough time to make a defensive perimeter at the control point.
 Soldier
- The Soldier provides the offensive spearhead for any push. In this map, it's best to hang around other Soldiers or Heavies as it's easy to become outnumbered and overwhelmed.
- As soon as the control point is unlocked, you are one of the most deadly classes due to most enemies usually clustering around the central point to capture it as fast as they can. You can easily clear the whole point by rocket spamming towards it while waiting for the slower moving Heavies to arrive.
 Pyro
Pyro
- You are very good at clearing the control point when it's being captured and also in ambushing enemies around the tight corners of the buildings.
- Since this map only has two water pits that are usually far away from the fighting, it is very useful to employ a hit-and-run tactic, as you may get overwhelmed by Heavies lurking around with their Medics.
- Be sure to spy check around your team's Engineer bases that are defending the point. This will be come useful for better defense of the point.
- Make use of the valley underneath the capture point to ambush unaware players inside the buildings. The Backburner is a great choice for this type of gameplay style, as you can quickly kill enemies with crits from behind and the +10% damage bonus.
 Demoman
- Playing as a "Vanilla Demoman" or a "Expert Ordinance Demoman" will like have you furiously playing defense and trying to keep the enemy back. This is best if you want to hang around teammates and focus on area denial rather than wiping out the enemy team. This is really effective if your enemy is mostly focused on turtling before trying to push when the Capture Point unlocks.
- The "Demoknight" variant is best suited in King of the Hill maps. With its many straight areas and narrow lanes, you will easily catch up with an enemy and take his head. It is best to employ an offensive play style as you will usually have to make split-second decisions.
 Heavy
Heavy
- Considering that there is only one point to capture, the Natascha or the Brass Beast can prove to be a secure choice to use, as you may find yourself not moving around as much as you would on the control point version of Badlands. If your team has not captured the point, however, the Tomislav would prove better, as you will be able to enter combat much faster. If your team captures the point, you should consider switching to either of the aforementioned Miniguns.
- If your team lacks Medics, use a lunch box item that you can continuously use, such as a Dalokohs Bar. If you use a Sandvich, there may be times where it will not be available to use. It's still better than having not having any source of healing with you though. Your Sandvich can also be used to save your Medic if you throw it to him.
 Engineer
- Engineers can place Sentry Guns on the inside of a wall with a Dispenser beside them to defend against the enemy using the map as a shield for Spies.
- When capping a point, use the Gunslinger to quickly aid your teammates and boost your health. After you have capped your point, use a different Wrench to build more permanent Sentry Guns, preferably the Jag, which will construct buildings faster.
- Try not to use the Southern Hospitality because there are many ways a Pyro can easily reach you and take advantage of your extra fire vulnerability. Of course, if there are few Pyros on the other team and they instead have a lot of Spies, this Wrench may be the best choice with its ability to cause enemies to bleed.
 Medic
Medic
- As a Medic, you are a prime target for Spies. Try to steer clear of the area under the bridge, as this is where Spies commonly hide.
- An ideal time to use your ÜberCharge is just as the enemy team makes a push for the bridge. You and your partner should then move onto the point while attacking to halt them from capturing the point.
 Sniper
- Snipers can use the windows of the buildings to have a good place to snipe, only showing the top half of themselves can help from damage taken. However, it's an area where Spies can easily backstab you, so be wary.
 Spy
Spy
- Spies can hide under the bridge outside the respawn of the other team and easily get a backstab. This area is also a good place to hide from Pyros because their flamethrowers won't work under the water.
