Difference between revisions of "Robots"
Dragonrage (talk | contribs) (→Gameplay) |
(→Gameplay: Added MVM class icons) |
||
| Line 35: | Line 35: | ||
|- | |- | ||
| − | | style="border:1px solid #333;" | '''[[Scout Robot#Regular Scout Bot|Scout]]''' | + | | style="border:1px solid #333;" | [[Image:Leaderboard class scout.png|20px]] '''[[Scout Robot#Regular Scout Bot|Scout]]''' |
| style="border:1px solid #333;" | [[Bat]], [[Scattergun]] | | style="border:1px solid #333;" | [[Bat]], [[Scattergun]] | ||
| style="border:1px solid #333;" | | | style="border:1px solid #333;" | | ||
| Line 43: | Line 43: | ||
| style="border:1px solid #333;" | 125 | | style="border:1px solid #333;" | 125 | ||
|- | |- | ||
| − | | style="border:1px solid #333;" | '''[[Soldier Robot|Soldier]]''' | + | | style="border:1px solid #333;" | [[Image:Leaderboard class soldier.png|20px]] '''[[Soldier Robot|Soldier]]''' |
| style="border:1px solid #333;" | [[Rocket Launcher]] | | style="border:1px solid #333;" | [[Rocket Launcher]] | ||
| style="border:1px solid #333;" | | | style="border:1px solid #333;" | | ||
| Line 51: | Line 51: | ||
| style="border:1px solid #333;" | 200 | | style="border:1px solid #333;" | 200 | ||
|- | |- | ||
| − | | style="border:1px solid #333;" | '''[[Pyro Robot|Pyro]]''' | + | | style="border:1px solid #333;" | [[Image:Leaderboard class pyro.png|20px]] '''[[Pyro Robot|Pyro]]''' |
| style="border:1px solid #333;" | [[Flame Thrower]] | | style="border:1px solid #333;" | [[Flame Thrower]] | ||
| style="border:1px solid #333;" | | | style="border:1px solid #333;" | | ||
| Line 59: | Line 59: | ||
| style="border:1px solid #333;" | 175 | | style="border:1px solid #333;" | 175 | ||
|- | |- | ||
| − | | style="border:1px solid #333;" | '''[[Demoman Robot#Regular Demobot|Demoman]]''' | + | | style="border:1px solid #333;" | [[Image:Leaderboard class demoman.png|20px]] '''[[Demoman Robot#Regular Demobot|Demoman]]''' |
| style="border:1px solid #333;" | [[Grenade Launcher]] | | style="border:1px solid #333;" | [[Grenade Launcher]] | ||
| style="border:1px solid #333;" | | | style="border:1px solid #333;" | | ||
| Line 66: | Line 66: | ||
| style="border:1px solid #333;" | 175 | | style="border:1px solid #333;" | 175 | ||
|- | |- | ||
| − | | style="border:1px solid #333;" | '''[[Heavy Robot#HeavyBot|Heavy]]''' | + | | style="border:1px solid #333;" | [[Image:Leaderboard class heavy.png|20px]] '''[[Heavy Robot#HeavyBot|Heavy]]''' |
| style="border:1px solid #333;" | [[Minigun]] | | style="border:1px solid #333;" | [[Minigun]] | ||
| style="border:1px solid #333;" | | | style="border:1px solid #333;" | | ||
| Line 73: | Line 73: | ||
| style="border:1px solid #333;" | 300 | | style="border:1px solid #333;" | 300 | ||
|- | |- | ||
| − | | style="border:1px solid #333;" | '''[[Sniper Robot#Sniper|Sniper]]''' | + | | style="border:1px solid #333;" | [[Image:Leaderboard class sniper.png|20px]] '''[[Sniper Robot#Sniper|Sniper]]''' |
| style="border:1px solid #333;" | [[Sniper Rifle]], [[Kukri]] | | style="border:1px solid #333;" | [[Sniper Rifle]], [[Kukri]] | ||
| style="border:1px solid #333;" | | | style="border:1px solid #333;" | | ||
| Line 82: | Line 82: | ||
| style="border:1px solid #333;" | 125 | | style="border:1px solid #333;" | 125 | ||
|- | |- | ||
| − | | style="border:1px solid #333;" | '''[[Spy Robot|Spy]]''' | + | | style="border:1px solid #333;" | [[Image:Leaderboard class spy.png|20px]] '''[[Spy Robot|Spy]]''' |
| style="border:1px solid #333;" | [[Revolver]], [[Knife]], [[Disguise Kit]], [[Sapper]], [[Invisibility Watch]] | | style="border:1px solid #333;" | [[Revolver]], [[Knife]], [[Disguise Kit]], [[Sapper]], [[Invisibility Watch]] | ||
| style="border:1px solid #333;" | | | style="border:1px solid #333;" | | ||
| Line 103: | Line 103: | ||
! class="header" width="50px" style="background: #333; color: white; border:1px solid #333;" | Health | ! class="header" width="50px" style="background: #333; color: white; border:1px solid #333;" | Health | ||
|- | |- | ||
| − | | style="border:1px solid #333;" | '''[[Scout Robot|Minor League Scout]]''' | + | | style="border:1px solid #333;" | [[Image:Leaderboard class scout stun.png|20px]] '''[[Scout Robot|Minor League Scout]]''' |
| style="border:1px solid #333;" | {{Class link|Scout}} | | style="border:1px solid #333;" | {{Class link|Scout}} | ||
| style="border:1px solid #333;" | [[Sandman]]<br>[[Batter's Helmet]] | | style="border:1px solid #333;" | [[Sandman]]<br>[[Batter's Helmet]] | ||
| Line 110: | Line 110: | ||
| style="border:1px solid #333;" | 125 | | style="border:1px solid #333;" | 125 | ||
|- | |- | ||
| − | | style="border:1px solid #333;" | '''[[Demoman Robot#Demoknight|Demoknight]]''' | + | | style="border:1px solid #333;" | [[Image:Leaderboard class demoknight.png|20px]] '''[[Demoman Robot#Demoknight|Demoknight]]''' |
| style="border:1px solid #333;" | {{Class link|Demoman}} | | style="border:1px solid #333;" | {{Class link|Demoman}} | ||
| style="border:1px solid #333;" | [[Eyelander]]<br>[[Chargin' Targe]] | | style="border:1px solid #333;" | [[Eyelander]]<br>[[Chargin' Targe]] | ||
| Line 119: | Line 119: | ||
| style="border:1px solid #333;" | 175 | | style="border:1px solid #333;" | 175 | ||
|- | |- | ||
| − | | style="border:1px solid #333;" | '''[[Heavy Robot#Steel Gauntlet|Steel Gauntlet]]''' | + | | style="border:1px solid #333;" | [[Image:Leaderboard class heavy steelfist.png|20px]] '''[[Heavy Robot#Steel Gauntlet|Steel Gauntlet]]''' |
| style="border:1px solid #333;" rowspan="3" | {{Class link|Heavy}} | | style="border:1px solid #333;" rowspan="3" | {{Class link|Heavy}} | ||
| style="border:1px solid #333;" | [[Fists of Steel]] | | style="border:1px solid #333;" | [[Fists of Steel]] | ||
| Line 128: | Line 128: | ||
| style="border:1px solid #333;" | 900 | | style="border:1px solid #333;" | 900 | ||
|- | |- | ||
| − | | style="border:1px solid #333;" | '''[[Heavy Robot#Heavyweight Champion|Heavyweight Champ]]''' | + | | style="border:1px solid #333;" | [[Image:Leaderboard class heavy champ.png|20px]] '''[[Heavy Robot#Heavyweight Champion|Heavyweight Champ]]''' |
| style="border:1px solid #333;" | [[Killing Gloves of Boxing]]<br>[[Pugilist's Protector]] | | style="border:1px solid #333;" | [[Killing Gloves of Boxing]]<br>[[Pugilist's Protector]] | ||
| style="border:1px solid #333;" | | | style="border:1px solid #333;" | | ||
| Line 136: | Line 136: | ||
| style="border:1px solid #333;" | 300 | | style="border:1px solid #333;" | 300 | ||
|- | |- | ||
| − | | style="border:1px solid #333;" | '''[[Heavy Robot|Fast Heavy]]''' | + | | style="border:1px solid #333;" | [[Image:Leaderboard class heavy urgent.png|20px]] '''[[Heavy Robot|Fast Heavy]]''' |
| style="border:1px solid #333;" | [[Gloves of Running Urgently]] | | style="border:1px solid #333;" | [[Gloves of Running Urgently]] | ||
| style="border:1px solid #333;" | | | style="border:1px solid #333;" | | ||
| Line 145: | Line 145: | ||
| style="border:1px solid #333;" | 300 | | style="border:1px solid #333;" | 300 | ||
|- | |- | ||
| − | | style="border:1px solid #333;" | '''[[Medic Robot#Quick-Fix Medic|Quick-Fix Medic]]''' | + | | style="border:1px solid #333;" | [[Image:Leaderboard class medic.png|20px]] '''[[Medic Robot#Quick-Fix Medic|Quick-Fix Medic]]''' |
| style="border:1px solid #333;" rowspan="2" | {{Class link|Medic}} | | style="border:1px solid #333;" rowspan="2" | {{Class link|Medic}} | ||
| style="border:1px solid #333;" | [[Quick-Fix]] | | style="border:1px solid #333;" | [[Quick-Fix]] | ||
| Line 155: | Line 155: | ||
| style="border:1px solid #333;" | 150 | | style="border:1px solid #333;" | 150 | ||
|- | |- | ||
| − | | style="border:1px solid #333;" | '''[[Medic Robot#Über Medic|Über Medic]]''' | + | | style="border:1px solid #333;" | [[Image:Leaderboard class medic uber.png|20px]] '''[[Medic Robot#Über Medic|Über Medic]]''' |
| style="border:1px solid #333;" | [[Medi Gun]] | | style="border:1px solid #333;" | [[Medi Gun]] | ||
| style="border:1px solid #333;" | | | style="border:1px solid #333;" | | ||
| Line 163: | Line 163: | ||
| style="border:1px solid #333;" | 150 | | style="border:1px solid #333;" | 150 | ||
|- | |- | ||
| − | | style="border:1px solid #333;" | '''[[Sniper Robot#Bowman|Bowman]]''' | + | | style="border:1px solid #333;" | [[Image:Leaderboard class sniper bow.png|20px]] '''[[Sniper Robot#Bowman|Bowman]]''' |
| style="border:1px solid #333;" rowspan="2" | {{Class link|Sniper}} | | style="border:1px solid #333;" rowspan="2" | {{Class link|Sniper}} | ||
| style="border:1px solid #333;" | [[Huntsman]] | | style="border:1px solid #333;" | [[Huntsman]] | ||
| Line 171: | Line 171: | ||
| style="border:1px solid #333;" | 125 | | style="border:1px solid #333;" | 125 | ||
|- | |- | ||
| − | | style="border:1px solid #333;" | '''[[Sniper Robot#Sydney Sniper|Sydney Sniper]]''' | + | | style="border:1px solid #333;" | [[Image:Leaderboard class sniper sydneysleeper.png|20px]] '''[[Sniper Robot#Sydney Sniper|Sydney Sniper]]''' |
| style="border:1px solid #333;" | [[Sydney Sleeper]] | | style="border:1px solid #333;" | [[Sydney Sleeper]] | ||
| style="border:1px solid #333;" | | | style="border:1px solid #333;" | | ||
| Line 188: | Line 188: | ||
! class="header" width="40px" style="background: #333; color: white; border:1px solid #333;" | Health | ! class="header" width="40px" style="background: #333; color: white; border:1px solid #333;" | Health | ||
|- | |- | ||
| − | | style="border:1px solid #333;" | '''[[Sentry Buster]]''' | + | | style="border:1px solid #333;" | [[Image:Leaderboard class sentry buster.png|20px]] '''[[Sentry Buster]]''' |
| style="border:1px solid #333;" | {{Class link|Demoman}} | | style="border:1px solid #333;" | {{Class link|Demoman}} | ||
| style="border:1px solid #333;" | | | style="border:1px solid #333;" | | ||
| Line 210: | Line 210: | ||
! class="header" width="50px" style="background: #333; color: white; border:1px solid #333;" | Health | ! class="header" width="50px" style="background: #333; color: white; border:1px solid #333;" | Health | ||
|- | |- | ||
| − | | style="border:1px solid #333;" | '''[[Scout Robot#Major League Scout|Major League Scout]]''' | + | | style="border:1px solid #333;" | [[Image:Leaderboard class scout stun.png|20px]] '''[[Scout Robot#Major League Scout|Major League Scout]]''' |
| style="border:1px solid #333;" rowspan="2"| {{Class link|Scout}} | | style="border:1px solid #333;" rowspan="2"| {{Class link|Scout}} | ||
| style="border:1px solid #333;" | [[Sandman]]<br>[[Batter's Helmet]] | | style="border:1px solid #333;" | [[Sandman]]<br>[[Batter's Helmet]] | ||
| Line 218: | Line 218: | ||
| style="border:1px solid #333;" | 1600 | | style="border:1px solid #333;" | 1600 | ||
|- | |- | ||
| − | | style="border:1px solid #333;" | '''[[Scout Robot#Super Scout|Super Scout]]''' | + | | style="border:1px solid #333;" | [[Image:Leaderboard class scout giant fast.png|20px]] '''[[Scout Robot#Super Scout|Super Scout]]''' |
| style="border:1px solid #333;" | [[Bat]] | | style="border:1px solid #333;" | [[Bat]] | ||
| style="border:1px solid #333;" | | | style="border:1px solid #333;" | | ||
| Line 224: | Line 224: | ||
| style="border:1px solid #333;" | 1600 | | style="border:1px solid #333;" | 1600 | ||
|- | |- | ||
| − | | style="border:1px solid #333;" | '''[[Soldier Robot|Rapid-Fire Soldier]]''' | + | | style="border:1px solid #333;" | [[Image:Leaderboard class soldier spammer.png|20px]] '''[[Soldier Robot|Rapid-Fire Soldier]]''' |
| style="border:1px solid #333;" rowspan="2"| {{Class link|Soldier}} | | style="border:1px solid #333;" rowspan="2"| {{Class link|Soldier}} | ||
| style="border:1px solid #333;" | [[Rocket Launcher]] | | style="border:1px solid #333;" | [[Rocket Launcher]] | ||
| Line 231: | Line 231: | ||
| style="border:1px solid #333;" | 3300 | | style="border:1px solid #333;" | 3300 | ||
|- | |- | ||
| − | | style="border:1px solid #333;" | '''[[Soldier Robot|Giant Charged Soldier]]''' | + | | style="border:1px solid #333;" | [[Image:Leaderboard class soldier crit.png|20px]] '''[[Soldier Robot|Giant Charged Soldier]]''' |
| style="border:1px solid #333;" | [[Original]] | | style="border:1px solid #333;" | [[Original]] | ||
| style="border:1px solid #333;" | | | style="border:1px solid #333;" | | ||
| Line 238: | Line 238: | ||
| style="border:1px solid #333;" | 3800 | | style="border:1px solid #333;" | 3800 | ||
|- | |- | ||
| − | | style="border:1px solid #333;" rowspan="2"| '''[[Pyro Robot|Giant Pyro]]''' | + | | style="border:1px solid #333;" rowspan="2"| [[Image:Leaderboard class pyro.png|20px]] '''[[Pyro Robot|Giant Pyro]]''' |
| style="border:1px solid #333;" rowspan="2"| {{Class link|Pyro}} | | style="border:1px solid #333;" rowspan="2"| {{Class link|Pyro}} | ||
| style="border:1px solid #333;" | [[Flamethrower]] | | style="border:1px solid #333;" | [[Flamethrower]] | ||
| Line 250: | Line 250: | ||
| style="border:1px solid #333;" | 3000 | | style="border:1px solid #333;" | 3000 | ||
|- | |- | ||
| − | | style="border:1px solid #333;" | '''[[Demoman Robot#Rapid-Fire Demobot|Rapid Fire Demoman]]''' | + | | style="border:1px solid #333;" | [[Image:Leaderboard class demoman.png|20px]] '''[[Demoman Robot#Rapid-Fire Demobot|Rapid Fire Demoman]]''' |
| style="border:1px solid #333;" | {{Class link|Demoman}} | | style="border:1px solid #333;" | {{Class link|Demoman}} | ||
| style="border:1px solid #333;" | [[Grenade Launcher]] | | style="border:1px solid #333;" | [[Grenade Launcher]] | ||
| Line 257: | Line 257: | ||
| style="border:1px solid #333;" | 3300 | | style="border:1px solid #333;" | 3300 | ||
|- | |- | ||
| − | | style="border:1px solid #333;" | '''[[Heavy Robot#Deflector Heavy|Deflector Heavy]]''' | + | | style="border:1px solid #333;" | [[Image:Leaderboard class heavy deflector.png|20px]] '''[[Heavy Robot#Deflector Heavy|Deflector Heavy]]''' |
| style="border:1px solid #333;" | {{Class link|Heavy}} | | style="border:1px solid #333;" | {{Class link|Heavy}} | ||
| style="border:1px solid #333;" | [[Deflector]] | | style="border:1px solid #333;" | [[Deflector]] | ||
| Line 273: | Line 273: | ||
! class="header" width="100px" style="background: #333; color: white; border:1px solid #333;" | Health | ! class="header" width="100px" style="background: #333; color: white; border:1px solid #333;" | Health | ||
|- | |- | ||
| − | | style="border:1px solid #333;" | '''[[Tank Robot|Tank]]''' | + | | style="border:1px solid #333;" | [[Image:Leaderboard class tank.png|20px]] '''[[Tank Robot|Tank]]''' |
| style="border:1px solid #333;" | | | style="border:1px solid #333;" | | ||
* Has an extremely large amount of health, more than any other robot. | * Has an extremely large amount of health, more than any other robot. | ||
Revision as of 02:57, 19 August 2012
| “ | I am ready to fight robots.
Click to listen
— The Heavy
|
” |

Robots are the enemies fought in Mann vs. Machine. They were created by Gray Mann in order to destroy all things Mann Co..
Gameplay
Regular robots function nearly identically to the players, being operated by bots, whilst special robots exist that use non-Stock weapons, and other forms of robots exist with abilities and directives that no class normally possesses. Unlike players, robots can notably be sapped, temporarily disabling them often in groups, or in the case of giant robots, slowing them. As noted by Miss Pauling, they run on money, and they drop it when destroyed, allowing players to use that money to upgrade their weapons.
One robot per wave will enter the field armed with a bomb. The primary directive of the robots is to transport this bomb to the hatch at the end of the map, and the Defenders must stop them. After the bomb is dropped, another robot can pick it up. Any robot can carry the bomb, excluding the Sentry Buster and the Tank. Carrying a bomb will slow a robot to about half speed. After all robots in a wave are killed, the wave is completed, while if the bomb is transported to the hatch, the wave is lost.
Robots receive certain buffs after a period of time carrying the bomb, and the buffs stack.
| Stages | Upgrades |
|---|---|
| First stage | Defensive buff, shared with all nearby robots |
| Second stage | Health regeneration |
| Final stage | Full crits all the time |
Robots are all designed off of each of the mercenaries employed under Blutarch and Redmond Mann, excluding the Engineer, and share their basic abilities. Regular robots are equipped with the stock loadout of the classes. Über Medics are not noted as regular robots, despite the fact that they use their Stock weapons.
| Machine | Equipped with | Abilities/Notes | Health
|
|---|---|---|---|
| Bat, Scattergun |
|
125 | |
| Rocket Launcher |
|
200 | |
| Flame Thrower |
|
175 | |
| Grenade Launcher |
|
175 | |
| Minigun |
|
300 | |
| Sniper Rifle, Kukri |
|
125 | |
| Revolver, Knife, Disguise Kit, Sapper, Invisibility Watch |
|
125 |
Special Robots
A number of Special Robots also exist, which each possess unique abilities belonging to unlockable weapons rather than the Stock weapons that most robots use. Each special robot also has the advantages and disadvantages of the original classes it is based off of, unless noted.
| Machine | Based on | Equipped with | Abilities/Notes | Health |
|---|---|---|---|---|
| Sandman Batter's Helmet |
|
125 | ||
| Eyelander Chargin' Targe |
|
175 | ||
| Fists of Steel |
|
900 | ||
| Killing Gloves of Boxing Pugilist's Protector |
|
300 | ||
| Gloves of Running Urgently |
|
300 | ||
| Quick-Fix |
|
150 | ||
| Medi Gun |
|
150 | ||
| Huntsman |
|
125 | ||
| Sydney Sleeper |
|
125 |
Sentry Buster
The Sentry Buster is the only robot not to resemble a class, as it is literally a bomb on legs. It is never predetermined to spawn during a wave, and only spawns if Engineer is doing significant damage with his Sentry Gun to the robot horde. Its arrival is announced by a theme, a HUD notification, and by the Administrator. If the team has multiple Engineers with Sentry Guns, a Sentry Buster can spawn for each problematic Sentry Gun.
| Machine | Based on | Notes | Health |
|---|---|---|---|
|
2500 |
Giant Robots
Giant Robots are notably larger than other robots. They can only be slowed by a Sapper rather than destroyed by it, and they cannot be killed at full health by a backstab unless the knife is fully upgraded. They sport significantly more health than other robots, but move at half-speed. Their presence in a wave is noted by a red background behind their class symbol in the pre-wave overhead. Giant Robots that carry the bomb do not receive buffs for it.
Giant Robot versions exist of the Scout, Soldier, Pyro, Demoman, and Heavy. Multiple Giant Robots can occur in a single wave, either of the same class or not.
| Machine | Based on | Equipped with | Abilities | Health |
|---|---|---|---|---|
| Sandman Batter's Helmet |
|
1600 | ||
| Bat |
|
1600 | ||
| Rocket Launcher |
|
3300 | ||
| Original |
|
3800 | ||
| Flamethrower |
|
3000 | ||
| Flare Gun Old Guadalajara |
|
3000 | ||
| Grenade Launcher |
|
3300 | ||
| Deflector |
|
5000 |
Tank
Noted as "???" in the official Mann vs. Machine update page, the tank is a rare enemy that usually appears for one or two waves per mission, rarely more than once in one wave. It has a large amount of health, but no attack method, and cannot harm players. It does, however, carry a bomb.
| Machine | Notes | Health |
|---|---|---|
|
28000 Coal Town: Wave 3 30000 Coal Town: Wave 5 20000 Decoy: Wave 3 20000 Decoy: Wave 8 20000 Mannworks: Wave 2 22500 Mannworks: Wave 7 |
Gallery
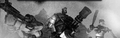
Giant Robots.
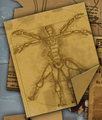
A diagram of a robotic Scout, seen in the Engineer Update.

| ||||||||||||||||||||||||||||||||||||||
| ||||||||||||||||||||||||||||||||||||||||||||||||||||||||||||||||||||||||||||||||||||||||||||||||||